 OpenMediaVault is a popular NAS software solution. It has an easy-to-use graphical web interface for simple management of settings, plugins, etc. OpenMediaVault allows the user to create shared folders and manage access to these shares within the web interface. This guide has been tested on the Raspberry Pi 2 with Minibian but should also work on other Pi models and non-ARM architectures. If you have not installed OpenMediaVault yet and want to on your Pi device, follow the installation guide found here before proceeding.
At A Glance: Our Top 5 Picks For PI Units
- Our Top Pick: Raspberry Pi 3
- Raspberry Pi 2
- Raspberry Pi
- Banana Pi
- Banana Pi Pro
I want to see the top picks for PI Units
Create Shared Folders OpenMediaVault for USB Hard Drives
The first step is to make sure the USB drive has a file system and is mounted. If your USB hard drive was automatically recognized you can skip these steps about creating the file system and jump down to Create Shared Folder.
Quick Summary: Our Top Picks for PI Units
Our Top Pick
|
Raspberry Pi 3 |
|
VIEW LATEST PRICE → |

|
Raspberry Pi 2 |
|
VIEW LATEST PRICE → |
|
Raspberry Pi |
|
VIEW LATEST PRICE → |

|
Banana Pi |
|
VIEW LATEST PRICE → |

|
Banana Pi Pro |
|
VIEW LATEST PRICE → |
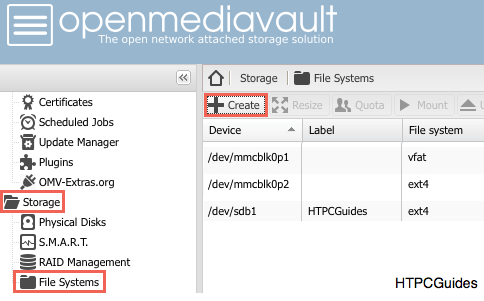
Create the File System
Connect your USB drive to your device and open the OpenMediaVault web interface.
Navigate to Storage then File Systems and click Create
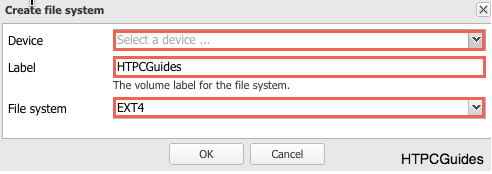
Select the USB drive, enter a label for the drive and confirm the file system of the USB drive.
ext4 is recommended as the file system since it is native to Linux. If you want to be able to plug this hard drive into a Windows machine in the future then it is best to use NTFS.
Select the drive you have attached and click Mount
Note: the image is taken after selecting Mount. Remember to apply the changes when prompted.

Create a Shared Folder on OpenMediaVault
As the drive is now recognized and mounted, it is time to create shared folders with OpenMediaVault from a USB hard drive.
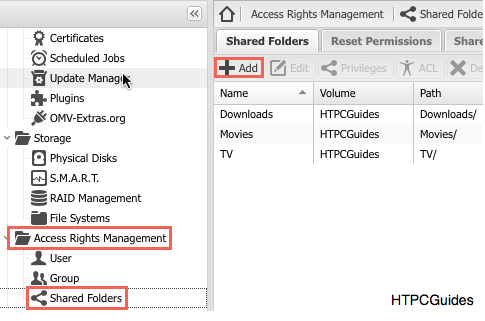
While in the OpenMediaVault web interface, navigate to Access Rights Management > Shared Folders and click Add
Fill in the requested information, name the folder, select a volume and a path. The path refers to the path of the folder to share and will be auto-generated, it is ok to use the default.
You can leave the permissions on the default setting, these will be altered later.
Click Save and the specified folder will be created, if it does not already exist.
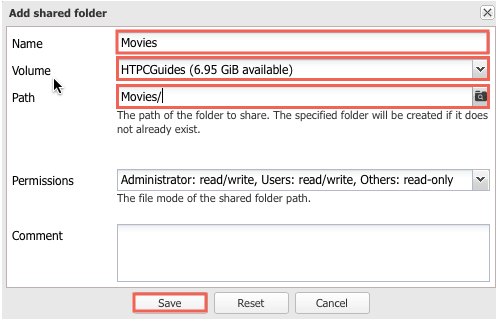
Repeat this step if you want to create more shared folders.
Note: if you get a permissions error, check to see how the hard drive is formatted. If you don’t mind losing what is on the drive, reformat the drive to ext4. The ext4 format was the only format found to be compatible with OMV which also allowed ACL to be set properly.
We will also need to tell the system who has what access to these folders. Select a folder and press the ACL button. Check the appropriate rights for your users and/or groups for each folder. If you’ll be using nzbget, transmission, DLNA or any other services/plugins, you’ll also need to give access rights to these system users, for example nzbget, debian-transmission and minidlna. (Don’t forget this part when you install new services.)
Now that you have created some shared folders on OpenMediaVault, it is time to put something in them. There are guides for installing the following plug-ins, MiniDLNA, NZBGet, CouchPotato and Transmission. The individual guides show how shared folder access rights are given for each plug-in.