![]() Do you listen to lot of music using a good old amplifier and a great set of stereo speakers? The HiFiBerry DAC+ or DIGI+ might be right up your alley. Maybe you are a lucky owner of a NAD 3020 amp and you have a priceless collection of vinyls, that you, like me, believe still sounds best on apms from 70s – 80s, and the source must be a vinyl? I know the feeling, trust me. Don't get me wrong, I'm addicted to gadgets and can't really imagine my everyday without them, but not when it comes to music. I never appreciated CDs, even if I somewhat accept the superior sound quality that (most of the time) they deliver, but still, no CD ever sounds so good as my Led Zeppelin vinyl.
Do you listen to lot of music using a good old amplifier and a great set of stereo speakers? The HiFiBerry DAC+ or DIGI+ might be right up your alley. Maybe you are a lucky owner of a NAD 3020 amp and you have a priceless collection of vinyls, that you, like me, believe still sounds best on apms from 70s – 80s, and the source must be a vinyl? I know the feeling, trust me. Don't get me wrong, I'm addicted to gadgets and can't really imagine my everyday without them, but not when it comes to music. I never appreciated CDs, even if I somewhat accept the superior sound quality that (most of the time) they deliver, but still, no CD ever sounds so good as my Led Zeppelin vinyl.
But as Bob Dylan said back in the 60s: “The Times They Are a-Changin”, and recently I decided I will need to try something that might be quite as good as my vinyls, but with all the advantages that the digital age offers. I never wanted to switch to CDs, although I do have a lot of them. I kept my stereo amp for music, and I have a surround AVR as well for HTPC use. Finally I found the solution that I fell in love since the first day I started to use HiFiBerry. I still keep returning to my vinyls, and nobody will convince me that anything can sound better, but I found myself enjoying the new way of listening to music equally exciting.
Who Is HiFiBerry For?
- The DAC+ is for those who are looking for an excellent quality dedicated audio player Raspberry Pi device for stereo music (RCA) at a very reasonable price
- DIGI+ for those who are using Kodi (LibreElec, OpenElec) on a Raspberry Pi who need digital audio output (S/PDIF) for music or surround cinema
- For those who would like to use their premium Spotify account with a dedicated music player (with RuneAudio, still in beta)
What I wanted is a way to have my music played from my home server or some similar solution, but still to keep the analog output, to keep all my music in digital format (preferably a lossless format like FLAC, but I still have a plenty of good quality mp3 files around, even if mp3 is not to be associated with quality), and to control my music playback from my smartphone or notebook. I also wanted to make use of Spotify, and all this in a single simple setup. I searched a lot on audiophile forums for different solutions, and many people started to recommend a Raspberry Pi with a HiFiBerry add on board, a high-resolution digital-to-analog converter for the Raspberry Pi.
Great hardware requires proper software. Luckily there are some projects created and developed by real audiophile experts with full Raspberry Pi and HiFiBerry support, tweaked to near perfection to squeeze out the last perfect bit and byte of quality from these great pieces of hardware. What follows is a review of the HiFiBerry products that turn your Raspberry Pi into an (more then entry level) audiophile player, without emptying your bank account.
An important aspect for me was that everything should be “ready to use”. I wanted to buy the required components and just put them together. I get the Raspberry Pi device, install the HiFiBerry DAC+ module, put everything into a compatible case, and that's it, ready for use.
There will be a follow-up guide for installing and configuring your Raspberry Pi & HiFiBerry add-on module with RuneAudio to start enjoying your music.
If you want to put together a dedicated audio player of excellent quality to playback your music collection the Raspberry Pi + HiFiBerry DAC+ or DIGI+ will be your best friend. If you have a premium Spotify account you will be able to use it with your new setup (still in beta, there are some limitations).
Pros
- Excellent sound quality for price
- Very easy to assemble
- Excellent software support from audiophile developers
- HiFiBerry boards are fully supported by RuneAudio, Volumio, Kodi, LibreELEC, OpenELEC, etc
Cons
- The best sound quality can be achieved with filtered power supply, which requires modifications to the module
HiFiBerry DAC+ or DIGI+ Getting Started
HiFiBerry products are made by the Modul 9 company in Switzerland. They are specialized in high-quality audio playback on embedded devices and deliver excellent products. This time we are focusing on their HiFiBerry DAC+ and DIGI+ add on boards made for Raspberry Pi A+/B+/2/3/Zero. They even have the HiFiBerry AMP+, which is a Class-D power amplifier for the Raspberry Pi, a perfect solution for multi-room audio installations and a very interesting product with many possibilities. I plan to return to a more in-depth review of the Amp+ in the near future.
What Are These Add On Boards?
You simply attach them to the GPIO of your Raspberry Pi, no additional soldering is required. Get a compatible case made for the HiFiBerry DAC+ or DIGI+ (or you can build the case from Lego if you want), and you are good to go. As it is with Raspberry Pi devices, I strongly recommend to use a decent power supply of at least 2.5A. The HiFiBerry DAC+ and DIGI+ doesn't require additional power supply, it is powered by the power supply of the Pi.
Of course, if you are a hardcore audiophile, you can modify the board to use a separate filtered power supply instead of the switching power supply for the Raspberry Pi to achieve even better sound quality. However, this requires some soldering and modification of the HiFiBerry board. You should know what you are doing and have the necessary skills. First try out and listen to the sound you get without any modifications. If you like what you hear, then enjoy the music. Remember, there is always a next level of quality, especially when it comes to audio equipment.
HiFiBerry DAC+
You need the HiFiBerry DAC+ version if you need a DAC (Digital to Analog Converter), that is, you want to connect your Raspberry Pi to a stereo amp with RCA cable. Older amplifiers don't have digital inputs (coaxial or S/PDIF inputs). It is really not just a myth, if you want excellent sound quality, you should definitely use a stereo amplifier and not a new(er) surround AVR. There are some very good surround AVR units that deliver the sound quality of stereo amps, but they cost a fortune. Of course, you can use the DAC+ with any new AVR unit that has RCA inputs, which all of them do.
The DAC+ comes in four different versions: Light, Standard, Pro, Zero. I recommend the Pro version as the price difference compared to Standard is around $10. The Pro version comes with gold plated RCA, and the clock generator is a dual ultra-low jitter Xpresso oscillators included on the board. You are also fine with the Standard version. Get the DAC+ if you want to use it with a stereo amplifier and get the best stereo quality, and you don't need digital audio (you can still use the HDMI port on your Pi for multi channel audio with a HDMI compatible AVR).
The HiFiBerry DAC+ Standard and Pro versions have a dedicated 192kHz/24bit high-quality Burr-Brown DAC for best sound quality, and hardware volume control. You can control the output volume using alsamixer or any application that supports ALSA mixer controls.
The HiFiBerry DAC+ is an excellent choice if you want to put together a dedicated stereo audio player for around $100 (price inclusive of Raspberry Pi 2 or 3), and you want to enjoy excellent sound quality on your good old stereo amplifier or AVR. In my opinion the audio quality is excellent, especially considering the value you get for your money. You will find some audiophiles complaining about the quality (especially because of the Pi's power supply), but as always, we consider here the value you get for your money. I really recommend to try it out and judge on the quality you hear and experience.
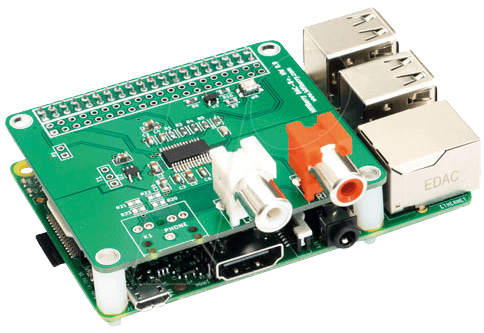
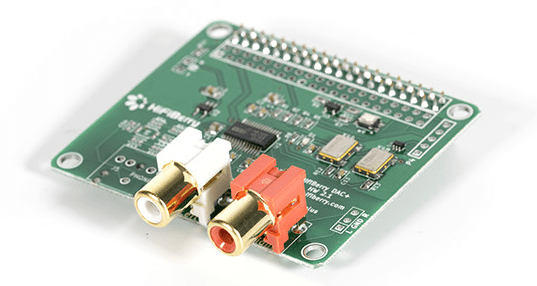
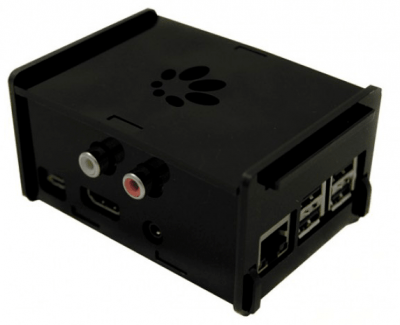
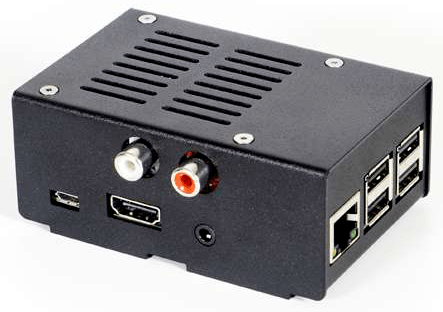
On the above image you can see a HiFiBerry DAC+ Standard installed on a Raspberry Pi 2.
HiFiBerry DIGI+
You need the HiFiBerry DIGI+ version if you want to use S/PDIF output instead of stereo analog RCA. Of course, you will need an AVR with S/PDIF input available to use the DIGI+, and use either a coaxial RCA cable or a fibre optic cable with TOSLINK connector.
The dedicated S/PDIF interface chip supports up to 192kHz/24bit resolution, and you can use it for surround sound too, not just for stereo (for example, in Kodi). There are three versions available, Standard, Transformer, and Pro. Without going into too much technical details about the differences here, I would say that most likely you are fine with the Standard version, unless you need the version with galvanic isolation (useful if you prefer the coaxial RCA cable) and dual low-jitter Xpresso oscillators. If you know what is this and you need galvanic isolation, then you should select the Transformer or Pro version. The DIGI+ is also great for music, but older stereo amps usually don't have digital inputs, make sure to check this on your amp before buying!
My AVR is an older one, without any HDMI inputs. I do have however S/PDIF input on the AVR (both coaxial and TOSLINK), and I am very satisfied with the HiFiBerry DIGI+ Standard version. I use it also to listen to music, but it works great with Kodi as a surround sound output for Dolby Digital and DTS tracks for movies. I didn't want to replace my AVR just because of the lack of HDMI inputs, therefore the HiFiBerry DIGI+ was an excellent solution for me.
Note: due to copy protection reasons it is not possible to output HD definition audio over S/PDIF, therefore if you want DTS-HD or Dolby TrueHD audio you will need to use HDMI.
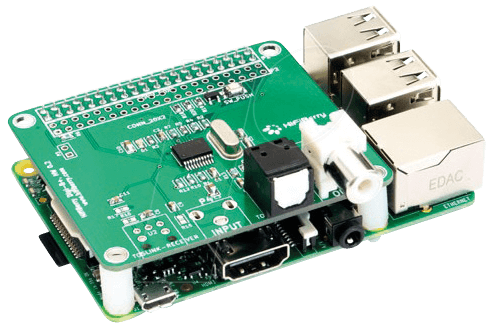
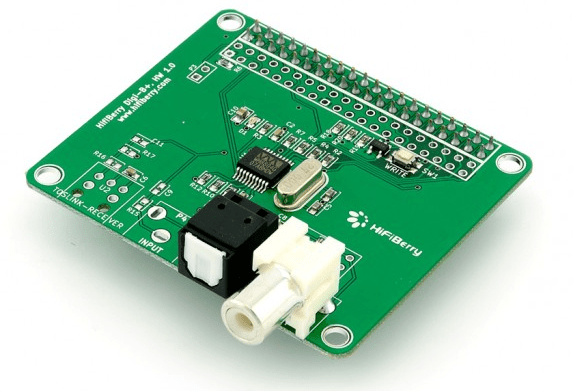
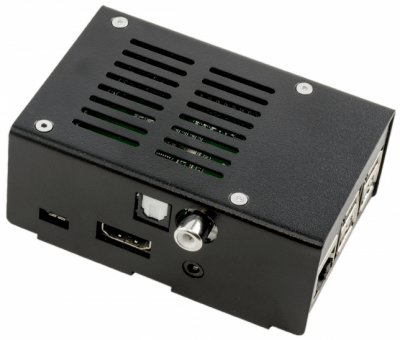
On the above image you can see a HiFiBerry DIGI+ Standard installed on a Raspberry Pi 2.
What Will You Need for HiFiBerry?
A list of hardware and accessories what you will need to put together your audiophile audio player. Obviously, if you have some Raspberry Pi's lying around, or SD Card, audio cables, etc, then you need only to buy the components you are missing.
- Raspberry Pi A+/B+, 2 or 3
- HiFiBerry DAC+ or HiFiBerry DIGI+ board
- HiFiBerry DAC+ or DIGI+ compatible case
- Power Supply for RPi (2.5A recommended)
- MicroSD card (8-16GB)
- Stereo RCA audio cable for DAC+ or Toslink/Coaxial cable for DIGI+
Raspberry Pi
If you plan to use the HiFiBerry DAC+ or DIGI+ as a dedicated audio player, then you should use a Raspberry Pi 3 (or a Raspberry Pi 2). You can also use A+/B+ version, but if you don't have some A+/B+ versions lying around and you need to buy a Pi, I would recommend the RPi 3, as the price difference is really small. If you need DAC+ then you can even use a RPi Zero, but in that case you will need the HiFiBerry DAC+ Zero version (DIGI+ doesn't have a ZERO version) and you need to solder a 40-pin male header to the board. Choose Zero if you are prepared to do the additional work.
HiFiBerry DAC+ or DIGI+ Board
You should now know if you want to go with a DAC+ or a DIGI+ version. To clarify, if you don't need surround sound and you want to use the player with a good old stereo amp as a dedicated audio player, then go with the DAC+ Pro version. The only reason I see to go with DIGI+ board is if you don't want to use the Pi as a dedicated audio player but also as a multimedia player, and you will use Kodi (LibreELEC) to listen to your music and watch your movies. Then the DIGI+ Standard version should be fine for you.
Power Supply
Get a decent at least 2.5A power supply for your RPi (make sure you get at least a 2.5A if you are suing a Raspberry Pi 3 board). A quality power supply can save you lot of headaches. Watch out for the cheap power supplies that comes in certain kits, they can cause you a lot of frustration.
The NorthPada UL Listed 2.5A is decent quality power supply that I can recommend. (Make sure you get the plug version you need!)
HiFiBerry Compatible Cases
There are some great cases available, make sure you get the version you need, as a different version of case is required for the HiFiBerry DAC+ and DIGI+. I saw some really great DIY cases around, it is really up to you and your imagination. HiFiBerry offers some excellent cases, you can't go wrong with these, and they are made to fit perfectly with their DAC+ and DIGI+ boards.
The HiFiBerry Case for DAC+ and DIGI+ is a simple and functional case. It is practical, as you get two versions of the audio output side, therefore you can use it for both DAC+ and DIGI+. The cut outs for the ports are quite precise.
If you want something of much better quality and outlook, then you can go with the HiFiBerry steel case for HiFiBerry DAC+ or HiFiBerry steel case for HiFiBerry DIGI+, available with black or brushed covers. I really like these cases, and they really look professional.
SD Card
Depending on the audio software you choose, you should be fine with an 8GB SD card. I assume that you want to use the RPi + HiFiBerry kit as a dedicated audio player AND you don't want to store your music on the SD Card, but on a NAS, external Hard Drive, etc.
Get a 8GB Class 10 micro SD card, or since the prices for a 16GB SD Card are basically the same, you can go with the 16GB version.
Audio Cable
Get a good quality cable to connect your HiFiBerry DAC+ or DIGI+ to your stereo amp or AVR. I'm really not a fan of cables that cost a fortune, but make sure you don't get a budget cable either. A mid range quality is usually a good compromise. For DAC+ you will need a stereo RCA cable, while for the DIGI+ you can choose to use optical (TOSLINK) or coaxial cable (check the input on your AVR, but most likely you have both). Many argue that the coaxial RCA cable is better then the optical, I leave this up to you (I personally consider both equally good).
If you are new to the audiophile “universe”, you will be probably stunned when you first look at the price of the high end quality cables. They cost a fortune (hey, they cost more than the Pi3 or the HiFiBerry module), and while I'm sure these high end cables are flawless, I just feel that a decent mid-range cable is more than sufficient for most of us.
For DAC+ you will need a stereo RCA-RCA cable. I can recommend the following cable RCA Audio Cable 2 RCA to 2 RCA 24K Gold Plated Oxygen Free Shielded by KabelDirekt, priced between $10 – 15.
If you want an audiophile classified cable (still from the lower end, but reasonably priced), then you can select the Oyaide Neo d+ Series Class B RCA Cable, which are a little more expensive at $35, but you get real quality for the price.
For DIGI+ you will need an optical TOSLINK digital audio cable or a coaxial cable. I can recommend the Optical TOSLINK Digital Audio Cable PRO Series by KabelDirekt, priced $7 – 12.
For coaxial the FosPower RCA Male to RCA Male Premium S/PDIF Digital Audio Coax Cable.
If you are a lucky individual who can hear the difference between two decent quality set of cables, then choose the one you think sounds better for you.
Storage
You will need to store your music somewhere. You have many options: a NAS, a home server (chances are great you already have a small home server configured using a Raspberry Pi), or an external hard drive. You can connect an external 2.5″ hard drive to your Pi, but it is not guaranteed to work without an additional power supply (like an active powered USB HUB).
Using a decent power supply with the Pi and a recently new low power USB 2.5 HDD you will probably be able to connect it directly to your Pi, and do the Max USB Current hack to give some more power to the USB ports (important: if you will run RuneAudio, don't do the rpi-update). I run several of these and all work nice, but I already had some 2.5″ drives that won't work without an active USB HUB.
Connectivity
You will need to connect your Pi to the home network and probably Internet. As always, I recommend to do this with a LAN cable, but you can try to experiment with WiFi too. With RPi 3 you already have a built in WiFi. Chances are great that for music, even lossless format, you will be good with a decent WiFi connection. Note: some reports claim that the HiFiBerry boards will lower a bit the range of the built in WiFi adapter of the RPi3, take this possibility into consideration.
Remote Control
If you plan to use the player as a headless unit (which is most likely the case), then you will use your smartphone or tablet as the remote. Both RuneAudio and Volumio are controlled from the UI accessible from any browser.
You also have apps to control both RuneAudio and Volumio. There is the official RuneAudio app for Android, for iPhone you can use MPDluxe, for Windows (including Phone) Chimney. Of course, you can use any device that has a browser to control the player: notebook, tablet or desktop. So chances are great that you already have a remote, you just need to get the app, or launch your favorite browser.
Your Music Collection
Even the best set of audiophile equipment doesn't sound good if the source you play on it is of low quality. In our case you will need to have your music collection in digital format. Obviously, the best is to store your music in a lossless format like FLAC, you can rip your CDs to FLAC without any quality loss (if you use the proper way to do this, like Exact Audio Copy, aka EAC). I did this with my music collection that I have on CDs, and the CDs are just sitting on the shelf. I can't remember when was the last time I used my CD player.
My favorite is still Spotify, and their premium streaming service is already supported by RuneAudio (still experimental, but it works great, do remember that you need a premium Spotify account to make this work!). Spotify offers Ogg Vorbis format at 320Kbps, and while it is not lossless, it is very good quality. Not to mention the excellent plans Spotify offers and the vast number of music you have access to by becoming a subscriber. They offer a 30 day trial, make sure you check them out if you didn't yet.
I personally prefer to avoid mp3s. They can still sound actually quite good, but I don't really see a reason why would anybody use them today and speak about excellent quality at the same time. As always, it depends on your equipment, your ear for the music, and the quality of the mp3 file itself.
How you store your music collection and the format you choose depends on your personal preferences. When you are satisfied with what you year then you can start enjoying your music. Make sure you check out other options to hear what is possible, and settle for the one you find the best (and still can afford). A very important thing about your whole music setup: make sure that your equipment is more or less on the same level in terms of quality. There is no real point of using a high end amplifier if you don't have speakers of the same quality, you won't hear the difference in sound in a way it was meant to be.
Conclusion
I must emphasize, the things I wrote here are based on my personal experience when it comes to music listening. You can find a lot of positive reviews about the HiFiBerry boards, generally people are quite satisfied with them. Remember, there is always something better, more advanced, more professional, etc. Most of the audiophiles (and I don't consider myself an audiophile, just a true music fanatic) tend to exaggerate things and get lost in pursuing the best possible audio quality, and along this road they forget the most important thing: to find time to listen to and enjoy music!
Now that you probably have your hardware for the audio player, it is time to install the audio player software. Our new guide will show you how to install and configure RuneAudio on a Raspberry Pi with a HiFiBerry add on module, and we will also configure Spotify streaming.