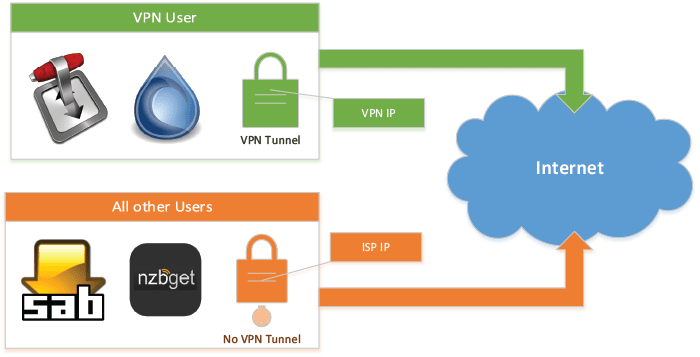
![]() In this guide we will show you how to configure your Ubuntu Server 14.04 LTS for Split Tunneling with OpenVPN. You will be able to route your torrent traffic over your VPN connection, while everything else will have direct access, bypassing the VPN. We are essentially separating the network traffic on your server.
In this guide we will show you how to configure your Ubuntu Server 14.04 LTS for Split Tunneling with OpenVPN. You will be able to route your torrent traffic over your VPN connection, while everything else will have direct access, bypassing the VPN. We are essentially separating the network traffic on your server.![]()
You will have full control over which applications you want to route over VPN. Additionally, it has an “Automatic Kill Switch” implemented with firewall rules, meaning if your VPN connection drops or breaks for any reason, your real IP address will not be revealed. DNS leaks are also prevented, and remote access to your Torrent client of choice (Transmission or Deluge) is possible with nginx reverse proxy. Sounds great? Lets proceed!
| VPN Service | ||||
|---|---|---|---|---|
| Private Internet Access | ($3.33 / month) |
|||
| Pure VPN | ($4.91 / month) |
|||
| IPVanish | ($6.41 / month) |
We cannot emphasize enough how important is to protect your online privacy. For this purpose we would certainly recommend using a VPN (Virtual Private Network) with OpenVPN. You can choose from many paid VPN servers. Always read their Privacy Policy, and consider the quality of the service for the price, choose one you trust. In this guide we will use Private Internet Access (PIA) as the VPN provider, in my experience configuring others will not differ too much.
Important: This guide is written for Ubuntu Server 14.04 LTS and uses upstart script. It might work on other Linux distributions, but it is guaranteed to work on Ubuntu Server 14.04 LTS. For systems that use Systemd (like Ubuntu Server 16.04 LTS, Debian 8 (Jessie), Minibian (that is based off Debian 8), etc., systemd is required instead of upstart script. For Minibian installation of additional packages is required! A guide for systemd systems will be published soon, until then you can check the forum for help.
Why Split VPN Tunnel?
If you are running a home server based on Ubuntu Server and you configure your OpenVPN client, you will be completely tunneled over the active VPN connection. But what if we would like to tunnel only few applications' traffic over VPN (for example Transmission or Deluge) and allow everything else direct connection? This is called split tunneling the VPN connection. What if your VPN connection breaks because the VPN server is offline? Without proper firewall rules you will automatically fall back to your direct Internet connection and immediately expose your real IP address. This poses privacy and anonymity risks!
The Benefits of VPN Split Tunneling
Control
- You can select which services/applications should be tunneled over the VPN connection by running the selected services/application as vpn user, therefore you can protect your identity
Automation
- The VPN connection with Split Tunneling is started automatically on each system start, restarted automatically once the VPN provider is online again
Increased Safety
- If the VPN connection breaks, the vpn user is “disconnected” from the Internet (Automatic Kill Switch), if VPN connection is established again, vpn user will have access to Internet again over VPN. This ensures that your real IP address is never exposed publicly, only the IP address assigned by VPN provider is visible.
Increased Convenience
- You retain you direct internet connection for all the other users, bypassing the VPN for services/applications that don't require you to hide your real IP address
Keep Remote Access
- You will still be able to remotely manage your services by reverse proxy!
This is a detailed guide how to configure Ubuntu Server 14.04 LTS for Split Tunneling over a VPN. This is an advanced and detailed guide but every effort has been made to make it friendly for new users with basic Linux knowledge. Should anything go wrong, feel free to comment or post on the Forum, we will do our best to help you.
This is Part 1 of the split tunnel guide. In this guide you will create and configure the vpn user.
In Part 2 of upcoming guides you will configure your torrent client (Transmission or Deluge guide) to run as the VPN user.
Here is an overview of all the steps in Part 1:
- Install and configure OpenVPN (including auto connecting to VPN server on system start)
- Modify PIA configuration file to adjust for Split Tunneling
- Configure DNS Server for VPN connection to prevent DNS leak
- Create the vpn user that will be tunneled over VPN
- Use iptables to mark vpn user's traffic and routing rules to route marked packets over VPN connection
- Check everything is configured and working correctly
Install OpenVPN
The Ubuntu repository is not always up to date. It is best to use the latest OpenVPN release to make sure you have the latest security fixes. It is quite easy to build OpenVPN from source (stay tuned for a guide on how to build OpenVPN from source), but let's check if the current version of OpenVPN is available from the Ubuntu repository.
sudo apt-get update
sudo apt-cache policy openvpn
This will show you the version of OpenVPN in the Ubuntu repository. At the moment of writing this guide, it is version 2.3.2, quite behind the latest stable release. You can always check on the official OpenVPN site for the latest version (and the changelog too).
Note: if you are using an ARM device (like Raspberry Pi) do not add the OpenVPN repository, just install OpenVPN from the repository of the distribution you are using.
Latest OpenVPN releases are available in the OpenVPN project's apt repositories.
First import the public GPG key that is used to sign the packages
wget https://swupdate.openvpn.net/repos/repo-public.gpg -O - | sudo apt-key add -Add the OpenVPN repository
echo "deb http://build.openvpn.net/debian/openvpn/stable trusty main" | sudo tee -a /etc/apt/sources.list.d/openvpn.listUpdate: OpenVPN apt repository has changed, the guide has been updated with the new address.
Install OpenVPN
sudo apt-get update
sudo apt-get install openvpn -y
Create the upstart script that will start OpenVPN on system start.
sudo nano /etc/init/openvpn.confThis script will also restart OpenVPN service if the service was terminated for some reason, logs will be located in syslog (/var/log/syslog).
Copy and paste the following
# OpenVPN upstart script
# HTPC Guides - www.htpcguides.com

start on filesystem and static-network-up
stop on runlevel [!2345]

respawn

exec /usr/sbin/openvpn --status /var/run/openvpn.client.status 10 --cd /etc/openvpn --config /etc/openvpn/openvpn.conf --syslog openvpn
Hit Ctrl+X, Y and Enter to save.
Create PIA Configuration File for Split Tunneling
We need to modify the configuration file provided by PIA to adjust it for the Split Tunneling. We will use the Sweden VPN server, but you can use any of the available servers – more on this later. For best VPN performance (especially for torrents) I strongly recommend using UDP protocol, and not TCP.
Get the Required Certificates for PIA
If unzip is not installed on your server, just install with
sudo apt-get install unzip -yDownload the archive with required files
cd /tmp
sudo wget https://www.privateinternetaccess.com/openvpn/openvpn.zip
sudo unzip openvpn.zip
Copy the required PIA certificates
sudo cp crl.rsa.2048.pem ca.rsa.2048.crt /etc/openvpn/Create Modified PIA Configuration File for Split Tunneling
We make the following changes to the default PIA configuration file:
- Add route-noexec to prevent the server from push “redirect-gateway” and make the client send all traffic over VPN by default. This is required for Split Tunneling to work.
- Add auth-nocache to prevent caching passwords in memory.
- Add the call for login.txt file with the username and password to make automatic login possible.
- Add script-security 2 to allow client to call externals scripts (up and down).
- Call the first script, iptables.sh, to mark packets for the VPN user (OpenVPN allows only one up call).
- Add down script, update-resolv-conf, to restore DNS servers when disconnecting from VPN.
You can change the hostname highlighted in red to the server of your choice. For the list of available locations and hostnames look at PIA's site and select the hostname of your choice.
Create the configuration file
sudo nano /etc/openvpn/openvpn.confCopy and paste the following
client
dev tun
proto udp
remote sweden.privateinternetaccess.com 1198
resolv-retry infinite
nobind
persist-key
persist-tun
cipher aes-128-cbc
auth sha1
tls-client
remote-cert-tls server
auth-user-pass /etc/openvpn/login.txt
auth-nocache
comp-lzo
verb 1
reneg-sec 0
crl-verify /etc/openvpn/crl.rsa.2048.pem
ca /etc/openvpn/ca.rsa.2048.crt
disable-occ
script-security 2
route-noexec

up /etc/openvpn/iptables.sh
down /etc/openvpn/update-resolv-conf
Hit Ctrl+X, Y and Enter to save.
Make OpenVPN Auto Login on Service Start
The username and password for PIA will be stored in a login.txt file, this way OpenVPN can auto connect on service start. Create the txt file
sudo nano /etc/openvpn/login.txtEnter your PIA username and password
USERNAME
PASSWORD
Hit Ctrl+X, Y to save and exit.
Configure VPN DNS Server
Next we are going to prevent DNS leak. DNS Leaks are the primary reason your real identity gets exposed even if using VPN. You can read more about DNS leaks at this location.The update-resolv-conf script that comes with OpenVPN will automatically apply the preferred DNS servers when OpenVPN connects.
This script will make sure that when using OpenVPN you are not subject to DNS leak. We will use PIA's DNS Servers (209.222.18.222 and 209.222.18.218) and Google's (8.8.8.8) as a third option. Of course, you are free to use the DNS servers you trust and prefer. It is advised to change the local DNS to a public one even if you are not using VPN. If you are behind a router (and you probably are), it is also a good practice to configure public DNS address on the router too.
Open the update-resolv-conf file
sudo nano /etc/openvpn/update-resolv-confLocate this part:
# foreign_option_1='dhcp-option DNS 193.43.27.132'
# foreign_option_2='dhcp-option DNS 193.43.27.133'
# foreign_option_3='dhcp-option DOMAIN be.bnc.ch'
Replace the part highlighted in red, make sure you uncomment (remove the # from beginning) these 3 lines, and pay attention to the third line where your need to replace DOMAIN with DNS.
It should look exactly like this:
foreign_option_1='dhcp-option DNS 209.222.18.222'
foreign_option_2='dhcp-option DNS 209.222.18.218'
foreign_option_3='dhcp-option DNS 8.8.8.8'
Hit Ctrl+X, Y and Enter to save.
Your DNS is configured for OpenVPN to prevent DNS leak.
Split Tunneling with Iptables and Routing Tables
We will use iptables to mark packets from a user (in our case vpn), and then use routing tables to route these marked packets through the OpenVPN interface, while allowing unmarked packets direct access to the Internet.
Create vpn User
Create the user vpn, all of the applications you want tunneled over VPN will run as this user. For example, you should run Transmission or Deluge as the vpn user. At the end of this guide you will see the links to our guides on how to configure Transmission and Deluge with Split Tunneling.
Create vpn user with no login option
sudo adduser --disabled-login vpnI suggest to leave personal details blank, just proceed with Enter, and finally answer Y to create vpn user. We disabled login for the vpn user for security reasons.
We are going to use vpn user to run services (like Torrent client), it is recommended to add your regular user to the vpn group and vpn user to your regular user's group to avoid any permission issues.
Replace username with the user you would like to add to the vpn group
sudo adduser username vpnReplace group with the group name of your regular user that you would like to add vpn user
sudo adduser vpn groupGet Routing Information for the iptables Script
We need the local IP and the name of the network interface. Make sure you are using a static IP on your machine or reserved DHCP also known as static DHCP.
ip route listThe output will be similar to this
default via 192.168.1.1 dev eth0
192.168.1.0/24 dev eth0 proto kernel scope link src 192.168.1.130
eth0 is the network interface (NETIF), and 192.168.1.130 is the local IP address (LOCALIP). You will need to enter these two into the following script, which we are going to create now.
UPDATE (8 November 2016): thanks to a feedback by our member Jesus, we are now addressing a vulnerability related to the VPN Split Tunnel implementation. If the PIA login credentials are not correct, then OpenVPN will not establish the VPN connection, therefore the firewall rules are not applied (since OpenVPN will execute up scripts only on successful connection). The result is not having the kill switch enabled (iptables rules loaded) and vpn user has direct access to Internet. To prevent this scenario, we will implement a permanent firewall rule to block vpn user’s access to Internet until the OpenVPN tunnel is up and functional, and the required scripts are started. This will prevent any IP leaks even if no connection to PIA is possible for any reason.
Flush current iptables rules
sudo iptables -FAdd the following rule, which will block vpn user's access to Internet (except the loopback device). Note, if you configured Split Tunnel with different user then vpn, then change vpn marked in red to the user you used.
sudo iptables -A OUTPUT ! -o lo -m owner --uid-owner vpn -j DROPNow install iptables-persistent to save this single rule that will be always applied on each system start.
sudo apt-get install iptables-persistent -yDuring the install, iptables-persistent will ask you to save current iptables rules to /etc/iptables/rules.v4 as seen on the screenshot, accept this with YES

Now when system starts, vpn user is not able to access Internet. If the OpenVPN service is started successfully, then this rule is flushed (only until the next system restart), and the Split Tunnel rules are applied.
iptables Script for vpn User
The first script will mark the packets for vpn user that will be routed by the second script.
Create the iptables script
sudo nano /etc/openvpn/iptables.shCopy the following to the iptables.sh script, and make sure you enter the network interface and the local IP we identified and marked with red and blue respectively.
You can see the comments for each section about the function of the given part of the script. If you are interested in more details about iptables, a good starting point is the Official Ubuntu Documentation.
Remember, this script will flush your existing iptables rules (UFW included), therefore you need to add your own rules into this script if you need any additional rules.
#! /bin/bash
# Niftiest Software – www.niftiestsoftware.com
# Modified version by HTPC Guides – www.htpcguides.com

export INTERFACE="tun0"
export VPNUSER="vpn"
export LOCALIP="192.168.1.130"
export NETIF="eth0"

# flushes all the iptables rules, if you have other rules to use then add them into the script
iptables -F -t nat
iptables -F -t mangle
iptables -F -t filter

# mark packets from $VPNUSER
iptables -t mangle -A OUTPUT -j CONNMARK --restore-mark
iptables -t mangle -A OUTPUT ! --dest $LOCALIP -m owner --uid-owner $VPNUSER -j MARK --set-mark 0x1
iptables -t mangle -A OUTPUT --dest $LOCALIP -p udp --dport 53 -m owner --uid-owner $VPNUSER -j MARK --set-mark 0x1
iptables -t mangle -A OUTPUT --dest $LOCALIP -p tcp --dport 53 -m owner --uid-owner $VPNUSER -j MARK --set-mark 0x1
iptables -t mangle -A OUTPUT ! --src $LOCALIP -j MARK --set-mark 0x1
iptables -t mangle -A OUTPUT -j CONNMARK --save-mark

# allow responses
iptables -A INPUT -i $INTERFACE -m conntrack --ctstate ESTABLISHED -j ACCEPT

# block everything incoming on $INTERFACE to prevent accidental exposing of ports
iptables -A INPUT -i $INTERFACE -j REJECT

# let $VPNUSER access lo and $INTERFACE
iptables -A OUTPUT -o lo -m owner --uid-owner $VPNUSER -j ACCEPT
iptables -A OUTPUT -o $INTERFACE -m owner --uid-owner $VPNUSER -j ACCEPT

# all packets on $INTERFACE needs to be masqueraded
iptables -t nat -A POSTROUTING -o $INTERFACE -j MASQUERADE

# reject connections from predator IP going over $NETIF
iptables -A OUTPUT ! --src $LOCALIP -o $NETIF -j REJECT

# Start routing script
/etc/openvpn/routing.sh

exit 0
Hit Ctrl+X, Y and Enter to save and exit.
Now make the iptables script executable
sudo chmod +x /etc/openvpn/iptables.shRouting Rules Script for the Marked Packets
With the routing rules we configure the route for the packets we just marked with the first script. You can read more about the routing tables at the following link.
Create the routing script
sudo nano /etc/openvpn/routing.shPaste the following script which makes the default route after the VPN the loopback interface, effectively nulling the traffic if the VPN connection goes down.
#! /bin/bash
# Niftiest Software – www.niftiestsoftware.com
# Modified version by HTPC Guides – www.htpcguides.com

VPNIF="tun0"
VPNUSER="vpn"
GATEWAYIP=`ifconfig $VPNIF | egrep -o '([0-9]{1,3}\.){3}[0-9]{1,3}' | egrep -v '255|(127\.[0-9]{1,3}\.[0-9]{1,3}\.[0-9]{1,3})' | tail -n1`
if [[ `ip rule list | grep -c 0x1` == 0 ]]; then
ip rule add from all fwmark 0x1 lookup $VPNUSER
fi
ip route replace default via $GATEWAYIP table $VPNUSER
ip route append default via 127.0.0.1 dev lo table $VPNUSER
ip route flush cache

# run update-resolv-conf script to set VPN DNS
/etc/openvpn/update-resolv-conf

exit 0
Hit Ctrl+X, Y and Enter to save and exit..
Finally, make the script executable:
sudo chmod +x /etc/openvpn/routing.shConfigure Split Tunnel VPN Routing
We need to add a routing table by adding the table name to the rt_tables file (in our case it is vpn). Open rt_tables
sudo nano /etc/iproute2/rt_tablesAdd the vpn user table at the bottom of the file
200 vpnIt should look like this:
#
# reserved values
#
255     local
254     main
253     default
0       unspec
#
# local
#
#1      inr.ruhep
200     vpn
Hit Ctrl + X, Y and Enter to save and exit.
Change Reverse Path Filtering
Next we need to change the default level of reverse path filtering to ensure the kernel lets the traffic get routed correctly. By default it is set to value of 1 that is “strict mode”. It is not necessary to disable reverse path filtering completely, but we need to set it to level 2, “loose mode”.
Create a reverse path filter file for the vpn user
sudo nano /etc/sysctl.d/9999-vpn.confCopy the following, make sure you use the correct network interface name in the third line marked with red (remember the ip route list command from before and the output, in our case it was eth0)
net.ipv4.conf.all.rp_filter = 2
net.ipv4.conf.default.rp_filter = 2
net.ipv4.conf.eth0.rp_filter = 2
Hit Ctrl + X, Y and Enter to save and exit.
To apply new sysctl rules run:
sudo sysctl --systemTesting the VPN Split Tunnel
I recommend a system restart, and if everything was configured properly, you should have a VPN connection enabled for user vpn and all the other users on your server should have direct access to Internet. Now lets check if everything is correct.
Test OpenVPN service
Login as your regular user over SSH, and check if OpenVPN has started correctly
sudo service openvpn statusThis should return
openvpn start/running, process xxxxIf you get this output
openvpn stop/waitingSomething went wrong. We configured OpenVPN to log into /var/log/syslog, you can check if there is a log of the error. For troubleshooting you can set output verbosity in the openvpn.conf file to a higher level, I would recommend 3. You can always ask for help in the forum section. Remember to set verbosity level back to 1 if you don't need more detailed logs anymore.
Check IP address
Still using the SSH session for the regular user, check the IP address
curl ipinfo.ioIt will return your IP and depending on how much information is provided, the country should be listed in each case. Obviously, it should be your ISP now and your location.
Now check the IP address of the vpn user with
sudo -u vpn -i -- curl ipinfo.ioIf everything went fine, it should return the IP address and the country of the VPN server you selected. If you used Sweden server, then the country should be “SE”. It is very important that the IP address for user vpn should be different then your regular user's IP.
In my case for user vpn and using Sweden PIA server I have the following output
{
  "ip": "X.XXX.XXX.XX",
  "hostname": "No Hostname",
  "city": "",
  "region": "",
  "country": "SE",
  "loc": "59.3294,18.0686",
  "org": "AS57858 Inter Connects Inc"
Obviously, the “x.xxx.xxx.xx” part is my assigned VPN IP address which is different then my public IP, and you can see the country as SE which is Sweden.
Check DNS Server
Finally, check if the DNS for VPN is properly configured
sudo -u vpn -i -- cat /etc/resolv.confIt should return
# Dynamic resolv.conf(5) file for glibc resolver(3) generated by resolvconf(8)
# DO NOT EDIT THIS FILE BY HAND -- YOUR CHANGES WILL BE OVERWRITTEN
nameserver 209.222.18.222
nameserver 209.222.18.218
nameserver 8.8.8.8
If you see the above DNS servers then your DNS for VPN is configured correctly.
Conclusion
Congratulations, now you have configured your Ubuntu Server 14.04 LTS for VPN with Split Tunneling. You should now install your Torrent client of choice and configure it for Split Tunneling: