 The Banana Pi and Banana Pi Pro by LeMaker are alternatives to the Raspberry Pi for a NAS home media server solution. Powered with SATA and gigabit, it has significant network throughput improvements compared to the Raspberry Pi and Pi 2 (see benchmarks). I decided to make my new HTPC Media Server Installer compatible with the Banana Pi so setting up your own media server is much easier. This image is based on Igor's build scripts, Armbian and microserver installer which greatly simplified the process of creating the HTPC Installer distro.
The current kernel version in this distro is 3.19.7 running Debian Wheezy because it has modular port multiplier support. The image hosted here does not support DVB tuners out of the box but it is being looked into.
Available Images
Wheezy with 3.19 Kernel – has SATA PMP support
Recommended: Jessie with Kernel 4.1.6 – with and without SATA PMP support
New: Jessie with Kernel 4.2.6 with SATA PMP support
When you are done customizing your image, resize and back up your image to save you time in case you ever make a mistake.
| Pi Unit | ||||||||
|---|---|---|---|---|---|---|---|---|
| Raspberry Pi 3 | Quad Core |
|||||||
| Raspberry Pi 2 | Quad Core |
|||||||
| Raspberry Pi | Single Core |
|||||||
| Banana Pi | Dual Core |
|||||||
| Banana Pi Pro | Dual Core |
Banana Pi Pro Home Media Server Installer
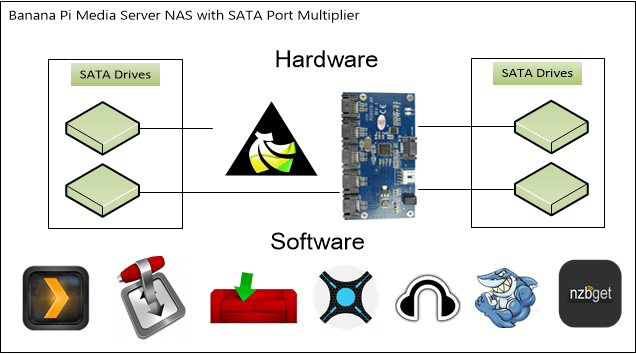
One of the best things about the Banana Pi is the ability to use a SATA port multiplier to connect multiple hard drives. For the 4 SATA hard drive BanaNAS home media server, I am using the JMB 321 port multiplier available on AliExpress which costs $29.00 including shipping.
I found this 4 x 2.5″ bay ($30) which allows you to put 4 2.5″ hard drives into a single 5.25″ bay and a molex to DC power adapter to power the 4 hard drives in the bay. Now I won't be using multiple external USB drives which each take up their own power socket.
This is a visual diagram of the Banana Pi Media Server with multiple SATA hard drives
The installer will be expanded to include x86 and x64 Ubuntu and Debian systems in the future, forks will not be necessary as development will be maintained by me as a school project.
The HTPC Guides Installer includes most of the goodies in the table below.
The installed services work well with UsenetServer and Astraweb for usenet. If you want to know more about usenet read this article.
Torrent users, be safe with Private Internet Access for secure torrenting.
Login/Password |
|||
|---|---|---|---|
Install HTPC Guides Media Server Installer
There are two options, clone the installer from github yourself onto your existing Banana Pi operating system SD card installation. It is designed to be used on a fresh system and Debian Wheezy and Jessie along with Ubuntu 14.04 and latter. The second option is to download the prepared image at the bottom of this post which has the installer preloaded for your convenience. The login credentials are root/htpcguides and pi/htpguides, for security reasons follow the initial setup guide to reset your SSH keys and password.
Install git or you can't grab easily update the repository when I add new features
sudo apt-get install git -yGit clone the latest HTPC Guides Media Server Installer
sudo git clone https://github.com/blindpet/MediaServerInstaller /root/HTPCGuidesUsing the Banana Pi Media Server Installer Image
Flash the image found at the bottom of this post, the default SSH username is root/htpcguides. The root file system is automatically expanded and SSH keys are regenerated so you can feel secure. You will be forced to change this password upon the first boot and you cannot change it to the original password htpcguides.
You are required to change your password immediately (root enforced)

 ____                                  ____ ___
| __ )  __ _ _ __   __ _ _ __   __ _  |  _ \_ _|
|  _ \ / _` | '_ \ / _` | '_ \ / _` | | |_) | |
| |_) | (_| | | | | (_| | | | | (_| | |  __/| |
|____/ \__,_|_| |_|\__,_|_| |_|\__,_| |_|  |___|


Changing password for root.
I recommend creating a user to run services as, replace pi with whatever you want.
adduser piAdd the user to your sudo group if you don't want to use the root account
usermod -a -G sudo piReconfigure keyboard layout
sudo dpkg-reconfigure keyboard-configuration
sudo service keyboard-setup restart
If you want to enable your SATA Port multipler open this
nano /etc/modprobe.d/ahci-sunxi.confAdd this line
options ahci-sunxi enable_pmp=1Save and exit with Ctrl+X, Y and Enter
Disable ramlog
service ramlog stop
service ramlog disable
You can choose to reboot if you like, it does work without rebooting
rebootRunning the HTPC Guides Installer
To get the IP of your headless server, log in to your router and check the DHCP table and look for the Banana Pi entry.
Make sure you are root
sudo -iEnter the HTPC Guides installer
cd /root/HTPCGuidesMake sure the HTPC Guides installer is up to date
git pullExecute the installer
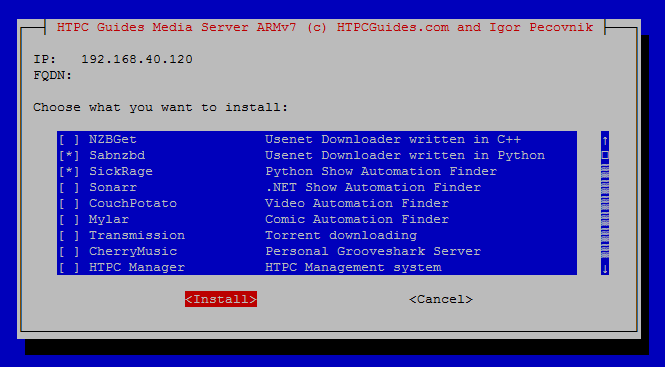
sudo bash install.shSome required components will be installed, then you will be shown the installer menu.
Choose the item you want installed by pushing the Space bar key.
Only install one program at a time.
Then click Tab to get to the Install button and press Enter.
For each program you will be prompted for the user to run the program as, this must be a user that exists or the installer will exit. You should make sure the user has permissions for the directory you will be storing your media files.
For Ubooquity you must exit root mode if you typed sudo i earlier
exitUbooquity is having trouble autostarting on boot for now so I would recommend following the manual guide (the Raspberry Pi versions for now).
Here is the HTPC Guides Banana Pi Media Server Installer Image, if you can't see the social locker below you need to turn off Adblock ;).