 Plex Media Server is a fantastic software solution if you want to stream to multiple clients in your house. The Raspberry Pi Model B is powerful enough to act as a Plex Home Theater device thanks to the active developer community project RasPlex. When you couple RasPlex with a cheap plug and play remote control it becomes an affordable way to watch your media on additional TVs.
If you are trying to figure out which hardware would work best for you, consider reading the Pi benchmarks.
| Pi Unit | ||||||||
|---|---|---|---|---|---|---|---|---|
| Raspberry Pi 3 | Quad Core |
|||||||
| Raspberry Pi 2 | Quad Core |
|||||||
| Raspberry Pi | Single Core |
|||||||
| Banana Pi | Dual Core |
|||||||
| Banana Pi Pro | Dual Core |
Install Plex Home Theater on Raspberry Pi
Getting Started
You will need the RasPlex latest image (0.4.0-rc5)
You will need the Win32 Disk Imager software
A 2GB sd card that fits in your Pi
Install RaspPlex
You need to unpack the RasPlex image using a program like WinRAR
Plug in your SD card and note the drive letter (mine is E:).
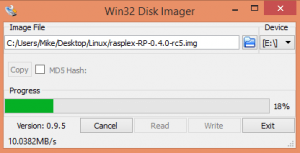
Run Win32 Disk Imager as an Admin. Choose the correct drive letter.
Browse to the unpacked RasPlex image location and press Write.
You will see the progress screen
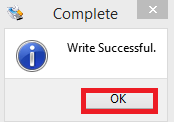
When you see Write Successful, press OK
Now pop the SD card into the Raspberry Pi, plug in any remote you have and the ethernet network cable (or wifi if you have the adapter) and give the Raspberry Pi some power.
Now you will be met with the RasPlex interface, your remote will work if it was plugged in.
It should find your Plex Media Server automatically.
Make sure to enable caching to speed up the interface.
Enjoy your super cheap Plex Home Theater client 🙂