 The awesome Plex Media Server can now finally be installed on the Raspberry Pi 2 without a chroot. The chroot method broke when using upstart scripts and had metadata issues, those are no longer a problem! Using a Synology package compiled for an ARMv7 processor we can use it on the Pi 2 with a bit of extra work.
This will unfortunately not work on the B+ or earlier models as they use an ARMv6 processor. Many thanks to uglymagoo from the Plex forum who identified the package that could be used without a chroot on the Raspberry Pi 2. I used a minimal Raspbian distribution Minibian for this guide, when you are done Plex will also autostart on boot. There is also a link to an image at the bottom of this post with Minibian and Plex installed, please share this post if you use the image. This how-to also has a section on fixing Plex permissions so if your Plex can't see your folders then you will be able to solve that problem here.
March 2016 Update: Jessie Image posted compatible with Raspberry Pi 2 and Pi 3
Previous Update: Method 3 for early Plex releases now working with Jessie
Image Updated August 2015 to version 6 with Minibian Jessie with Kernel 4.1 and Plex 0.9.12.8 (if you experience issues use this image use the installer)
Instructions Updated for Plex 0.9.12.8 on Raspbian Wheezy start at Pre-install requirements
There are also Media Server and HTPC Combo Images available here that combine Kodi, usenet and torrent automation.
Plex for ARM CPU architectures is compiled with very limited transcoding abilities. Do not expect transcoding to work, you will get the best experience by using DirectPlay or DirectStream features of Plex streaming locally. H264 content should play remotely as long your internet connection can support it and client can play back the media's codecs. If your content has subtitles it will not work for transcoding.
The Banana Pi can run Plex Media Server as well and sports a SATA and gigabit port for extra speed (see benchmarks).
| Pi Unit | ||||||||
|---|---|---|---|---|---|---|---|---|
| Raspberry Pi 3 | Quad Core |
|||||||
| Raspberry Pi 2 | Quad Core |
|||||||
| Raspberry Pi | Single Core |
|||||||
| Banana Pi | Dual Core |
|||||||
| Banana Pi Pro | Dual Core |
Guides for other ARMv7 processors are available: ODROID-C1, Orange Pi and Banana Pi. This guide has been split up into four methods in order of easiest to hardest. You must start with the pre install section to make sure the locales are in order before you proceed to the other methods, I recommend using the repository as it is easiest and fastest.
Now there is a guide to install the Plex UnSupported AppStore
Many users want to mount their hard drives, here is a guide for that so you can find your media in Plex
Install Plex Media Server on Raspberry Pi 2
Installation Checklist
This guide is rather long and easy to overlook things so here is a checklist of what you need to do
- Verify you have the en_US locale
- Verify you have the libc6 2.19 if you want to use the latest Plex Media Server
- Make sure you have libexpat1 installed
- Make sure you are using the right repository – must be jessie if you want the latest and greatest
- Move the transcoding folder to your external hard drive
- Do not use WiFi if you want the best results
- Stick to Method 1 for installation
- Avoid using Plex.tv to connect as it can override the force transcoding, only use your local IP address or dynamic DNS address
- Monitor Plex Media Server and restart it automatically with this guide.
- Do not use Plex.tv instead use Dynamic DNS and a reverse proxy with this guide.
- Fix Plex permissions (at the bottom of this post)
- If you are having problems with video playback you can use an older transcoder with this guide.
Pre-Install Requirements
Generate Locales
This command lists current locales and fix any locale error (otherwise see the comments from Jason)
locale -aMy output looks like this
C
C.UTF-8
en_US.utf8
POSIX
If you don't have en_US.utf8 you can generate it
To generate the locale edit the locale generator configuration file first to enable the locale
sudo nano /etc/locale.genUncomment this line by deleting the #
# en_US.UTF-8 UTF-8Ctrl+X, Y and Enter to save
Now generate the locales
sudo locale-genIf you get the locale-gen cannot be found error it is probably because you are on Minibian, use this command
echo "export PATH=$PATH:/usr/sbin" >> ~/.profileNow generate the locales again if you get the locale-gen cannot be found error
sudo locale-genReconfigure locales for good measure (source)
sudo dpkg-reconfigure localesUpgrade libc6 to 2.19 on Raspbian
As of Plex 0.9.12.8, version 2.19 of libc6 is required, Wheezy (the current prevalent repo) only has version 2.13. You can install version 2.19 manually though but it involves pinning apt sources which can cause other issues. If you don't care about having the latest and greates version then you can just use uglymagoo's Wheezy repo. I recommend backing up your SD card before manipulating your packages.
Make sure you have read the warnings above and have backed up or are using an extra SD card.
Check which version of the glibc6 you have by typing this command
ldd --versionIf the output says 2.13 upgrade manually by following the next few steps, if it says 2.19 then you can skip ahead to installing from uglymagoo's repository in the next section
Add Jessie repositories
echo "deb http://mirrordirector.raspbian.org/raspbian/ jessie main contrib non-free" | sudo tee -a /etc/apt/sources.list
echo "deb http://archive.raspbian.org/raspbian jessie main contrib non-free" | sudo tee -a /etc/apt/sources.list
Create the jessie preferences file so we can control it
sudo nano /etc/apt/preferences.d/jessie.prefPaste this code. Pinning forces jessie to be of a lower priority so it doesn't conflict with existing packages, a value of -1 means only packages we specify to be installed from jessie will be installed from there, no other packages should be affected unless they are dependencies.
Package: *
Pin: release n=jessie
Pin-Priority: -1
Now Ctrl+X, Press Y and then Enter
Update packages
sudo apt-get updateInstall libc6 from the Jessie repository
sudo apt-get install -t jessie libc6 -yWhen prompted say yes to restart services automatically under installation
Now you should have libc6 version 2.19. Check the version again
ldd --versionIf it still says any version below 2.19 here is how to fix it by changing pin preferences.
sudo nano /etc/apt/preferencesAdd this information or adjust your pin priority so it matches
Package: *
Pin: release n=wheezy
Pin-Priority: 989
Ctrl+X, Y and enter to save
sudo apt-get update
sudo apt-get install -t jessie libc6 -y
If you ever experience issues when installing other packages in the future you may need to install dependencies like this
sudo apt-get install -t jessie packagenameMethod 1 – Install Plex Media Server on Raspberry Pi 2 using Repository
Enable https transport or you will get this error: E: The method driver /usr/lib/apt/methods/https could not be found.
sudo apt-get update && sudo apt-get install apt-transport-https binutils -y --force-yesGrab uglymaoo's gpg key for his repository
wget -O - https://dev2day.de/pms/dev2day-pms.gpg.key | sudo apt-key add -Add uglymagoo's repository, if your ldd –version output said 2.19 or you have updated manually using the steps above, leave it as jessie. If you don't care about having the latest version you can change jessie to wheezy in the line below
echo "deb https://dev2day.de/pms/ jessie main" | sudo tee /etc/apt/sources.list.d/pms.listUpdate your package lists
sudo apt-get updateInstall Plex Media Server
sudo apt-get install plexmediaserver-installer -yIf you manually installed libc6 2.19 use this command to specify installation from the jessie repository
sudo apt-get install -t jessie plexmediaserver-installer -yWhen you know there is a new version of Plex Media Server you can upgrade with this command now
sudo apt-get update && sudo apt-get upgrade -yAccess Plex on your Raspberry Pi 2 at this URL, replace ip.address with your actual local IP http://ip.address:32400/web or http://ip.address:32400/manage/index.html#!/setup
If it hasn't started then you may have a systemd / init.d issue which can happen if you are on Debian jessie, start Plex manually like this, the & puts in the background. If you are troubleshooting leave out the & to get some error information.
sudo bash /usr/lib/plexmediaserver/start.sh &Go shopping for a new hard drive at Amazon to store your media
| USB Hard Drive Model | |||
|---|---|---|---|
| Western Digital My Passport Ultra Portable Hard Drive | |||
| Western Digital My Passport Ultra Portable Hard Drive |
Read about usenet for grabbing content automatically.
If you need to remove Plex you can do so with this command
sudo apt-get remove plexmediaserver -yMethod 2 – Old Easy Install Method
This method grabs the latest package straight from uglymagoo's repository. It was used before uglymagoo created a repository and is only here for the sake of completion.
Enter your temp folder, this will ensure the package is emptied after you reboot
cd /tmpRemove any existing plex package in case you are upgrading to the newest version from an older version
rm plexmediaserver_*.debGrab the latest Plex Media Server package link from here, you must know if you are on Wheezy or Jessie
Replace the http link below with the link you copied.
wget http://dev2day.de/plex-latestInstall the latest Plex Media Server Package
sudo dpkg -i plex*It will autostart on boot when you restart your machine, go to http://ip.address:32400/web and Plex should pop up
You can start and stop the service with this command, replace restart with start or stop as you see fit
sudo service plexmediaserver restartIf you want to remove plex using this method
sudo dpkg -r plexmediaserverYou do not need to read the rest of this guide but can now configure Plex or install some transcoding tools at the bottom of this post.
Method 3 – Build the Plex Media Server Package
This method is deprecated, see the new manual installation guide.
With this method you are going to grab the latest plex ARMv7 Synology package straight from Plex and turn into a deb package you can install on your Raspberry Pi 2.
First you may need to install patchelf for updating symlinks for the libc6 library
This step may not be necessary so only do it Plex doesn't start after building and installing the package
sudo apt-get install build-essential autoconf automake git -y
git clone https://github.com/NixOS/patchelf
cd patchelf
autoconf
./bootstrap.sh
automake
./configure --prefix=/usr
sudo make
make install
Enter home directory
cd ~Grab the latest Plex skeleton package
wget http://dev2day.de/skeleton.tgzUnpack the Plex skeleton
tar -xzf skeleton.tgzGrab the latest Plex Media Server package link for ARMv7 which can be found at https://plex.tv/downloads click NAS.

Click the Synology tab and right click on the ARMV7 button and copy the link to the clipboard.
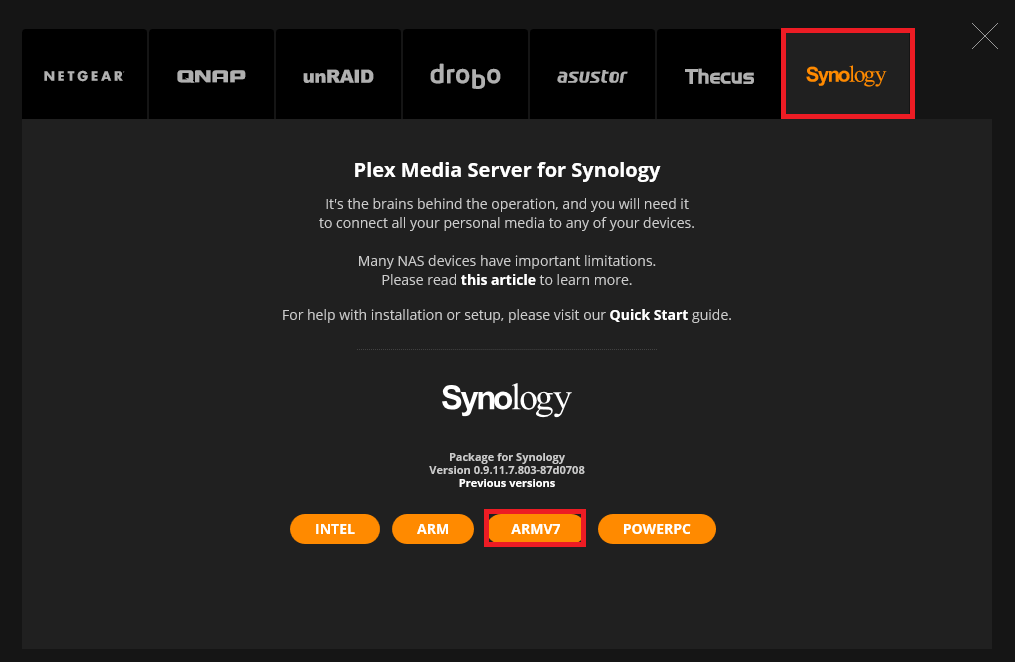
Back in SSH type wget and paste the link you have copied to the clipboard, trim the s from https as well if you have issues
wget https://downloads.plex.tv/plex-media-server/0.9.12.19.1537-f38ac80/PlexMediaServer-0.9.12.19.1537-f38ac80-arm7.spkRename the Synology Plex package, replace the filename here with the filename of the newest package you just downloaded.
mv PlexMediaServer-0.9.12.19.1537-f38ac80-arm7.spk PlexMediaServer-0.9.12.19.1537-f38ac80-arm7.tgzUnpack the Plex package, again replace the package name
tar -xvf PlexMediaServer-0.9.12.19.1537-f38ac80-arm7.tgzUnpack the package to the skeleton directory
tar -xvf package.tgz -C skeleton/usr/lib/plexmediaserverDelete unnecessary stuff
rm -r skeleton/usr/lib/plexmediaserver/dsm_configEnter the plexmediaserver folder
cd skeleton/usr/lib/plexmediaserverCreate some symbolic links, skip the red lines and only use it if the first build doesn't work
find . -executable -type f -exec patchelf --set-interpreter /lib/ld-linux-armhf.so.3 {} \;
ln -s /lib/ld-linux-armhf.so.3 /lib/ld-linux.so.3
find . -iname "*.so" -exec chmod 644 {} \;
find . -iname "*.so.*" -exec chmod 644 {} \;
Go back to the home directory
cd ~This is optional, you can edit the package details
nano skeleton/DEBIAN/controlChange Maintainer if you want and adjust the version
Package: plexmediaserver
Version: 0.9.11.7.803-87d0708-3
Architecture: armhf
Maintainer: Jan Friedrich (uglymagoo) <jft@dev2day.de>
Section: video
Priority: extra
Homepage: http://www.plexapp.com
Description: Plex Media Server for Linux
  Stream media everywhere(tm)
Install fakeroot
sudo apt-get install fakeroot -yBuild the deb package for installation
fakeroot dpkg-deb --build skeleton ./You can now install the plexmediaserver package you just created
sudo dpkg -i plexmediaserver*If all went well you can remove the files and folders you used to build the package
rm skeleton.tgz
rm -R ~/skeleton
rm plex*.deb
Install the transcoding tools at the bottom of this post.
Method 4 – Manual Plex Installation
The following section is only necessary if the above methods do not work. I will update this section to mimic the exact paths from the package above to avoid any future confusion if methods are mixed. It is based on the chroot guide.
Plex is updating packages so often it is worth making sure you are grabbing the latest package by grabbing the newest download link as outlined in Method 2 and using the new file name in the 3 relevant lines below).
Enter your home directory
cd ~Create a plex directory to work with
mkdir plexEnter the plex working directory
cd plexGrab the Synology arm7 package (update new name if you want the latest package for the next 3 commands)
wget https://downloads.plex.tv/plex-media-server/0.9.12.19.1537-f38ac80/PlexMediaServer-0.9.12.19.1537-f38ac80-arm7.spkRename the Synology arm7 package to tar so it can be unpacked and used on the Raspberry Pi 2
mv PlexMediaServer-0.9.12.19.1537-f38ac80-arm7.spk PlexMediaServer-0.9.12.19.1537-f38ac80-arm7.tarUnpack the Plex Media Server tar package
tar -xvf PlexMediaServer-0.9.12.19.1537-f38ac80-arm7.tarCreate a directory for plex
sudo mkdir -p /opt/plex/ApplicationUnpack the Plex package to the plex folder you just created
sudo tar -xvf package.tgz -C /opt/plex/ApplicationCreate a symlink for this file
ln -s /lib/ld-linux.so.3 /lib/ld-linux-armhf.so.3Make sure you have the en_US.utf locale or you will get this error
terminate called after throwing an instance of 'std::runtime_error'

what(): locale::facet::_S_create_c_locale name not valid
or this error
start.sh: line 8: warning: setlocale: LC_ALL: cannot change locale (en_US.UTF-8): No such file or directory
terminate called after throwing an instance of 'std::runtime_error'
 what(): locale::facet::_S_create_c_locale name not valid
This command lists current locales and fixes the locale error above
locale -aMy output looks like this
C
C.UTF-8
en_US.utf8
POSIX
If you don't have en_US.utf8 you can generate it or modify the plexmediaserver file further below to use your locale
To generate the locale edit the locale generator configuration file first to enable the locale
sudo nano /etc/locale.genUncomment this line by deleting the #
# en_US.UTF-8 UTF-8Ctrl+X, Y and Enter to save
Now generate the locales
sudo locale-genNow run Plex for the first time!
Enter your plex directory
cd /opt/plex/ApplicationStart Plex Media Server to see if it's working
sudo bash start.sh &Browse to http://ip.address:32400/web and Plex should pop up!
Configure Plex Media Server to Autostart on Boot
This is for the manual method only!
To get Plex to start on boot, create this file
sudo nano /usr/local/bin/plexmediaserverPaste this inside
#!/bin/sh
SCRIPTPATH=/opt/plex/Application
export LD_LIBRARY_PATH="${SCRIPTPATH}"
export PLEX_MEDIA_SERVER_HOME="${SCRIPTPATH}"
export PLEX_MEDIA_SERVER_MAX_PLUGIN_PROCS=6
export LC_ALL="en_US.UTF-8"
export LANG="en_US.UTF-8"
export PLEX_MEDIA_SERVER_APPLICATION_SUPPORT_DIR="/opt/plex/Application/Library/Application Support"
ulimit -s 3000
/opt/plex/Application/Plex\ Media\ Server
Ctrl+X, Y and Enter to save and exit
Make the plexmediaserver file executable
sudo chmod +x /usr/local/bin/plexmediaserverCreate the init.d script to start and stop plexmediaserver on the Raspberry Pi 2
sudo nano /etc/init.d/plexmediaserverPaste this slightly modified PMS script
#!/bin/sh
### BEGIN INIT INFO
# Provides:          plexmediaserver
# Required-Start:    $remote_fs $syslog $networking
# Required-Stop:
# Default-Start:     2 3 4 5
# Default-Stop:      0 1 6
# Short-Description: Plex Media Server
# Description:       Plex Media Server for Linux,
#                    More information at http://www.plexapp.com
#                    Many thanks to the great PlexApp team for their wonderfull job !
# Author:            Cedric Quillevere / origin@killy.net
# Rewamped           Christian Svedin / christian.svedin@gmail.com
# Adapted (cubox-i)  Francis Belnger / francis.belanger@gmail.com
# Version:           1.2
### END INIT INFO

# Read configuration variable file if it is present
[ -r /etc/default/plexmediaserver ] && . /etc/default/plexmediaserver

test -f "/usr/local/bin/plexmediaserver" || exit 0

plex_running=`ps ax | grep "/opt/plex/Application/Plex Media Server" | awk '{ print $1 }' | wc -l`


case "$1" in
    start)
        if [ "$plex_running" -gt 1 ]; then
                echo "Plex already running..."
                exit 0
        fi
        echo -n "Starting Plex Media Server: "
        su -l $PLEX_MEDIA_SERVER_USER -c "/usr/local/bin/plexmediaserver &" >/dev/null 2>&1
        sleep 1
        echo "done"
        ;;
    stop)
        if [ "$plex_running" -eq 1 ]; then
                echo "Plex Media Server is not running (no process found)..."
                exit 0
        fi
        echo -n "Killing Plex Media Server: "
        # Trying to kill the Plex Media Server itself but also the Plug-ins
        ps ax | grep "Plex Media Server" | awk '{ print $1 }' | xargs kill -9 >/dev/null 2>&1
        ps ax | grep "Plex DLNA Server" | awk '{ print $1 }' | xargs kill -9 >/dev/null 2>&1
        sleep 1
        echo "done"
        ;;
    restart)
        sh $0 stop
        sh $0 start
        ;;
    status)
        if [ "$plex_running" -gt 1 ]; then
                echo "Plex Media Server process running."
        else
                echo "It seems that Plex Media Server isn't running (no process found)."
        fi
        ;;
    *)
        echo "Usage: $0 {start|stop|restart|status}"
        exit 1
        ;;
esac

exit 0
Ctrl+X, Y and Enter to save the Plex Media Server script
sudo chmod +x /etc/init.d/plexmediaserverUpdate rc to enable your new Plex Media Server script
sudo update-rc.d plexmediaserver defaultsCreate the /etc/default/plexmediaserver file
sudo nano /etc/default/plexmediaserverPaste this, it is also here you can adjust the user the plex service runs as and the transcoding directory which should be your external hard drive
# default script for Plex Media Server

# the number of plugins that can run at the same time
PLEX_MEDIA_SERVER_MAX_PLUGIN_PROCS=6

# ulimit -s $PLEX_MEDIA_SERVER_MAX_STACK_SIZE
PLEX_MEDIA_SERVER_MAX_STACK_SIZE=3000

# where the mediaserver should store the transcodes
PLEX_MEDIA_SERVER_TMPDIR=/tmp

# uncomment to set it to something else
# PLEX_MEDIA_SERVER_APPLICATION_SUPPORT_DIR="${HOME}/Library/Application\ Suppo$

# the user that PMS should run as, defaults to 'plex'
# note that if you change this you might need to move
# the Application Support directory to not lose your
# media library
PLEX_MEDIA_SERVER_USER=plex
Ctrl+X, Y and Enter to Save
Reboot and you are all ready to start adding media to Plex and stream it around your home!
sudo rebootTranscoding Tools
Plex Media Server requires a new libc6 module that you can pull from the jessie repo (thanks again to uglymagoo). This part may not necessary if you used the precompiled deb package at the top.
Install libexpat1 for help playing in the Android app
sudo apt-get install libexpat1 -yThese mkvtools can help but are possibly unnecessary
sudo apt-get install mkvtoolnix -yIt may help enable XviD, DivX and MKV playback in the Plex web interface and in the Plex app.
If you already have libc6 2.19 you can skip the next 3 steps and go to Use Hard Drive for Transcoding.
Stop your Plex server first
sudo service plexmediaserver stopThis next block should no longer be necessary and is here for archival purposes only. Grab the package, extract the libc6 file and place it in the Plex Media Server folder. The libc6 is from the jessie testing repo can is updated from time to time, if you get a not found error try incrementing the version by 1 or 2 so that the filename is for example: libc6_2.19-19_armhf.deb.
If you used method 3 replace /usr/lib/plexmediaserver with /opt/plex/Application
cd /tmp/
mkdir libc6
cd libc6
wget http://ftp.us.debian.org/debian/pool/main/g/glibc/libc6_2.19-18_armhf.deb
dpkg-deb -x libc6_2.19-18_armhf.deb ./
cp -a lib/arm-linux-gnueabihf/libm-2.19.so /usr/lib/plexmediaserver
cd /usr/lib/plexmediaserver
chmod ugo+x libm-2.19.so
unlink libm.so.6
ln -s libm-2.19.so libm.so.6
Restart your Plex server
sudo service plexmediaserver restartFix Plex Permission Issues
If Plex isn't reading your drives or folders you can do one of two things, change the permissions of your external storage or change the user Plex is running as (which could mean you need to rescan for metadata).
First try adding your plex user to your regular user's group that owns the mount point for your hard drive
sudo usermod -aG pi plexThen add your regular user to the plex group if the plex group exists
sudo usermod -aG plex piThen set the permissions for the folder containing your media to 775 so the plex in the user's group can read them
sudo chmod -R 775 /folder/with/mediaIf that still fails you can change the permissions where /mnt/usbstorage is your mount path for your hard drive so everybody can read, write and execute
sudo chmod -R 777 /mnt/usbstorageAlternatively you can change the user Plex runs as to your pi user
To change which user Plex runs as, open this file
sudo nano /etc/default/plexmediaserverChange this line, replace plex with your username you use to log on or the owner of the mounted drive, most likely pi
PLEX_MEDIA_SERVER_USER=piCtrl+X, Y and Enter to save
Then restart your Plex server
sudo service plexmediaserver restartUse Hard Drive for Transcoding
You should set Plex to use your external hard drive for temporary transcoding data after you have mounted your drives properly.
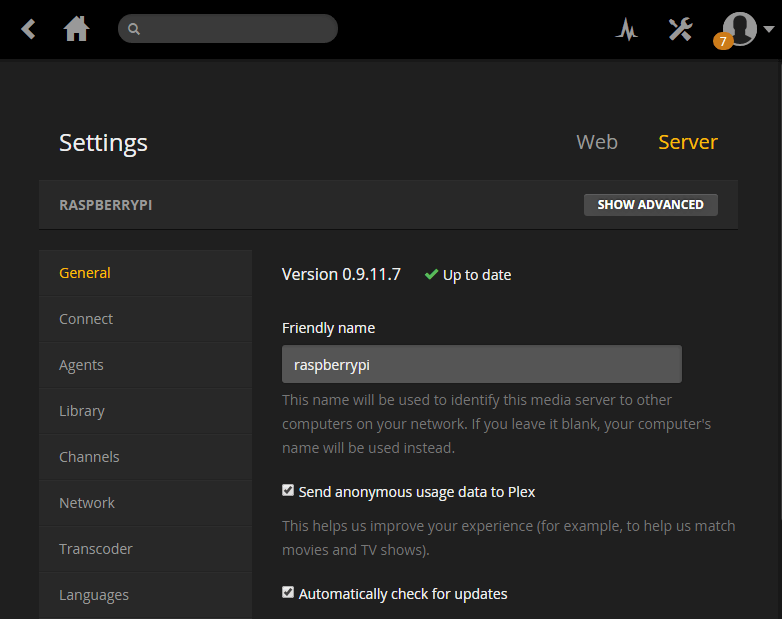
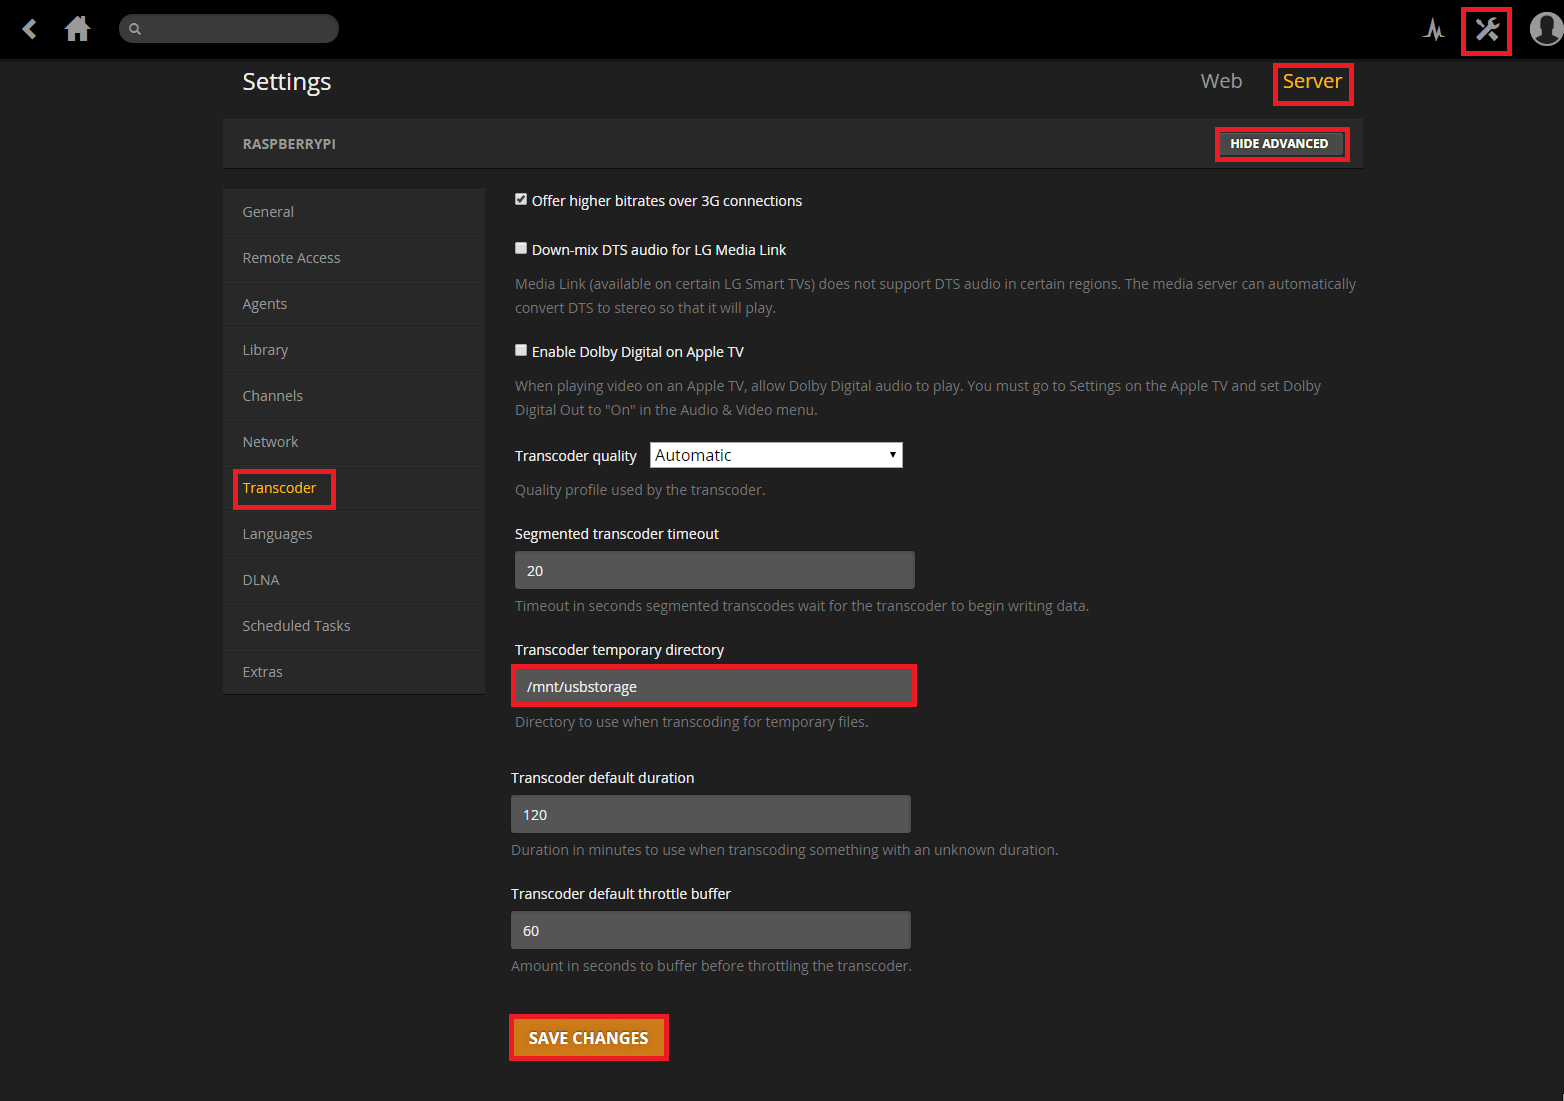
Click the settings icon in the top right, Click Server and then Transcoder in the left pane.
Make sure SHOW ADVANCED is enabled underneath Server.
Scroll down to Transcoder temporary directory and set your USB external drive's mount path (e.g. /mnt/usbstorage not /dev/sda1)
Scroll down further and hit Save Changes
I plan to create a Raspberry Pi 2 cluster to see if transcoding improves with 2 working together.
Now that you have completed the Install Plex Media Server on Raspberry Pi 2 guide you can configure Plex Media Server
Plex Raspberry Pi 2 Images
There is a ready made image for the Raspberry Pi 2 that are regularly updated, share the post to reveal the links. Update Plex by running sudo apt-get update && sudo apt-get upgrade -y.
If you cannot see the unlocker whitelist this site in AdBlock 😉
For the Plex Media Server image, login with root, password htpcguides and use raspi-config to expand the file system, it does not include WiFi drivers yet but you can install them
apt-get install firmware-linux-nonfree -yEnjoy Plex on your Raspberry Pi 2 🙂