 Static IPs on the internet usually cost extra from your ISP. Many of us have dynamic IPs which change every so often. This can be annoying if you want remote access to our Raspberry Pi our home media servers. Dynamic DNS solves this by automatically registering your new IP address with a domain like crabdance.com.
I have tried several free dynamic DNS providers over the years. They have been increasingly getting annoying to manage because they nag your free account to log in once a month to reactivate their account. Fortunately, freedns.afraid.org have a completely nag free gratis dyndns service and it is very easy to setup for your Raspberry Pi home media server. If you have a separate HTPC that you don't leave on all the time then using the low powered Raspberry Pi to keep your dynamic DNS address updated without increasing your electricity bill significantly.
If you are trying to figure out which hardware would work best for you, consider reading the Pi benchmarks.
| Pi Unit | ||||||||
|---|---|---|---|---|---|---|---|---|
| Raspberry Pi 3 | Quad Core |
|||||||
| Raspberry Pi 2 | Quad Core |
|||||||
| Raspberry Pi | Single Core |
|||||||
| Banana Pi | Dual Core |
|||||||
| Banana Pi Pro | Dual Core |
Nag Free Dynamic DNS on Raspberry Pi
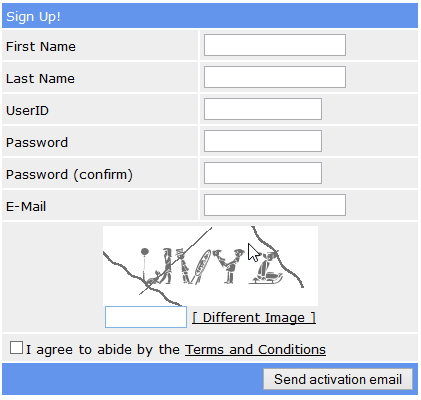
Sign up for a free account first
All you have to do is go sign up a free account at freedns.afraid.org
Create your free account and remember to click the activation link in your email.
Now log in to your new free account and choose a domain
Click subdomains on the left
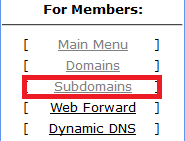
Then click Add subdomain
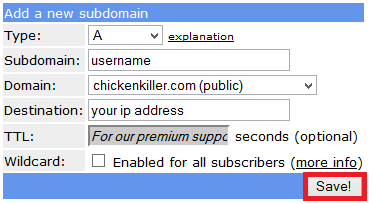
![]()
Choose your desired username, select a free domain and click Save
Your new Dynamic DNS address will be username.chickenkiller.com, there are other domains available like crabdance.com
Free Dynamic DNS Raspberry Pi Client
You will need your Direct URL from the Free Dynamic DNS account you just created.
Log in to your account at afraid.freedns.org and click Dynamic dns on the left pane. Scroll down and you will see a Direct URL hyperlink. The link looks something like this http://freedns.afraid.org/dynamic/update.php?HTPCGuidesSecretKey.
Right click and copy the URL of the Direct Link. You can paste this somewhere safe now or you can leave the window open and switch back to it. You will need this Direct URL shortly.
We will create a cronjob to run every 5 minutes and update your free dynamic DNS with your current IP address
Paste the code below but replace the URL http://freedns.afraid.org/dynamic/update.php?HTPCGuides with your direct link URL you copied to the clipboard.
crontab -l | { cat; echo "*/5 * * * * curl http://freedns.afraid.org/dynamic/update.php?HTPCGuides"; } | crontab -You will get a message that looks like an error but it isn't so don't worry.
no crontab for piTo verify that the command before added the cronjob you can list the cron jobs to make sure the freedns job is there
crontab -lIt should show
*/5 * * * * curl http://freedns.afraid.org/dynamic/update.php?HTPCGuides
Restart the cron service
sudo service cron restartI tested this several times and it is consistent, you can change the update interval by changing the */5 to */20 for every 20 minutes or whatever interval you choose.
If you are using the Raspberry Pi as a media server now you can access all of its services and programs from outside your home network. You will need to set up port forwarding of course.