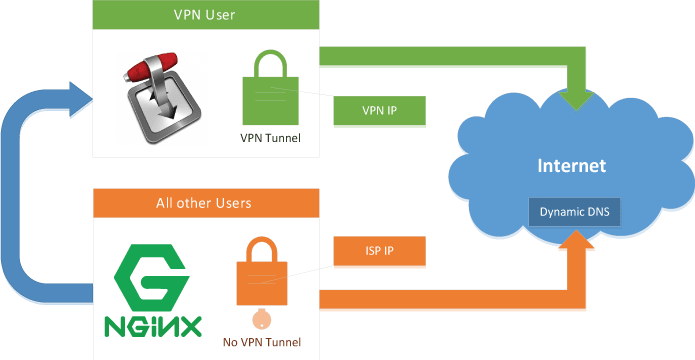
 Install Transmission BitTorrent Client for VPN Split Tunneling on Ubuntu 14.x. I highly recommend to run your BitTorrent client over VPN to protect your online privacy. My favorite way to do this is by using VPN Split Tunnel where only Transmission's traffic will be routed over VPN connection and you will retain your direct connection to Internet for all the other users. This method also implements the Automatic Kill Switch option and prevents possible DNS leaks. To access Transmission you need nginx Reverse Proxy (even on local network).
| VPN Service | ||||
|---|---|---|---|---|
| Private Internet Access | ($3.33 / month) |
|||
| Pure VPN | ($4.91 / month) |
|||
| IPVanish | ($6.41 / month) |
Configure Transmission for VPN Split Tunnel on Ubuntu 14.x
Part 1 is to complete the guide Force Torrent Traffic through VPN Split Tunnel on Ubuntu 14.x. If you have already configured Split Tunnel, then you can continue with this Part 2 guide to configure Transmission to use the VPN split tunnel. It is important that you have a working Split Tunnel on your server before you can proceed with configuring Transmission for VPN Split Tunneling, otherwise it will not work!
Installation Overview
- Install Transmission
- Configure Transmission to use the VPN split tunnel
- Verify Transmission is using the VPN
- Configure the nginx reverse proxy to keep remote access of Transmission
Install Transmission BitTorrent Client Ubuntu 14.x
After configuring the VPN Split Tunnel in Part 1, we need to install Transmission and configure it to run as the vpn user so that only the Transmission torrent traffic goes through the VPN connection.
Add the Transmission Ubuntu repository and update packages
echo "deb http://ppa.launchpad.net/transmissionbt/ppa/ubuntu trusty main" | sudo tee -a /etc/apt/sources.list.d/transmission-bt.list
echo "deb-src http://ppa.launchpad.net/transmissionbt/ppa/ubuntu trusty main" | sudo tee -a /etc/apt/sources.list.d/transmission-bt.list
sudo apt-key adv --keyserver hkp://keyserver.ubuntu.com:80 --recv-keys 365C5CA1
sudo apt-get update
sudo apt-get install transmission-daemon -y
Stop the Transmission service
sudo service transmission-daemon stopCreate the Upstart Script that will start Transmission on system start as vpn user
sudo nano /etc/init/transmission-daemon.confCopy and paste the Transmission upstart script, notice the setuid and setgid lines specify the vpn user
description "Bittorrent downloader"

start on filesystem and static-network-up
# Transmission needs to notify peers before it dips
stop on runlevel [016] or unmounting-filesystem or deconfiguring-networking

# Play with this for a lower cpu priority
#nice 10

setuid vpn
setgid vpn


exec /usr/bin/transmission-daemon -f --config-dir /var/lib/transmission-daemon/info
Ctrl+X, Y and Enter to Save.
Configure Transmission for VPN Split Tunnel
Since we are going to run Transmission as vpn user, we need to change the ownership of the Transmission configuration files
sudo chown -R vpn:vpn /etc/transmission-daemon/
sudo chown -R vpn:vpn /var/lib/transmission-daemon/
Give the Transmission settings file write and execute permissions for the vpn user and group.
sudo chmod -R 775 /etc/transmission-daemon/
sudo chmod -R 775 /var/lib/transmission-daemon/
Before we proceed, it is recommended to create a download folder for your torrents and set the required permissions. In this example we will create a folder Downloads in the regular user's home directory, in our case it is htpcguides. Of course, you should modify the path to fit your setup replacing htpcguides with your username.
Create the download folder if it doesn't already exist
mkdir /home/htpcguides/DownloadNow set the permissions of your download folders
sudo chown -R vpn:vpn /home/htpcguides/Download
sudo chmod -R 775 /home/htpcguides/Download
The rpc-whitelist specifies which IP addresses may access the Web interface. We are going to use an nginx reverse proxy to retain remote access to the Transmission web interface. With this method it is sufficient to limit access to the localhost only – the default value. This will work just fine as long as Transmission and nginx are running on the same server.
Open up the Transmission configuration file for editing
sudo nano /etc/transmission-daemon/settings.jsonChange the remote access username and password to your liking
"rpc-password": "password",
"rpc-username": "username",
Change the download directory to where you want to store your torrent downloads. By default it is /var/lib/transmission-daemon/downloads/ but if you created a new directory like described few lines before, make sure you enter that path.
"download-dir": "/home/htpcguides/Download",Set umask to 002 to avoid permission issues, these are equal to 775
"umask": 002,Ctrl+X, Y and enter to save and restart Transmission
sudo service transmission-daemon restartConfigure Transmission Remote Access with nginx Reverse Proxy
At this point you should have a fully working VPN with Split Tunneling and a running Transmission client tunneled over the VPN connection. To access Transmission Web UI with a split tunnel you need to create a reverse proxy.
The following part will show you how to configure nginx reverse proxy in less than five minutes. Note this configuration uses plain, unencrypted http connection for nginx. If you plan to access Transmission from outside of your local network you should consider to configure nginx with a secure SSL certificate using our guide Secure nginx Reverse Proxy with Let’s Encrypt, or alternatively you can configure with a self-signed certificate following the guide Enforce SSL for Secure nginx Reverse Proxy Linux (now that Let's Encrypt provides free valid certificates, I strongly recommend to use it).
Install nginx
sudo apt-get install nginx -yCreate a new nginx site
sudo nano /etc/nginx/sites-available/reverseAdd these lines, adjust your dynamic DNS address (mine is htpcguides.crabdance.com) and local IP address (mine is 192.168.40.100). If you changed your default Transmission port change 127.0.0.1:9091 to reflect your port. If you already have a reverse proxy virtual host configured then you only need to add the blue section.
Note that the red curly bracket closes the server block so if you add more reverse proxies you will have to do so before the second curly bracket.
server {
listen 80;
server_name htpcguides.crabdance.com, 192.168.40.100;

location /transmission {
    proxy_pass http://127.0.0.1:9091;
    proxy_set_header Host $host;
    proxy_set_header X-Real-IP $remote_addr;
    proxy_set_header X-Forwarded-For $proxy_add_x_forwarded_for;
  }
}
Ctrl+X, Y and Enter to Save and exit
Disable the default nginx site
sudo unlink /etc/nginx/sites-enabled/defaultEnable the reverse proxy site with Transmission enabled
sudo ln -s /etc/nginx/sites-available/reverse /etc/nginx/sites-enabled/reverseRestart the nginx service
sudo service nginx restartRestart the transmission-daemon
sudo service transmission-daemon restartYou can now access Transmission using the reverse proxy at http://ip.address/transmission or using your dynamic DNS address http://yourdns.address/transmission (Remember, you can access Transmission only through reverse proxy)
To access it outside the home network you will need to forward port 80 in your router to the machine hosting nginx. You can use the local IP address from within your home network, but when accessing it outside the home network you need to use the dynamic DNS address.
Recommended Transmission Settings for Maximum Security
In order to make sure that none of the services included in Transmission are going to leak your IP address, I recommend to set the following settings. These recommendations are based on many discussions on different forums.
In Transmission Web UI go to Settings and Peer tab.
Set Encryption mode to Require encryption, and uncheck PEX, DHT and LPD
![]()
In the Network tab, the Peer listening port is closed, which will limit the number of available peers you can connect to, but opening the port over VPN is not recommended as it greatly reduces security. Many VPN providers offer port forwarding like PIA do, but it requires additional configuration and is not considered safe it terms of security.
Make sure Enable uTP for peer communication is disabled.

Confirm Transmission is Using VPN Split Tunnel
We want to make sure that Transmission is using the VPN tunnel. A great way to do this is to download a torrent file from TorGuard. They have a great service called Check My Torrent IP Address. To download the torrent file click on

Alternatively, you can Save Link Location in Firefox or Copy link address in Chrome and copy directly into Transmission's enter URL field.
Note: the “Tracker returned an error message” is normal. The important part is the IP address at the end of the line. It should be the VPN server's IP address.

You can copy the IP address and check with IP Tracker. Just paste the IP address and the result should show you the location. Make sure it matches the VPN server's location you use (in our case it is Sweden).
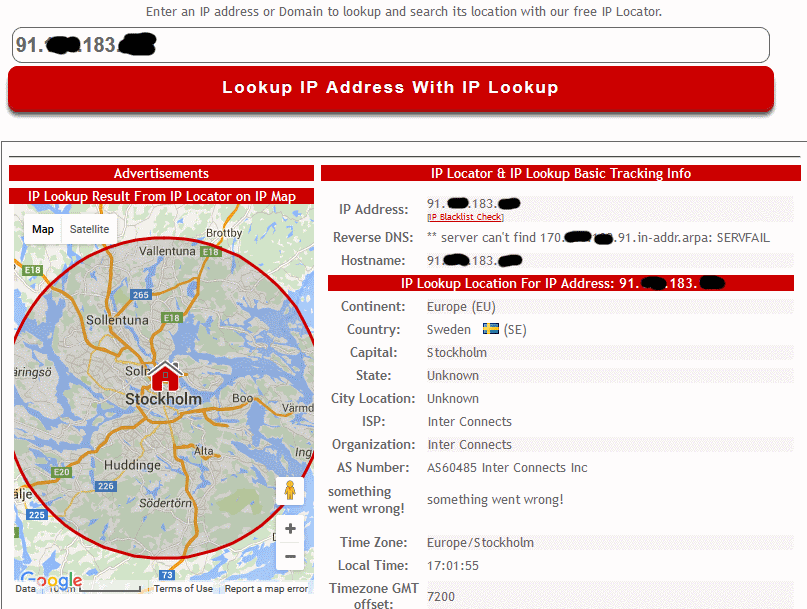
If the IP Lookup matches the VPN server's location, you successfully configured Transmission for VPN Split Tunneling.
Resolve Permission Issues
In Part 1 the VPN Split Tunnel guide we recommended to add your regular user to the vpn group, and to add vpn user to your regular user's group. It is important to avoid any permission related issues with the downloaded torrents. We configured Transmission's permissions for downloaded torrents to be fully accessible (read, write, execute) by vpn user and members of the vpn group.
If you use automation software like Sonarr or CouchPotato, the user who is running these services should be added to the vpn group. If you run the automation software as your regular user then you should not need to make any further changes to permissions beyond what you did in Part 1.
sudo usermod -aG vpn user-running-automation