![]() Varnish speeds up your WordPress site significantly. It acts as a reverse proxy and will cache all of your pages as HTML and serve them up quickly, bypassing the slow PHP backend (Apache or nginx). Traditionally plugins like W3 Total Cache and Varnish HTTP Purge empty single pages or the entire cache which leaves your website very slow while new users visit your web site and Varnish repopulates its cache. With this WordPress Varnish cache method you will always be serving up fast Varnish cached versions of your WordPress pages by warming up the Varnish cache.
Varnish speeds up your WordPress site significantly. It acts as a reverse proxy and will cache all of your pages as HTML and serve them up quickly, bypassing the slow PHP backend (Apache or nginx). Traditionally plugins like W3 Total Cache and Varnish HTTP Purge empty single pages or the entire cache which leaves your website very slow while new users visit your web site and Varnish repopulates its cache. With this WordPress Varnish cache method you will always be serving up fast Varnish cached versions of your WordPress pages by warming up the Varnish cache.![]()
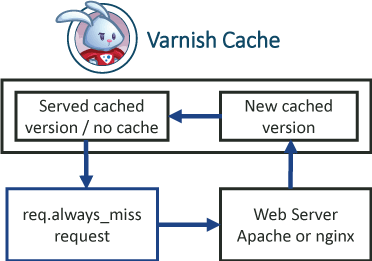
As a bonus, Varnish has a clever feature: using hash_always_miss lets Varnish continue to serve its cached version and only replaces it with an updated cached version when we send a hash_always_miss no-cache request using some bash scripts. This means you can slowly refill the Varnish cache instead of purging it all at once and being stuck with slow pages as new users request the uncached versions from Apache or nginx. I will assume you have access to your WordPress web server (like with Digital Ocean) to install packages and edit files. You also should have XML sitemaps enabled, Yoast SEO does this and is what I use. It works on Varnish 3 and 4 for caching WordPress posts, pages and categories. I use Debian and Ubuntu but this method works on all Linux operating systems, you may have to change a few small things though if you are using CentOS, Fedora or other distros.
Note: If you use CloudFlare then you need to use another similar method, the guide will be published so wait for that, there will be separate guides for Varnish 3 (now live) and Varnish 4 (now live).
I have a WordPress plugin which automates this, use the contact form to help test it and get a free copy
| VPS Provider | |||||
|---|---|---|---|---|---|
| Vultr | |||||
| Digital Ocean | |||||
| HostUS |
Varnish gives you the fastest load times that a regular WordPress PHP backend alone has difficulty competing with a VPS like Digital Ocean ($5 a month). Bear in mind this site would take over 3 seconds to load because I have way too many plugins (40+).

Warm up and Refresh WordPress Varnish Cache
I will assume you already have Varnish installed and configured to work with WordPress. These scripts have dual functionality, they warm up the cache and refresh old versions making it perfect for always serving fast cached versions. The WordPress Varnish cache scripts I include warm up the Varnish cache for your posts, single pages and categories.
Just to summarize the benefits of this approach:
- Never purge Varnish cache but always serve new content
- Scripts will warm up a single post, a list of posts or all of your posts to fill the Varnish cache
- Always serve Varnish cached pages for your posts, pages and categories
- Largely avoid slow PHP backend for your visitors
- Replace cached versions of your posts, pages and categories while still serving the slightly older Varnish cached version
- Script to automatically refresh your Varnish cache for your entire site (includes posts, pages, categories)
- Script to manually refresh your Varnish cache with a selection of posts, categories or pages
- Script to manually refresh your Varnish cache for a specific post, page or category
This is how the script works with the req hash_always_miss feature of Varnish to warm up the cache and refresh (replacing old cached version) with a new cached version that it grabs from the Web server (Apache or nginx)
You will need curl installed for the scripts
sudo apt-get install curl -yConfiguring Varnish for Smart Purging
Open your Varnish vcl file, usually default.vcl
sudo nano /etc/varnish/default.vclAdd an access control list (acl) for editors, this is for security so that other machines cannot force refreshes on your page. Add it after the backend section but before the sub vcl_recv section. Change IP.of.Server to the IP of the server that will run the script to refresh pages, I am just using the same VPS that runs the web server and Varnish. This section is important as it adds a layer of security so that only you control when these hash_always_miss requests are sent.
acl editors {
  "127.0.0.1";
  "IP.of.Server";
}
Adjust your VCL file to include hash_always_miss in your sub vcl_recv section, you only need to add the red section. It looks for the header Cache-Control with no-cache (which we will send later using curl) and whether the sender is a member of the editors acl.
sub vcl_recv {
    if (req.http.Cache-Control ~ "no-cache" && client.ip ~ editors) {
         set req.hash_always_miss = true;
    }
}
I have also set my Varnish time to live (ttl) – how long Varnish should keep cached version of the page – to 1 year in the sub vcl_fetch function. Since I will be refreshing the Varnish cache daily this shouldn't be a problem.
set beresp.ttl = 52w;Test your adjusted Varnish default.vcl works
varnishd -C -f /etc/varnish/default.vclIf you didn't get any errors reload your Varnish configuration
sudo service varnish reloadManual Varnish Smart Purge for Single URL
Make sure you have curl installed
sudo apt-get install curl -yCreate a new script that will send the always miss request for a URL you paste into the script when prompted
nano smartvarnishrefreshsingle.shPaste this code which sends a curl request with a no-cache header for a specific URL
#!/usr/bin/env bash

# WordPress Varnish Cache Refresh from HTPCGuides.com

echo Enter full URL to purge
read url

echo Refreshing $url
curl -s $url -H "Cache-Control: no-cache" -o /dev/null
echo Refreshed $url
Ctrl+X, Y and Enter to save the script
Make the script executable
sudo chmod +x smartvarnishrefreshsingle.shRun the manual single Varnish purge script like this
bash smartvarnishrefreshsingle.shYou will see this output, just paste your URL and press Enter
Enter full URL to purgeNow that WordPress post or page has been intelligently refreshed using Varnish.
Automated Smart Varnish Refresh Script for Full Site
The automated smart Varnish cache refresher script requires xml2 and curl so install them
sudo apt-get install xml2 curl -yCreate the smartvarnishrefresh script
nano smartvarnishrefresh.shPaste this, adjust site to your site's URL. If you do not want to include pages or categories you can remove those lines. This script does assume your sitemaps are in this format: http://www.yourwebsite.com/post-sitemap.xml which Yoast SEO does automatically, other sitemap plugins may have the same filenames but check just in case.
#!/usr/bin/env bash
# WordPress Varnish Cache Refresh from HTPCGuides.com
site=https://www.htpcguides.com

#Download post sitemap
wget -q $site/post-sitemap.xml -O postsitemap.xml

#Parse the xml file and put it into posts.txt
xml2 < postsitemap.xml | grep /url/loc= | sed 's/.*=//' > posts.txt

# Loop through the posts.txt and use curl to send an always miss request

while read post; do
  echo Refreshing $post
  curl -s $post -H "Cache-Control: no-cache" -o /dev/null
  echo Refreshed $post
  echo Waiting
  sleep 10
done < posts.txt

#Download page sitemap
wget -q $site/page-sitemap.xml -O pagesitemap.xml

#Parse the xml file and put it into pages.txt
xml2 < pagesitemap.xml | grep /url/loc= | sed 's/.*=//' > pages.txt

# Loop through the pages.txt and use curl to send an always miss request

while read page; do
  echo Refreshing $page
  curl -s $page -H "Cache-Control: no-cache" -o /dev/null
  echo Refreshed $page
  echo Waiting
  sleep 10
done < pages.txt

#Download category sitemap
wget -q $site/category-sitemap.xml -O categorysitemap.xml

#Parse the xml file and put it into categories.txt
xml2 < categorysitemap.xml | grep /url/loc= | sed 's/.*=//' > categories.txt

# Loop through the categories.txt and use curl to send an always miss request

while read category; do
  echo Refreshing $category
  curl -s $category -H "Cache-Control: no-cache" -o /dev/null
  echo Refreshed $category
  echo Waiting
  sleep 30
done < categories.txt

# Warm up and refresh blogroll pages, change 30 to the number of pages back you show posts
for i in {1..30}
 do
 echo Refreshing $site/page/$i
 curl -s $site/page/$i/ -H "Cache-Control: no-cache" -o /dev/null
 echo Refreshed $site/page/$i
 echo Waiting
 sleep 1
done
Ctrl+X, Y and Enter to save the script
Make the script executable
sudo chmod +x smartvarnishrefresh.shRun the Varnish cache refresh script to test it, warning this will take a while if you have a lot of content. When you see the Waiting prompt you can Ctrl+C to interrupt the script
bash smartvarnishrefresh.shYou will see a lot of curl commands and Refreshed URL names, this will take a while depending on how many posts, pages and categories you have.
You can add a daily cronjob for refreshing the WordPress Varnish Cache which will run every day at midnight.
crontab -l | { cat; echo "@daily /path/to/smartvarnishrefresh.sh"; } | crontab -Manual Smart Varnish Refresh Multiple URLs
Gather URLs to Refresh
This method is for users who only want to refresh a specific set of pages.
Go to your sitemaps, you can use as many or as few as you want
- Posts – http://www.yourwebsite.com/post-sitemap.xml
- Pages – http://www.yourwebsite.com/page-sitemap.xml
- Categories – http://www.yourwebsite.com/post-category.xml
Highlight and copy the entire table to the clipboard
Go into Excel or any spreadsheet program and paste the data
Do a search or find and replace, make find your full URL http://www.yourwebsite.com and leave the replace blank
Highlight the whole column and copy it to the clipboard, you will paste it in the manual script below
Create the Manual Varnish Refresh Multiple URLs Script
You need curl
sudo apt-get install curl -yCreate the manual Varnish refresh script
sudo nano smartrefreshvarnishmultiple.shChange your site name and paste your WordPress URLs from the spreadsheet in the pages section to refresh them in the Varnish cache (adapted from here)
#!/usr/bin/env bash
site="https://www.htpcguides.com"
#Paste sites in pages below
pages="
/
/100-amazon-gift-card-giveaway-july-2015/
/40-amazon-gift-card-giveaway/
"

echo -----------------------------
echo Refresh old pages from cache
echo -----------------------------
for page in $pages; do
	echo Refreshing $site$page
	curl -s $site$page -H "Cache-Control: no-cache" -o /dev/null
        echo $site$page refreshed
	sleep 10
done
Ctrl+X, Y and Enter to save the script
Make the script executable
sudo chmod +x smartvarnishrefreshmultiple.shRun the script like this
bash smartvarnishrefreshmultiple.shYou now have three different scripts to refresh and warm up WordPress Varnish cache which will ensure you always serve super fast cached pages.
If a few pages or posts are regularly updated, use the manual Varnish script.
If you only update a single post, page or category that required some correcting, use the manual single refresh script.
If you have a recent posts or popular posts widget then use the automatic refresh script.