![]() Deluge is a great BitTorrent client thanks to its very powerful options and wide array of plugins. A nice feature of Deluge is that besides the excellent Web UI, you can control the Deluge daemon running on your home server using Deluge's UI. Think of it like this: you configure Deluge daemon on your home server by following our guide Install Deluge on Ubuntu Server 14.04 LTS, and instead of using the Web UI in browser to control your torrents, you install Deluge on your desktop PC or notebook running your favorite Linux distribution or Windows XP/Vista/7/8/8.1/10. It also works on Apple Mac OS X.
Deluge is a great BitTorrent client thanks to its very powerful options and wide array of plugins. A nice feature of Deluge is that besides the excellent Web UI, you can control the Deluge daemon running on your home server using Deluge's UI. Think of it like this: you configure Deluge daemon on your home server by following our guide Install Deluge on Ubuntu Server 14.04 LTS, and instead of using the Web UI in browser to control your torrents, you install Deluge on your desktop PC or notebook running your favorite Linux distribution or Windows XP/Vista/7/8/8.1/10. It also works on Apple Mac OS X.
![]()
| VPN Service | ||||
|---|---|---|---|---|
| Private Internet Access | ($3.33 / month) |
|||
| Pure VPN | ($4.91 / month) |
|||
| IPVanish | ($6.41 / month) |
Configure Deluge Daemon for ThinClient use
Install Deluge daemon following our guide Install Deluge on Ubuntu Server 14.04 LTS or Install and Configure Deluge VPN Split Tunneling Ubuntu 14.x. Once you have a working Deluge daemon that you can access over Deluge Web UI you can proceed with the ThinClient setup. First we need to create a username and password for the client that will access the daemon. We need to edit the authentication file of the daemon.
If you are using an Ubuntu Server version up to 14.04 LTS (that use upstart script), then stop Deluge with
sudo service deluged stopIf you are running a version of Ubuntu Server equal or higher then 15.04 (that use systemd), then stop Deluge with
sudo systemctl stop delugedThe auth file consists of a line with a username, a password, and the authentication level associated with the client. The authentication level is a work in progress feature in Deluge 1.3.3 and it doesn't do anything yet, but it will be activated in an upcoming version. We will set it to level 10, admin, which will give the client user full control over Deluge daemon.
- If you installed Deluge Daemon as deluge user, then proceed to Option 1.
- If you have installed Deluge Daemon with VPN Split Tunneling, then proceed to Option 2.
Option 1. Deluge Daemon Installed as deluge User
If you installed Deluge following our guide then you are running Deluge with user deluge.
Choose a username and password you will use to access Deluge daemon from the client, replace accordingly
sudo echo "username:password:10" >> /var/lib/deluge/.config/deluge/authNext step is to enable and allow remote connection for the Deluge daemon, open the core.conf file for editing
sudo nano /home/deluge/.config/deluge/core.confFind the line
"allow_remote": false,and change it to
"allow_remote": true,Hit Ctrl + X, Y to save and exit.
Now start the Deluge daemon service, on Ubuntu Server up to 14.04 LTS with
sudo service deluged starton Ubuntu Server starting from version 15.04 with
sudo systemctl start delugedOption 2. Deluge Daemon Installed as vpn User for Split Tunneling
If you installed Deluge daemon with VPN Split Tunnel by following our guide, then you are running Deluge daemon as vpn user.
Choose a username and password you will use to access Deluge daemon from the client, replace accordingly
sudo echo username:password >> /home/vpn/.config/deluge/authNext step is to enable and allow remote connection for the Deluge daemon
sudo nano /home/vpn/.config/deluge/core.confFind the line
"allow_remote": false,and change it to
"allow_remote": true,Hit Ctrl + X, Y to save and exit.
Now start the Deluge daemon service, on Ubuntu Server up to 14.04 LTS with
sudo service deluged startOn Ubuntu Server starting from version 15.04 with
sudo systemctl start delugedInstall Deluge on Windows and Configure ThinClient
We will install Deluge on Windows 10 (it is the same procedure for all the supported Windows versions). Download Deluge for Windows from Deluge's official site, select the latest version (at the moment of writing this guide it is version 1.3.12.1) and install. When ready, start Deluge.
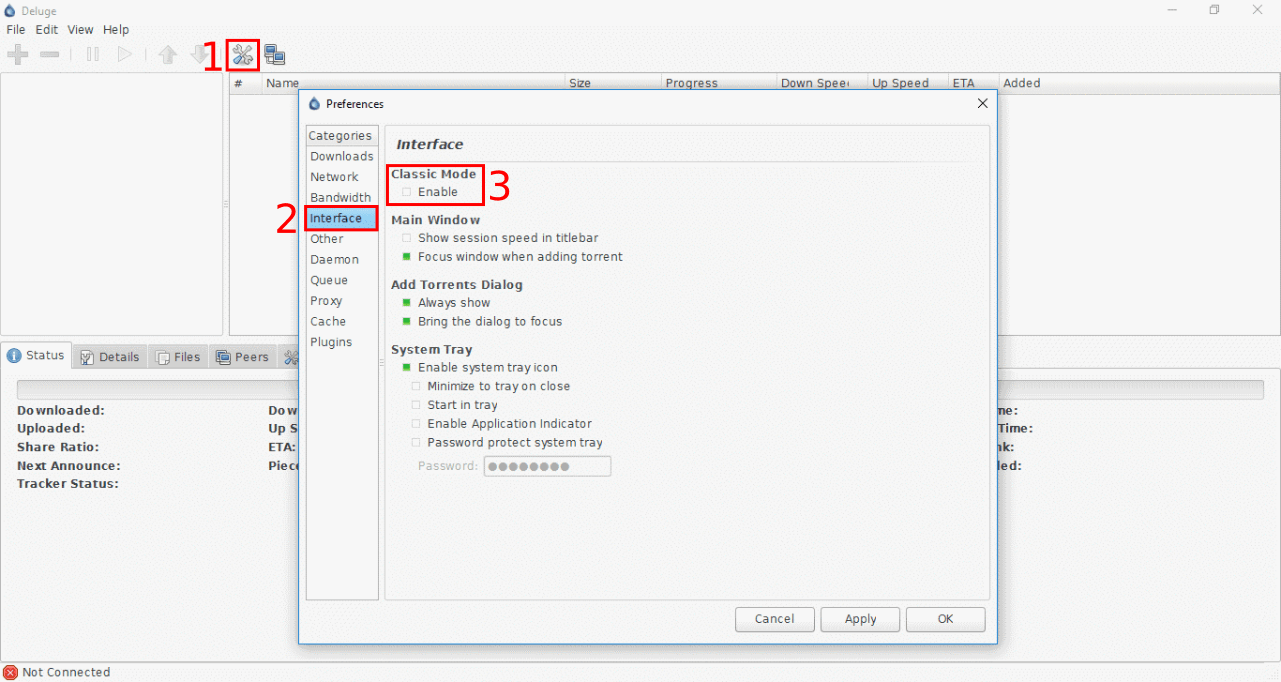
Click on Preferences (1), then Interface (2), and unselect Enable under Classic Mode (3), as in the screenshot. Click OK. Deluge will prompt you that you need to restart, click yes, and start Deluge again.
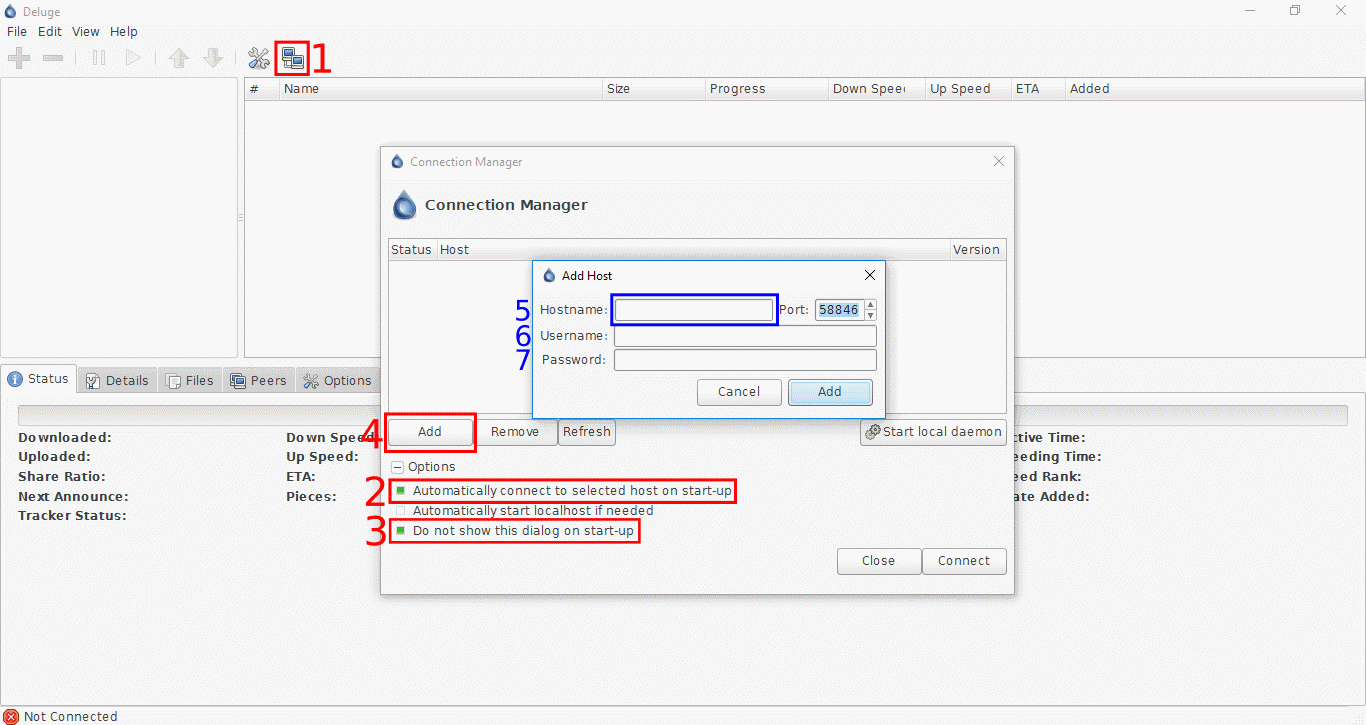
When Deluge starts, you should see the Connection Manager windows. If not, click on the icon (1). Make sure Automatically connect to selected host on start-up (2) and Do not show this dialog on start-up (3) are selected. This will make Deluge automatically connect to the configured Deluge daemon on each start and not prompt you to select which daemon to control each time you start Deluge on your client.
To add the host click Add (4) and under Hostname (5) enter the IP address of your server where Deluge daemon is running. You can use the DynamicDNS address if you want to be able to access Deluge daemon from you client outside of your local network. (If you want to make Deluge daemon accessible outside of your local network, you will need to forward port 58846 in your router. The connection between Deluge daemon and the ThinClien is encrypted!) Next, leave the Port as is, and enter the Username (6) and the Password (7) you selected for your client and added to the auth file. Click Add, and Connect.
Deluge is configured as a ThinClient. Compared to the Web UI, you have full control and access to all the features of Deluge, including all the plugins.