![]() Deluge is an excellent, powerful and very popular BitTorrent client. There is a constant debate which BitTorrent client should be used, and in most cases it really comes down to personal preferences. On Linux the three most popular choices are Transmission, Deluge and rTorrent (with ruTorrent interface). All three are excellent choices, I recommend to try them out and see for yourself which one you like the most. You can't go wrong with any of these three.
Deluge is an excellent, powerful and very popular BitTorrent client. There is a constant debate which BitTorrent client should be used, and in most cases it really comes down to personal preferences. On Linux the three most popular choices are Transmission, Deluge and rTorrent (with ruTorrent interface). All three are excellent choices, I recommend to try them out and see for yourself which one you like the most. You can't go wrong with any of these three.![]()
My client of choice is Deluge. I like the versatile plugins that Deluge offers, the excellent labeling options, powerful automation, but most of all the ThinClient mode. Of course, Deluge also has its own web-based GUI, which is very good if you would like to manage your torrents from browser. In this guide we install the Deluge daemon (server) and Deluge Web UI on Ubuntu Server 14.04 LTS and we will use upstart script.
| VPN Service | ||||
|---|---|---|---|---|
| Private Internet Access | ($3.33 / month) |
|||
| Pure VPN | ($4.91 / month) |
|||
| IPVanish | ($6.41 / month) |
Install Latest Deluge and Web UI on Ubuntu Server 14.04 LTS
Deluge is included in the official Ubuntu repository but it is quite outdated. The Deluge Team has its own PPA with the always up to date version. I strongly recommend installing Deluge using the official PPA.
Note: Raspberry Pi and similar devices should not use the ppa
Add the required PPA to your system
sudo add-apt-repository ppa:deluge-team/ppaUpdate the repository and install the Deluge Daemon (deluged) and the Deluge Web UI (deluge-web)
sudo apt-get update
sudo apt-get install deluged deluge-web -y
Create User and Group for Running Deluge
It is best practice to run your Torrent client as a limited user for security reasons. We will create a user and group called deluge and set the home directory to /var/lib/deluge
sudo adduser --system --group --home /var/lib/deluge delugeNext step is to add all your users to the group deluge to be able to manage and access files downloaded through Deluge. If you are using automation applications like Sonarr or CouchPotato, make sure you add the user who runs these services to the deluge group.
Replace username with the user you would like to add to the deluge group
sudo usermod -aG deluge usernameCreate Upstart Scripts for Deluge Daemon and Web UI
We need to make both Deluge daemon and Web UI autostart when the system boots. We use the set uid and set gid Upstart Script parameters so the Deluge user is running the daemon and Web UI. We make sure to restart on the service if Deluge crashes and logging is configured too.
Create the Upstart Scripts
The user who will run Deluge daemon is the deluge user we have just created, and Deluge log will be located at /var/log/deluge. We are using umask 007 value, this grants full access to the user and members of the group the Deluge daemon is running (in this case deluge) and prevents access from all other accounts.
Create the upstart script for Deluge daemon
sudo nano /etc/init/deluged.confCopy and paste the following
# deluged - Deluge daemon
#
# The daemon component of Deluge BitTorrent client. Deluge UI clients
# connect to this daemon via DelugeRPC protocol.

description "Deluge daemon"
author "Deluge Team"

start on filesystem and static-network-up
stop on runlevel [016]

respawn
respawn limit 5 30

env uid=deluge
env gid=deluge
env umask=007

exec start-stop-daemon -S -c $uid:$gid -k $umask -x /usr/bin/deluged -- -d -l /var/log/deluge/daemon.log -L warning
Hit Ctrl + X, Y to Save and Exit.
We will create a separate upstart script for Deluge Web UI too. By default, when the Deluge daemon is started/stopped, the Web UI is also started/stopped automatically, but with the separate upstart script you can control the Web UI independently form the Deluge daemon.
One more advantage is that you can run the Web UI as a different user and/or group as the Deluge daemon which comes very handy of you are using VPN Split Tunneling for torrents, and you still want to retain remote access to the Web UI without using nginx reverse proxy. Although, I strongly recommend to use an nginx reverse proxy with SSL and try to avoid opening ports on your router.
Create the upstart script for Deluge Web UI
sudo nano /etc/init/deluge-web.confCopy and paste the following
# deluge-web - Deluge Web UI
#
# The Web UI component of Deluge BitTorrent client, connects to deluged and
# provides a web application interface for users. Default url: http://localhost:8112

description "Deluge Web UI"
author "Deluge Team"

start on started deluged
stop on stopping deluged

respawn
respawn limit 5 30

env uid=deluge
env gid=deluge
env umask=027

exec start-stop-daemon -S -c $uid:$gid -k $umask -x /usr/bin/deluge-web -- -l /var/log/deluge/web.log -L warning
Hit Ctrl + X, Y to Save and Exit.
Configure Deluge Logging
Both Deluge daemon and Deluge Web UI logs will be located at /var/log/deluge. With the first line we create the required directory, with the second we take ownership of it the directory to user and group deluge, and with the third line we set the required permissions.
sudo mkdir -p /var/log/deluge
sudo chown -R deluge:deluge /var/log/deluge
sudo chmod -R 770 /var/log/deluge
Note: the chmod value 770 grants full access to the deluge user and members of the deluge group.
Finally, configure log rotation to properly maintain logs. Create the logrotate instance
sudo nano /etc/logrotate.d/delugeand insert the following
/var/log/deluge/*.log {
        rotate 4
        weekly
        missingok
        notifempty
        compress
        delaycompress
        sharedscripts
        postrotate
                initctl restart deluged >/dev/null 2>&1 || true
                initctl restart deluge-web >/dev/null 2>&1 || true
        endscript
}
Hit Ctrl + X, Y to save and exit.
Make Deluge Web UI Auto Connect to Deluge Daemon
When you start the Deluge Web UI, after entering the password (default password is deluge) it will always prompt you to select the Deluge daemon you would like to connect to. This is partly because you can have more Deluge daemons running so it allows you to select the specific Deluge daemon you would like to use. I assume that you are running one instance of Deluge daemon on your server, therefore it is preferred to configure auto connect.
Transdrone requires auto connect enabled to work. To set this, we need to start the Deluge daemon for a first time to let Deluge create the required configuration files which we set to the /var/lib/deluge/ directory.
sudo service deluged startThe configuration files are created, now we need to stop Deluge daemon to edit the web.conf file
sudo service deluged stopNow edit the newly created web.conf file
sudo nano /var/lib/deluge/.config/deluge/web.confFind the line
"default_daemon": "";and change it to the following
"default_daemon": "127.0.0.1:58846"Hit Ctrl + X, Y to save and exit.
Start Deluge daemon with
sudo service deluged start
From now on Deluge Web UI will automatically connect to the Deluge daemon.
Control Deluge Daemon and Deluge Web UI
Now you should have a fully working Deluge daemon and Deluge Web UI on your system. If you do a system restart both Deluge daemon and Web UI should start automatically. To manually start/stop Deluge services, you should use the following commands.
To start Deluge daemon
sudo service deluged startTo stop Deluge daemon
sudo service deluged stopYou can control the Web UI separately from the daemon.
Note: when the daemon is started/stopped, the Web UI is started/stopped automatically, but after the daemon starts you can stop the Web UI while leaving the daemon running.
To start Deluge Web UI
sudo service deluge-web startTo stop Deluge Web UI
sudo service deluge-web stopAccess Deluge Web UI and Change Password
Using your favorite browser, navigate to Deluge Web UI, replacing ip_address_of_the_server with the IP address of your server where Deluge daemon is installed
http://ip_address_of_the_server:8112
At the first login it will prompt you for the password, the default is deluge. Then it will offer you to change the password, I recommend to immediately set a new one.
If you have DynamicDNS configured and want to access Deluge Web UI from outside of your local network, you need to forward port 8112 in your router, and use your DynamicDNS address to connect
http://your_dynamicdns_address:8112
Set Download Directory and Permissions
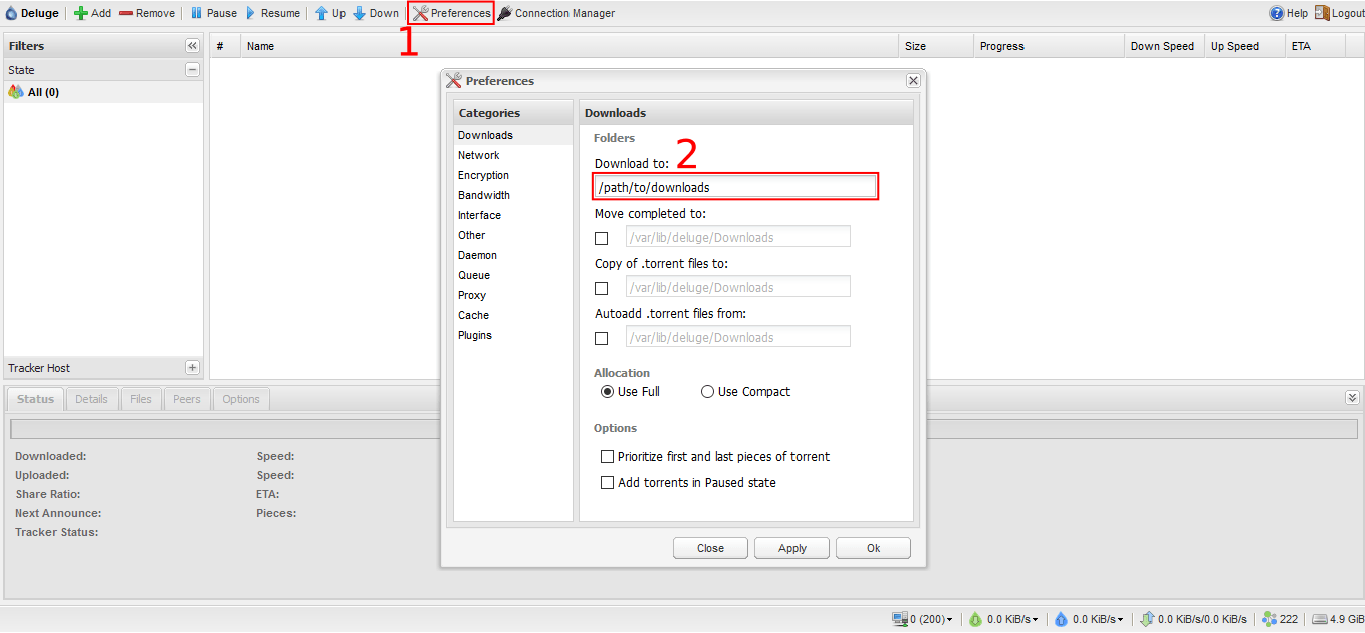
The next thing is to decide where do you want your files to be downloaded. I have all my downloads set to /home/USER/torrent/ folder. Create the folder, obviously you need to use your path where you will keep you downloads
mkdir /path/to/downloadsChange the permission of the folder to 770, which will grant user deluge and members of the deluge group full access to read, write and execute content, while other users will have no access to the content. Remember, we added our regular user to the deluge group, therefore it will have full access to downloads (if you need other users to have access, just add them to the deluge group).
sudo chmod -R 770 /path/to/downloadsNow in Deluge Web UI set the download path we just created.
Click on Preferences (1) and enter the /path/to/downloads in the Download to field (2), and click OK. Deluge will download into this folder.
You make the usual adjustments to Deluge according to your preferences, especially in the Bandwidth and Queue settings. Adjust to your liking and Internet connection speed.
Accessing Deluge Daemon in Different Ways
Deluge daemon can be accessed in multiple ways. In this guide we have covered the standard and conventional way, the Web UI using a browser, but there are other excellent ways to manage Deluge daemon. Let's go quickly through these options.
Access Deluge using Web UI
Using your browser you access the Deluge daemon running on your server. You can enable access from outside of your local network too by allowing remote access in configuration files and forwarding the default 8112 port in your router to your server (and setting up DynamicDNS on your router if you don't have a fix public IP address). Of course, you can use (and you should use) nginx Reverse Proxy instead of opening ports in your router. In this guide we have configured Deluge Web UI.
Access Deluge using ThinClient mode
It is possible to control the Deluge daemon with the Deluge's UI installed on your computer. Think about it like this: you have Deluge daemon running on your server (by completing this guide), you install Deluge on your laptop, enable the ThinClient mode and you connect to the Deluge daemon. Everything you do on your laptop in Deluge is basically done on your server. You have access to all the features implemented in Deluge, while using the Web UI you are limited for example to basic plugin control (many plugins don't even have a Web UI version).
External access outside of your local network is possible just as with the Web UI. Once you have configured Deluge daemon and Web UI by following this guide, you can proceed to the Deluge ThinClient guide and check if you prefer to use the ThinClient or the Web UI option (of course, when using ThinClient, you still retain the Web UI access). One of the reasons my favorite client is Deluge is exactly because of the ThinClient mode.
Smartphone Applications
It is possible to control Deluge daemon using an application on your smartphone/tablet, like Transdrone on Android. It is a really great app with many advanced options. Transdrone is so powerful that it can access your Deluge server even if you are using nginx reverse proxy with SSL and additional htpasswd authentication. Lately I find myself to use it more often then the other options, especially as almost all my downloads are automated with FlexGet, Sonarr and CouchPotato. We will cover Transdrone soon in a separate guide! Make sure to check it out as it really makes managing downloads easy and convenient from your smartphone.
Conclusion
Now that you (hopefully) have Deluge up and running, you should get yourself familiar with the Deluge interface and options. We will return with more guides that will cover excellent Deluge plugins, so stay tuned for more great stuff from HTPC Guides. At the end, I recommend to think about the security and privacy when using torrents: it is advised to use torrent clients through a VPN connection to protect your privacy.