 Nginx is one of the most popular web servers around. It is already the web server of choice for millions of people and companies around the world. Here at HTPC Guides we are mostly interested in its excellent reverse proxy capabilities that we use for BitTorrent clients like Deluge and Transmission, and automation tools like Sonarr, CouchPotato and SickRage. It also works perfectly with ownCloud to create your own private cloud server.
Each web server can operate on insecure, unencrypted http protocol: all the information between the server and the client is sent unencrypted, it can be easily intercepted by third party. Nginx can be configured to accept connection only through a secure https connection that requires TLS/SSL certificates.
Thanks to the great work done at Let's Encrypt, we can now have valid signed certificates for free! We can harden the nginx SSL configuration options to get a secure home web server running a reverse proxy. In this guide, we will show you how to configure nginx with Let' Encrypt, and how to secure your nginx web server & reverse proxy. This guide is written for and tested on Ubuntu Server 16.04 LTS. It might work on other Linux distributions too, but it is possible that some additional packages are required.
| VPN Service | ||||
|---|---|---|---|---|
| Private Internet Access | ($3.33 / month) |
|||
| Pure VPN | ($4.91 / month) |
|||
| IPVanish | ($6.41 / month) |
Secure nginx Reverse Proxy with Let's Encrypt on Ubuntu 16.04 LTS
In this guide we will cover the configuration of nginx with SSL certificate focusing on the reverse proxy functionality of nginx. At HTPC Guides we use mainly nginx as a reverse proxy for services like Transmission, Deluge, Sonarr, CouchPotato, therefore the provided nginx configuration will follow the structure of the guides available at HTPC Guides. I will outline the guide in the following points:
- Configure Dynamic DNS with Second Level Domain (using already published guides)
- Install nginx and configure the default server
- Install Let's Encrypt to obtain your free SSL certificate, and configure auto renewal
- Modify the nginx configuration so that unencrypted http requests are automatically redirected to encrypted https.
- Configure a strong SSL configuration that will get at least an “A” overall Rating on the Quallys SSL Labs Server Test
- Include the required reverse proxy configuration blocks for the services covered by our guides. You will need only to uncomment the blocks you wish to enable, simple as that!
Configure Dynamic DNS
When using a reverse proxy you will need a domain name that resolves to your home IP address. One way is to have a static public IP address assigned to you by your ISP and have a domain name associated with your static public IP address. For home use this is rare, most ISP's charge you extra for this, and unless you really need a static IP address from your ISP, there is no need to pay for it.
Most likely you have a dynamically assigned public IP address, therefore you will need to use a Dynamic DNS service that will always update and associate your current public IP address with the free subdomain for your server. There are great free Dynamic DNS services available like AfraidDNS, FreeDNS or DNSExit.
I strongly recommend to configure Dynamic DNS on your router! For Asus routers you can take a look at our guide Use Afraid Custom Dynamic DNS on Asus Routers. To configure any router with DD-WRT firmware, take a look at the DD-WRT Dynamic DNS page or the guide on FreeDNS here.
Alternatively you can configure Dynamic DNS on your Linux server by following our guide Nag Free Dynamic DNS on Raspberry Pi. Again, I strongly recommend to configure the Dynamic DNS on the router and not on the server.
The free Dynamic DNS providers also offer you a free subdomain (Second Level Domain), which is excellent for our purposes. Using their free service, your Second Level Domain will always be associated with your public IP address, and you don't need to buy a Top-Level Domain (although you can get a Top-Level Domain name for a reasonable price if you want a domain name like mydomainname.com).
Install nginx
This guide assumes that you don't have nginx installed on your system. If you have, make sure you do a backup of your nginx configuration files before you proceed with this guide! Of course, if you know what you are doing, feel free to integrate the below steps to your existing nginx configuration.
Update repository and install nginx
sudo apt-get update
sudo apt-get install nginx -y
Disable the default nginx site
sudo unlink /etc/nginx/sites-enabled/defaultCreate a new nginx site that will be your main configuration that includes the default server block (you can have only one default server block with nginx). We will call it reverse as it will be used (mainly) for reverse proxy
sudo nano /etc/nginx/sites-available/reverseAdd these lines, adjust your Dynamic DNS address (mine is htpcguides.crabdance.com) and local IP address (mine is 192.168.40.100). Remember, you need to have ports 80 and 443 forwarded to your server in your router. This is a temporary minimal nginx configuration that we need to obtain the Let's Encrypt certificates, it will be expanded later. Copy and paste the following
server {

        listen 80 default_server;
        listen [::]:80 default_server;

        server_name htpcguides.crabdance.com 192.168.40.100;
        root /var/www/html;
        index index.html index.htm index.nginx-debian.html;

        location ~ /.well-known {
                allow all;
        }
}
Hit Ctrl+X, Y to save and exit.
Enable the newly created reverse configuration
sudo ln -s /etc/nginx/sites-available/reverse /etc/nginx/sites-enabled/reverseTest nginx configuration
sudo nginx -tIf no errors were returned, then restart nginx
sudo systemctl restart nginxNow we have the required minimum nginx configuration to proceed with obtaining the certificates.
Install and Configure Let's Encrypt Client
“Let’s Encrypt is a free, automated, and open certificate authority (CA), run for the public’s benefit. Let’s Encrypt is a service provided by the Internet Security Research Group (ISRG)“.
Before Let's Encrypt, if you wanted to use a TLS/SSL certificate to encrypt your site, you either had to pay for it or to create a self-signed certificate. A one website SSL Certificate would costs you around $70-100/year, not so cheap. A self-signed certificate is free, but since the SSL certificate is not from a Certified Authority you will get warnings that the SSL certificate is not trusted (however, there is no reason not to trust a certificate that you have created yourself). Thanks to Let's Encrypt, we can now get a valid TLS/SSL certificate signed by a Certified Authority for free e! This is really great news: let's make the web a safer place by using the free SSL certificates!
Important: Let’s Encrypt provides rate limits to ensure fair usage by as many people as possible. These limits are changing, you can find the latest limits at this link. In practice this might result that the free Second Level Domain you use as your dynamic DNS address has already reached the weekly rate limit, and you will not be able to request the certificate. This should be not common, however, if you encounter a rate limit, you either have to wait until the next week (rates are on per weekly basis) or you can try to choose a new domain name.
To install the Certbot software needed to get the Let's Encrypt certificates we need to clone it from the official GitHub repository (don't use the version in the Ubuntu repository, as it is heavily outdated). Update the repository and install git
sudo apt-get update
sudo apt-get install git -y
Now clone Certbot into the /opt location
sudo git clone https://github.com/certbot/certbot /opt/certbotWe will use the Webroot plugin to obtain the certificates since the plugin for nginx is still experimental. The Webroot plugin will place a special file in the /.well-known directory of your document root, and this will be accessed through nginx by Certbot for validation. This is exactly what we created few lines above in the Install and Configure nginx section which just contains a simple configuration that has access to the /.well-known directory.
Next we will run Certbot to request the certificate. Make sure you replace the Dynamic DNS address marked with red with yours!
Go to the certbot folder
cd /opt/certbotand run the following command (as already noted, make sure you replace the Dynamic DNS address to match yours, mine is htpcguides.crabdance.com)
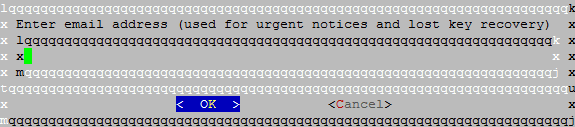
./certbot-auto certonly -a webroot --webroot-path=/var/www/html -d htpcguides.crabdance.comFirst you will be prompted to enter your email address. Make sure you use a valid address here, since that will be used for notices and lost key recovery
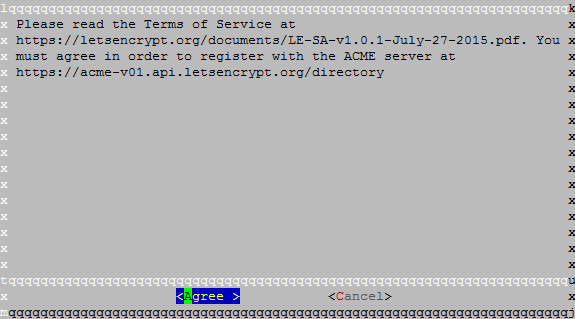
Next prompt will be the Let's Encrypt Subscribe Agreement. Read it if you feel like, but obviously you must select Agree to proceed
Certbot will create the required Let's Encrypt certificates, and the final output should look like this
IMPORTANT NOTES:
- Congratulations! Your certificate and chain have been saved at
/etc/letsencrypt/live/htpcguides.crabdance.com/fullchain.pem.
Your cert will expire on 2016-10-28. To obtain a new or tweaked
version of this certificate in the future, simply run
letsencrypt-auto again. To non-interactively renew *all* of your
certificates, run "letsencrypt-auto renew"
- If you like Certbot, please consider supporting our work by:

Donating to ISRG / Let's Encrypt: https://letsencrypt.org/donate
Donating to EFF: https://eff.org/donate-le
Your PEM-encoded files are created and stored at the /etc/letsencrypt/archive location:
- cert.pem: Your domain's certificate
- chain.pem: The Let's Encrypt chain certificate
- fullchain.pem: cert.pem and chain.pem combined
- privkey.pem: Your certificate's private key
Certbot creates symbolic links to the most recent version of the above files in the /etc/letsencrypt/live/htpcguides.crabdance.com directory, this way the links will always point to the most recent certificate files.
Create Diffie-Hellman group
Next step is to create a strong Diffie-Hellman group that will add a further level of security. It will improve the security of our nginx web server a lot. You can read more about the Diffie-Hellman group at this link. The default RSA key size of 2048 bit that Lets's Encrypt uses is perfectly enough for our home web server, therefore we will create a 2048 bit DH key. CertSimple has a nice article about key sizes, if you are interested.
Be aware, creating a DH key could take a while (depends on your hardware too), so be patient while the DH key is created. Run the following
sudo openssl dhparam -out /etc/ssl/certs/dhparam.pem 2048When done, we have all the required certificates and keys needed.
Configure nginx with Let's Encrypt
At this point we have all the required certificates, it's time to use them and implement the strong encryption setting.
We will do the following:
- Set up password authentication for web server.
- Create a snippet that will contain the recommended settings to make nginx much more secure.
- Configure nginx to accept only encrypted https connection (plain, unencrypted http will be automatically redirected to https).
- Configure nginx to use the Let's Encrypt certificates we obtained for our site.
- Add the reverse proxy settings to the configuration for the services we use at HTPC Guides. You can select which of these you want to use.
- Set up auto renewal of Let's Encrypt certificates using cron job
Set Up Password Authentication for Nginx
I recommend to protect your nginx web server (reverse proxy) with a strong password. After all, the content on the site is strictly for you and nobody should have access to it (unless you allow somebody, of course). We will use a .htpasswd file, and there are several ways to create it. You can use an online htpasswd generator, but since it is very easy to create the password file on your own server using either OpenSSL or Apache Utilities, I would recommend to do it on your server. I suggest to use Apache Utilities (it will not install Apache on your server, don't worry, just a set of useful utilities):
sudo apt-get update
sudo apt-get install apache2-utils -y
Now we can use the htpasswd utility to create the .htpasswd file, and add our username and password. You will need to enter this username and password when you try to access you web server or reverse proxy. Replace username with the username of your choice
sudo htpasswd -c /etc/nginx/.htpasswd usernameNext you need to enter and confirm your password. Make sure to use a long and secure password! You can always use a password generator or a password manager service like LastPass to create secure and unique passwords.
OPTIONAL: If you wish to add more username and password combinations to the existing .htpasswd file, you need to run htpasswd without the -c option
sudo htpasswd /etc/nginx/.htpasswd username2Configure nginx with Strong SSL Security
Next step is to create a configuration file in the nginx snippets directory. This file will contain all the security options we would like to use to make nginx more secure. In the nginx reverse configuration file we can include these settings with a single line. These are quite advanced settings, the detailed explanation is out of scope of this guide. You can read an excellent and detailed description at Remy van Elst‘s site, who put together these recommended settings (thank you Remy for the great work!).
Create the stong-ssl.conf file
sudo nano /etc/nginx/snippets/strong-ssl.confAnd insert the following:
# By Remy van Elst -- https://raymii.org/s/tutorials/Strong_SSL_Security_On_nginx.html
# Modified version by HTPC Guides -- https://www.htpcguides.com

ssl_protocols TLSv1 TLSv1.1 TLSv1.2;
ssl_prefer_server_ciphers on;
ssl_ciphers "EECDH+AESGCM:EDH+AESGCM:AES256+EECDH:AES256+EDH";
ssl_ecdh_curve secp384r1;
ssl_session_cache shared:SSL:10m;
ssl_session_tickets off;
ssl_stapling on;
ssl_stapling_verify on;

# Set Google's public DNS servers as upstream resolver
resolver 8.8.8.8 8.8.4.4 valid=300s;
resolver_timeout 5s;

add_header Strict-Transport-Security "max-age=63072000; includeSubdomains" always;

# Modify X-Frame-Option from DENY to SAMEORIGIN, required for Deluge Web UI, ownCloud, etc.
add_header X-Frame-Options SAMEORIGIN;

add_header X-Content-Type-Options nosniff;

# Use the 2048 bit DH key
ssl_dhparam /etc/ssl/certs/dhparam.pem;
Hit Ctrl + X. Y to save and exit.
Create the SSL nginx Server Block
Next step is to edit the reverse virtual host configuration file we created at the beginning of the guide. This is where we put all the bits and pieces together. This configuration file will do the following:
- Redirect insecure http traffic to secure https
- Include the Let's Encrypt certificates
- Include the strong-ssl.conf snippet
- Include the reverse proxy settings for the service we use at HTPC Guides; you can select which of these you wish to enable
Edit the reverse configuration file
sudo nano /etc/nginx/sites-available/reverseand delete the lines marked with red, and add the line marked with blue (in Nano you can delete a whole line with Ctrl+K)
server {

        listen 80 default_server;
        listen [::]:80 default_server;

        server_name htpcguides.crabdance.com 192.168.40.100;
        return 301 https://$server_name$request_uri;
        root /var/www/html;
        index index.html index.htm;

        location ~ /.well-known {
                allow all;
        }
}
Don't close the reverse virtual host configuration file, but copy and paste the following content after the last }. Change the Dynamic DNS address marked with green to your address!
You will find the reverse proxy configurations under the # Location settings for reverse proxy section for: Transmission, Deluge, Sonarr, CouchPotato, etc. You should remove the # from the block you wish to use (starting from line location until the } that closes the given location).
Update: In order to use auth_basic and still keep certificate renewal working, a change in the config file was needed. We need to disable auth_basic (password protection) for the Let's Encrypt certificate renewal process, otherwise renewal will fail. The updated part in the config file is the # Let's Encrypt Webroot plugin location
server {

 # SSL configuration

 listen 443 ssl http2 default_server;
 listen [::]:443 ssl http2 default_server;
 include /etc/nginx/snippets/strong-ssl.conf;
 ssl_certificate /etc/letsencrypt/live/htpcguides.crabdance.com/fullchain.pem;
 ssl_certificate_key /etc/letsencrypt/live/htpcguides.crabdance.com/privkey.pem;

 # Root location
 root /var/www/html;

 # Add index.php to the list if you are using PHP
 index index.html index.htm index.nginx-debian.html;

 # Basic Auth to protect the site
 auth_basic "Restricted";
 auth_basic_user_file /etc/nginx/.htpasswd;

 # Change the client side error pages (4xx) to prevent some information disclosure
 error_page 401 403 404 /404.html;

 # First attempt to serve request as file, then as directory,
 # then fall back to displaying a 404.

 location / {
          try_files $uri $uri/ =404;
 }

 # Deny access to .htaccess files, if Apache's document
 # root concurs with nginx's one

 location ~ /\.ht {
          deny all;
 }

# Let's Encrypt Webroot plugin location -- allow access

 location ^~ /.well-known/acme-challenge/ {
          auth_basic off;
          autoindex on;
       }

# Location settings for reverse proxy; enable those you wish to use
# by removing the # from the section between the location line and the last }
#
# Transmission
# location /transmission {
#    proxy_pass http://127.0.0.1:9091;
#    proxy_set_header Host $host;
#    proxy_set_header X-Real-IP $remote_addr;
#    proxy_set_header X-Forwarded-For $proxy_add_x_forwarded_for;
#  }
#
# Deluge
# location /deluge {
#    proxy_pass http://localhost:8112/;
#    proxy_set_header X-Deluge-Base "/deluge/";
#    include snippets/proxy-control.conf;
#  }
#
# NZBGet
# location /nzbget {
#   proxy_pass http://127.0.0.1:6789;
#   proxy_set_header Host $host;
#   proxy_set_header X-Real-IP $remote_addr;
#   proxy_set_header X-Forwarded-For $proxy_add_x_forwarded_for;
# }
#
# Sonarr
# location /sonarr {
#    proxy_pass http://127.0.0.1:8989;
#    proxy_set_header Host $host;
#    proxy_set_header X-Real-IP $remote_addr;
#    proxy_set_header X-Forwarded-For $proxy_add_x_forwarded_for;
#  }
#
# SickRage
# location /sickrage {
#   proxy_pass http://127.0.0.1:8081;
#   proxy_set_header Host $host;
#   proxy_set_header X-Real-IP $remote_addr;
#   proxy_set_header X-Forwarded-For $proxy_add_x_forwarded_for;
# }
#
# CouchPotato
# location /couchpotato {
#    proxy_pass http://127.0.0.1:5050;
#    proxy_set_header Host $host;
#    proxy_set_header X-Real-IP $remote_addr;
#    proxy_set_header X-Forwarded-For $proxy_add_x_forwarded_for;
#  }
#
# Madsonic
# location /madsonic {
#   proxy_pass http://127.0.0.1:4040;
#   proxy_set_header Host $host;
#   proxy_set_header X-Real-IP $remote_addr;
#   proxy_set_header X-Forwarded-For $proxy_add_x_forwarded_for;
# }
#
# Headphones
# location /headphones {
#   proxy_pass http://127.0.0.1:8181;
#   proxy_set_header Host $host;
#   proxy_set_header X-Real-IP $remote_addr;
#   proxy_set_header X-Forwarded-For $proxy_add_x_forwarded_for;
# }
#
# PlexPy
# location /plexpy {
#   proxy_pass http://127.0.0.1:8181;
#   proxy_set_header Host $host;
#   proxy_set_header X-Real-IP $remote_addr;
#   proxy_set_header X-Forwarded-For $proxy_add_x_forwarded_for;
# }
#
# Monit
# location /monit/ {
#   rewrite ^/monit/(.*) /$1 break;
#   proxy_ignore_client_abort on;
#   proxy_pass   https://127.0.0.1:2812;
#   proxy_set_header Host $host;
# }
#
# HTPC Manager
# location /htpc {
#   proxy_pass http://127.0.0.1:8085;
#   proxy_set_header Host $host;
#   proxy_set_header X-Real-IP $remote_addr;
#   proxy_set_header X-Forwarded-For $proxy_add_x_forwarded_for;
# }
}
Hit Ctrl+X, Y to save and exit.
It can be a little confusing with all these blocks, location settings, etc, therefore I will show here how your final reverse configuration file should look like
server {

listen 80 default_server;
listen [::]:80 default_server;

server_name your_dynamic_DNS_address your_server_IP_address;
return 301 https://$server_name$request_uri;

}

server {

# SSL configuration

listen 443 ssl http2 default_server;
listen [::]:443 ssl http2 default_server;
include /etc/nginx/snippets/strong-ssl.conf;
ssl_certificate /etc/letsencrypt/live/your_dynamic_DNS_address/fullchain.pem;
ssl_certificate_key /etc/letsencrypt/live/your_dynamic_DNS_address/privkey.pem;

# Root location
root /var/www/html;

# Add index.php to the list if you are using PHP
index index.html index.htm index.nginx-debian.html;

# Basic Auth to protect the site
auth_basic "Restricted";
auth_basic_user_file /etc/nginx/.htpasswd;

# Change the client side error pages (4xx) to prevent some information disclosure
error_page 401 403 404 /404.html;

# First attempt to serve request as file, then as directory,
# then fall back to displaying a 404.

location / {
try_files $uri $uri/ =404;
}

# Deny access to .htaccess files, if Apache's document
# root concurs with nginx's one

location ~ /\.ht {
deny all;
}

# Let's Encrypt Webroot plugin location -- allow access

location ^~ /.well-known/acme-challenge/ {
auth_basic off;
autoindex on;
}
# Location settings for reverse proxy; enable those you wish to use
# by removing the # from the section between the location line and the last }
#
# Transmission
# location /transmission {
#    proxy_pass http://127.0.0.1:9091;
#    proxy_set_header Host $host;
#    proxy_set_header X-Real-IP $remote_addr;
#    proxy_set_header X-Forwarded-For $proxy_add_x_forwarded_for;
#  }
#
# Deluge
# location /deluge {
#    proxy_pass http://localhost:8112/;
#    proxy_set_header X-Deluge-Base "/deluge/";
#    include snippets/proxy-control.conf;
#  }
#
# NZBGet
# location /nzbget {
#   proxy_pass http://127.0.0.1:6789;
#   proxy_set_header Host $host;
#   proxy_set_header X-Real-IP $remote_addr;
#   proxy_set_header X-Forwarded-For $proxy_add_x_forwarded_for;
# }
#
# Sonarr
# location /sonarr {
#    proxy_pass http://127.0.0.1:8989;
#    proxy_set_header Host $host;
#    proxy_set_header X-Real-IP $remote_addr;
#    proxy_set_header X-Forwarded-For $proxy_add_x_forwarded_for;
#  }
#
# SickRage
# location /sickrage {
#   proxy_pass http://127.0.0.1:8081;
#   proxy_set_header Host $host;
#   proxy_set_header X-Real-IP $remote_addr;
#   proxy_set_header X-Forwarded-For $proxy_add_x_forwarded_for;
# }
#
# CouchPotato
# location /couchpotato {
#    proxy_pass http://127.0.0.1:5050;
#    proxy_set_header Host $host;
#    proxy_set_header X-Real-IP $remote_addr;
#    proxy_set_header X-Forwarded-For $proxy_add_x_forwarded_for;
#  }
#
# Madsonic
# location /madsonic {
#   proxy_pass http://127.0.0.1:4040;
#   proxy_set_header Host $host;
#   proxy_set_header X-Real-IP $remote_addr;
#   proxy_set_header X-Forwarded-For $proxy_add_x_forwarded_for;
# }
#
# Headphones
# location /headphones {
#   proxy_pass http://127.0.0.1:8181;
#   proxy_set_header Host $host;
#   proxy_set_header X-Real-IP $remote_addr;
#   proxy_set_header X-Forwarded-For $proxy_add_x_forwarded_for;
# }
#
# PlexPy
# location /plexpy {
#   proxy_pass http://127.0.0.1:8181;
#   proxy_set_header Host $host;
#   proxy_set_header X-Real-IP $remote_addr;
#   proxy_set_header X-Forwarded-For $proxy_add_x_forwarded_for;
# }
#
# Monit
# location /monit/ {
#   rewrite ^/monit/(.*) /$1 break;
#   proxy_ignore_client_abort on;
#   proxy_pass   https://127.0.0.1:2812;
#   proxy_set_header Host $host;
# }
#
# HTPC Manager
# location /htpc {
#   proxy_pass http://127.0.0.1:8085;
#   proxy_set_header Host $host;
#   proxy_set_header X-Real-IP $remote_addr;
#   proxy_set_header X-Forwarded-For $proxy_add_x_forwarded_for;
# }
}
Available Reverse Proxy Services
Having the correct reverse proxy configuration in nginx is one part of the job, consult the relevant guides to see what you need to configure within the given application to enable reverse proxy support! Here is the list of services we covered at HTPC Guides and the link to each guide
Transmission and Transmission with VPN Split Tunnel
Deluge and Deluge with VPN Split Tunnel
NZBGet
Sonarr
SickRage
CouchPotato
Madsonic
Headphones
PlexPy
Monit
HTPC Manager
Disable nginx Version in HTTP Header
Finally, we make a small adjustment to the nginx main configuration file to prevent disclosing nginx version in http header. This is just a small addition, but without it, any potential attacker to your site can see the version of nginx you are running. We should hide this information to dislose as little information as possible. Edit the nginx.conf file
sudo nano /etc/nginx/nginx.confInside the http block add the server_tokens off; line. It should look like this
...

http {

##
# Basic Settings
##

server_tokens off;
...
Hit Ctrl+X, Y to save and exit.
Test nginx Configuration
Now let's test the nginx configuration files. Run
sudo nginx -tThere should be no errors, you should see the following output
nginx: the configuration file /etc/nginx/nginx.conf syntax is ok
nginx: configuration file /etc/nginx/nginx.conf test is successful
If there are no errors, restart nginx to make the new configurations active
sudo systemctl restart nginxTest nginx Reverse Proxy
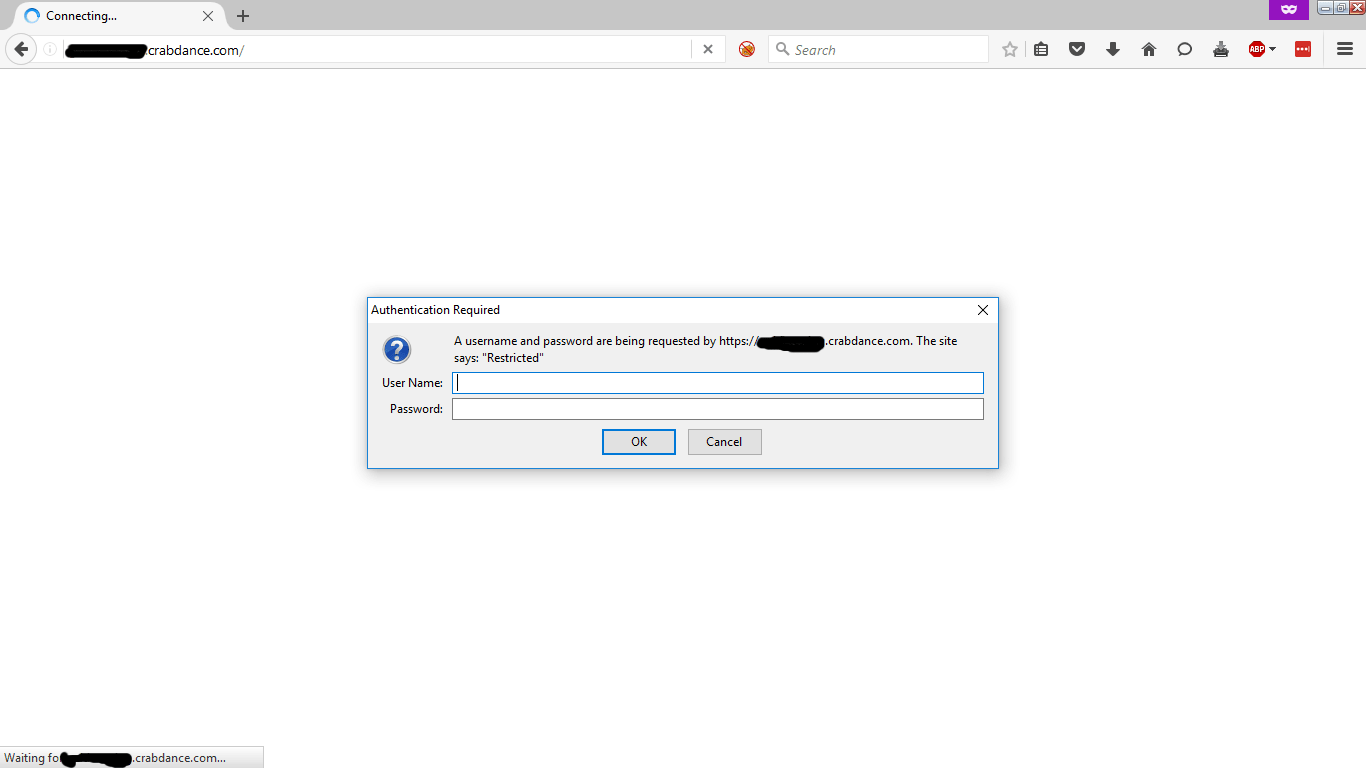
If everything went well, now you should have your secured nginx server up and running using SSL certificates issued by Let's Encrypt. It's time to log into your server. Open the browser of your choice and enter you Dynamic DNS address. Nginx should redirect the incoming http connection to https, and prompt you for the username and password. Go ahead, enter your username and password and click OK
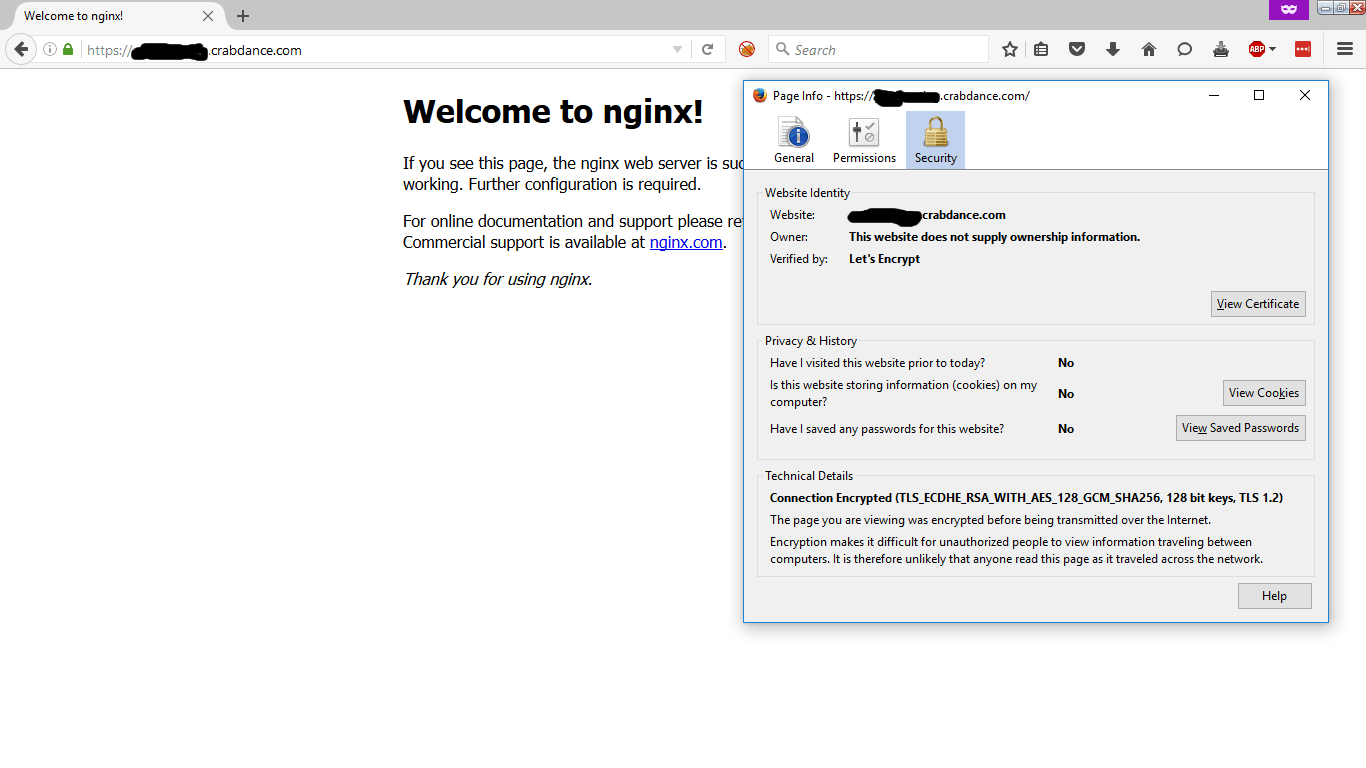
You should see the default nginx page. The important part is the green lock symbol in the address bar, it means that you are connected to your server over https and the certificates are valid! You can check the Page Info by clicking the green lock symbol, then More Information (if using Firefox).
Now you can access the enabled services by your_dynamic_dns_address/service_name
For example, if you configured Sonarr for reverse proxy, and enabled Sonarr location block in nginx configuration file, then you can access Sonarr by entering your_dynamic_dns_address/sonarr in the address bar of your browser.
Configure Let's Encrypt Auto Renewal
The Let's Encrypt certificates are valid for 90 days. You should always renew the certificates before they expire, otherwise they will become invalid. The renewal process is very simple and can be automated using a simple cronjob. Once you have configured the cronjob it will take care of the certificate renewal.
We will create a cron job that will run the certificate renewal process on every Wednesday, at 1:46am, and reload nginx at 1:51am. We need to edit the crontab for the root user
sudo crontab -eNow add the following lines to the end
# Renew Let's Encrypt certificates on every Wednesday 1:46am, reload nginx at 1:51am
46 1 * * 3 /opt/certbot/certbot-auto renew >> /var/log/le-renew.log
51 1 * * 3 /bin/systemctl reload nginx
Hit Ctrl+X, Y to save and exit.
Note: I assume your server is running 24/7. If this is not the case, then you should know that if your server was not online at the time the cronjob was scheduled to run (in our case every Wednesday at 1:51am) then cron will not run the missed job(s) on next system startup. If your server is offline for long periods of time, you should install and configure anacron. Alternatively, you can manually update the Let's Encrypt certificates with
/opt/certbot/certbot-auto renewIf you run the renewal command and the certificates are not due for renewal yet, you will receive the following output
Requesting root privileges to run certbot...
  /home/test/.local/share/letsencrypt/bin/letsencrypt renew

-------------------------------------------------------------------------------
Processing /etc/letsencrypt/renewal/htpcguides.crabdance.com.conf
-------------------------------------------------------------------------------

The following certs are not due for renewal yet:
  /etc/letsencrypt/live/htpcguides.crabdance.com/fullchain.pem (skipped)
No renewals were attempted.
Test Your SSL Web Server
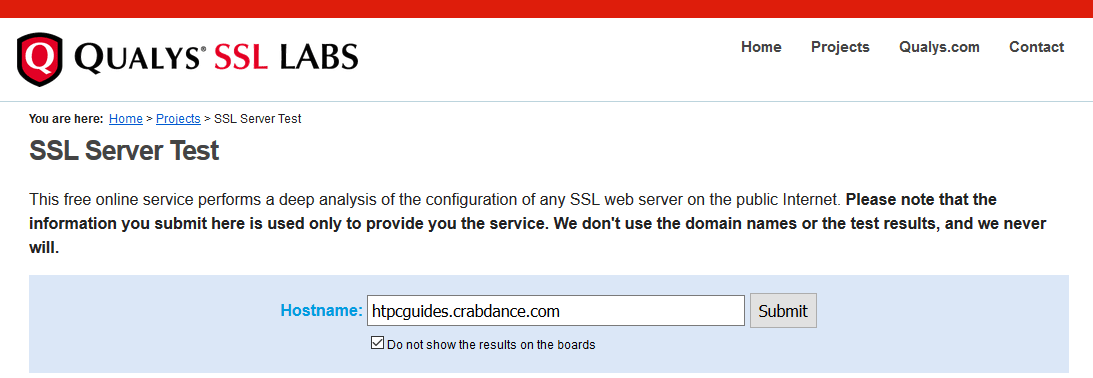
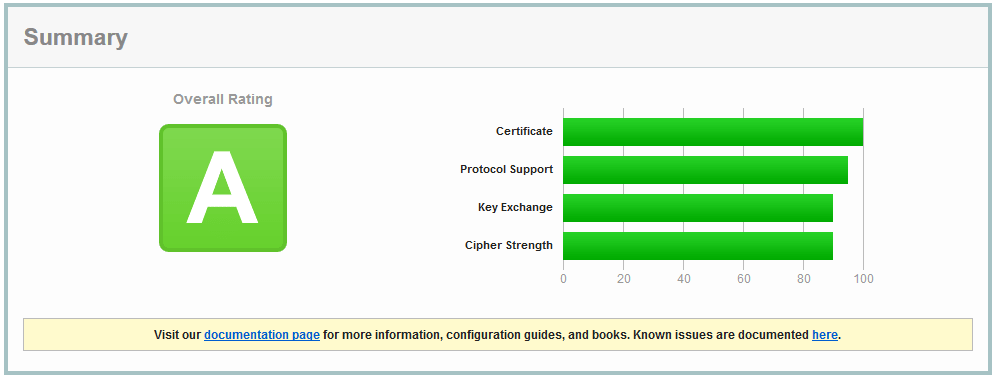
Finally, we should test our nginx configuration using Qually Labs SSL Test to get an SSL Report. With the configuration we used, the result should be an A, which is really excellent. It is possible to further harden the security settings to get the highest A+ rating, but that means there will be some settings that might break compatibility for certain services and web browsers, I do not recommend it at this point. Do note, Qually Labs change the grading based on current security standards, meaning: the same configuration that gave you A+ today might give you A few months later. For example, these settings gave A+ two months before the publication of this guide. Until you get at least an A, the setting should be fine.
To test your nginx web server, open Qually Labs SSL Test in your browser, and enter the dynamic DNS address of your server in the Hostname field. If you don't want to show results on boards, tick the Do not show the results on the boards option, then click Submit.
The test will begin, you will see the detailed results in your browser. At the moment, the configuration we used in this guide produces the following results
Conclusion
This is it, you have your nginx web server and reverse proxy up and running using a valid signed certificate with very decent security settings. Now when you access your web server or services behind reverse proxy, the connection between your device and server will be encrypted and secure. If you use nginx reverse proxy to access your services outside of your local network, I strongly recommend to forget about plain http connection and make sure you are using https.
You should consider using fail2ban to prevent brute force attacks on your nginx reverse proxy – guide is here.