 One of the many exciting features that Private Internet Access (PIA) provides is Port Forwarding on their P2P enabled VPN servers. If you are using a private tracker and you need to have decent upload to maintain your ratio, or if your want to download torrents with low number of seeds available, you will certainly benefit from using an active (open) port in your BitTorrent client.
Most VPN providers don't allow port forwarding at all, even if they do, they charge extra for this feature or you can get port forwarding to work only using their proprietary application. Luckily, PIA has a very professional approach. With some script-magic, you will always have an active connection in your client, all this fully automated. When it comes to Split Tunnel VPN, things get more complicated since we need to handle iptables rules too, but we got that part covered too!
| VPN Service | ||||
|---|---|---|---|---|
| Private Internet Access | ($3.33 / month) | |||
| Pure VPN | ($4.91 / month) | |||
| IPVanish | ($6.41 / month) |
Benefits and Disadvantages of Port Forwarding
If you are using port forwarding, then you will have the following benefits:
- You will be able to connect to considerably more seeds/peers.
- Since you can connect to more seeds/peers, you will be able to download torrents with only few seeders, and probably at higher speeds.
- Others will be able to download from you
- You will keep the torrent live
- Maintain your ratio (especially important on private trackers)
- Some private trackers require you to be active (have port forwarding enabled).
- You keep all the benefits of using Split Tunnel VPN (selective traffic routing, Kill Switch), and you are still able to take advantage of the above listed benefits of running your torrent client in active mode.
The only disadvantage of port forwarding is having an open port in your firewall, which always carries some security risk (not only for torrent clients, but in general). In practice, this should be just a minor security risk, but as a rule, it is best to have as few ports open as possible. You should be fine if you are using the well known clients like Transmission or Deluge.
Note: since you are running over VPN server, your upload speed will be limited to the upload speed of the VPN server you use (exactly the same as with download).
Port Forwarding when Using VPN
Configuring port forwarding without VPN is really a 3 minute job: you just open the selected ports in your router (or enable UPnP in you router and torrent client), and if your ISP doesn't block torrent traffic or have all the ports closed, you are good to go. With VPN, and especially with Split Tunnel VPN, it is more complicated, but luckily a good VPN provider like Private Internet Access and our auto port forwarding script for PIA makes this process quite easy.
We always recommend protecting your privacy by using a VPN provider if you are using torrents. You can also take advantage of Split Tunnel VPN features, like selective traffic routing and Kill Switch with our guide. However, we would like to keep the torrents alive, and also help those who are using private trackers. If you are using a VPN connection for torrents, everything you download and upload is tunneled over the VPN provider's server in encrypted form. The open port is assigned by the VPN provider, in our case PIA, and it changes randomly to provide an additional layer of security.
Important: port forwarding is available on selected PIA servers, please check this link at PIA site for an up-to-date list of servers that support port forward
How does the Port Forward for VPN Script Work?
- PIA will assign an open port for their p2p enabled severs with port forwarding enabled.
- This port number can change after you reconnect to the VPN server (not necessary, but possible), or even when you are connected to the server.
- The script will acquire the port number from the PIA server.
- If you are using Split Tunnel VPN, then we have strict iptables (firewall) rules enabled. The script will automatically open the reported port number in the firewall for vpn user (and close the unused port number).
- The script will update Transmission with the acquired port number, no user interaction is required.
- The script will be scheduled to run as a Cron Job at system boot and every two hours
- If the port number has changed when using Split Tunnel VPN
- Old port number will be removed from iptables to keep unused ports closed
- New port number will be opened
- Transmission will be updated with the new port number.
Configure Auto Port Forward PIA VPN for Transmission
Important: this script will work only with Private Internet Access, it will not work with any other VPN provider!
First you need to download the script from HTPC Guides GitHub, there is an updated version there if you view the pull requests!
sudo wget -O /etc/openvpn/portforward.sh https://raw.githubusercontent.com/HTPCGuides/pia-port-forwarding-scripts/master/transmission-pia-port-forwarding.shNow make the downloaded script executable
sudo chmod +x /etc/openvpn/portforward.shNext step is to edit the script and add your PIA username and password and the Transmission username and password to the script.
sudo nano /etc/openvpn/portforward.shLocate the two line below, enter your PIA username and password instead of piauser and piapass
USERNAME=piauser
PASSWORD=piapass
Next find the following two lines, and enter your Transmission username and password instead of user and pass (this is the username and password you enter when you access Transmission GUI in your browser)
TRANSUSER=user
TRANSPASS=pass
Hit Ctrl+X, Y, to Save and Exit.
If you are not using Split Tunnel VPN, then just skip the following section and go to Test Port Forward Script section.
Configure Port Forwarding for Transmission with Split Tunnel VPN
We assume you followed our guides for configuring Split Tunnel VPN for Transmission. Once you have Split Tunnel VPN with Transmission fully configured and working, and you followed this guide until this step, you need to enable Split Tunnel option in the Port Forwarding script.
Edit the script
sudo nano /etc/openvpn/portforward.shlocate this part
# set to 1 if using VPN Split Tunnel
SPLITVPN=""
and enable Split VPN Port Forwarding by setting 1, should look like this
# set to 1 if using VPN Split Tunnel
SPLITVPN="1"
Hit Ctrl+X, Y, to Save and Exit.
Next we need to make a modification to the Split Tunnel iptables script called by OpenVPN.
sudo nano /etc/openvpn/iptables.shLocate the following line
# allow responses
iptables -A INPUT -i $INTERFACE -m conntrack --ctstate ESTABLISHED -j ACCEPT
and add RELATED to the rule, it should look like this
# allow responses
iptables -A INPUT -i $INTERFACE -m conntrack --ctstate RELATED,ESTABLISHED -j ACCEPT
Finally, before the # reject connections from predator IP going over $NETIF line at the end of the script, insert the following line
iptables -A OUTPUT -m conntrack --ctstate RELATED,ESTABLISHED -j ACCEPTHit Ctrl+X, Y, to Save and Exit.
It should look like this, I highlighted the new line just added with red
iptables -A OUTPUT -m conntrack --ctstate RELATED,ESTABLISHED -j ACCEPT

# reject connections from predator IP going over $NETIF
iptables -A OUTPUT ! --src $LOCALIP -o $NETIF -j REJECT
I recommend a system restart to make sure that the required iptables rules are properly loaded
sudo reboot nowTest Port Forwarding Script
With the VPN connection established and Transmission running, it is time to test the port forward script. Run the script manually
sudo bash /etc/openvpn/portforward.shThe output will be similar to this. The IP address is the IP address assigned to you by the VPN provider and the next line is the open port number on that server
5.152.xxx.xxx
45282
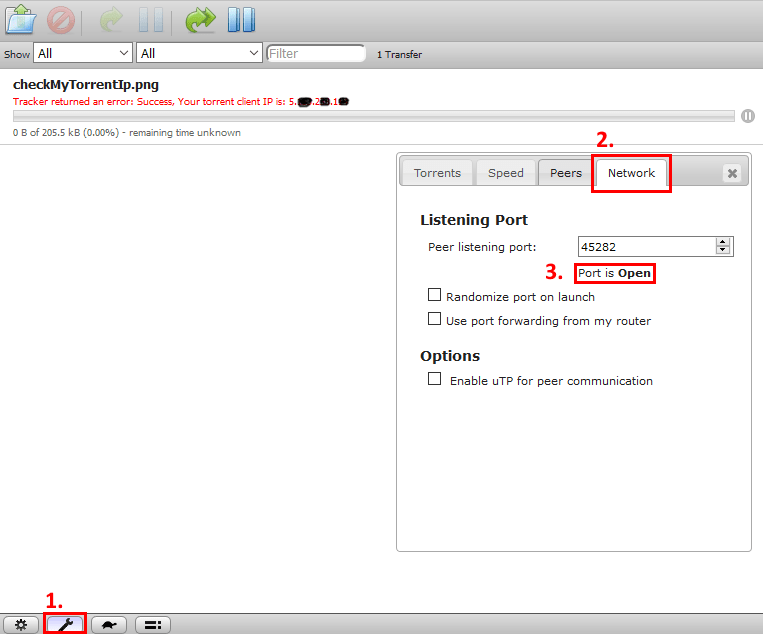
{"arguments":{},"result":"success"}Now open Transmission WEB UI, and click on (1) Edit Preferences.
Select the (2) Network tab.
Transmission should report the port number you received back from the script (in our case Peer listening port: 45282), and you should see the (3) Port is Open message. If this is the case, then you have successfully configured Transmission with port forwarding.
Configure Cron Job for Port Forwarding Script
Now that the you have checked that the script is working fine, it is time to configure a Cron Job that will run the script at system boot and every two hours. Since we don't know when the port number will change on a PIA server, Cron will run the script every two hours, and if the port is still the same, nothing will be done, but if the port number reported back has changed, the script will automatically update Transmission (and iptables if using Split Tunnel VPN).
We will run the script as root, create the Cron Job
sudo crontab -eInsert the following two lines at the end of the file
@reboot sleep 60 && /etc/openvpn/portforward.sh | while IFS= read -r line; do echo "$(date) $line"; done >> /var/log/pia_portforward.log 2>&1 #PIA Port Forward
0 */2 * * * /etc/openvpn/portforward.sh | while IFS= read -r line; do echo "$(date) $line"; done >> /var/log/pia_portforward.log 2>&1 #PIA Port Forward
Hit Ctrl+X, Y, to Save and Exit.
Based on this Cron Job, the script will
- Run on each system startup with a delay of 60 seconds, this should give enough time for for VPN tunnel to initialize and Transmission to start
- Run every two hours
- Output of the script will be logged to
/var/log/pia_portforward.logfile, and we also added a timestamp to each line.
Configure Logrotate
Finally, we need to configure log rotation, to keep the log file at reasonable size. I use daily rotation with compression, and I keep 7 log files (which means seven days). You can adjust this to your liking.
Create the log rotation configuration
sudo nano /etc/logrotate.d/pia_portforwardand insert the following
/var/log/pia_portforward.log {
        daily
        compress
        rotate 7
}
Hit Ctrl+X, Y, to Save and Exit.