 NZBGet is a lightweight usenet downloader recently updated to 15.0. NZBGet, like NZBGet 14 supports fake detector for discarding fake releases from your usenet download queue. I recommend a UsenetServer account for downloading from usenet. I tested this several times on my Minibian image and is part of my Media Server Image. Let's install NZBGet 15 Raspberry Pi for lightweight usenet downloading using hugbug's updated installer which will allow for automated updates in the future, no more building from source! If you are coming from NZBGet 14 and your current configuration is important to you, then back it up.
Note this guide will also work on the Banana Pi, Orange Pi, Cubieboard, ODROID and other ARM SBC devices.
Check out the Raspberry Pi vs Banana Pi benchmarks if you want to see the benefits of SATA and gigabit.
Guide updated July 26, 2016 to work with new NZBGet URL.
| Usenet Provider | |||||||
|---|---|---|---|---|---|---|---|
| UsenetServer | |||||||
| Newshosting | |||||||
| Frugal | |||||||
| Usenetlink |
Install Latest NZBGet on Raspberry Pi 2 and B+
Upgrading from NZBGet 14.x
First of all back up your SD card completely using Win32DiskImager, dd or whatever you use to write .img files.
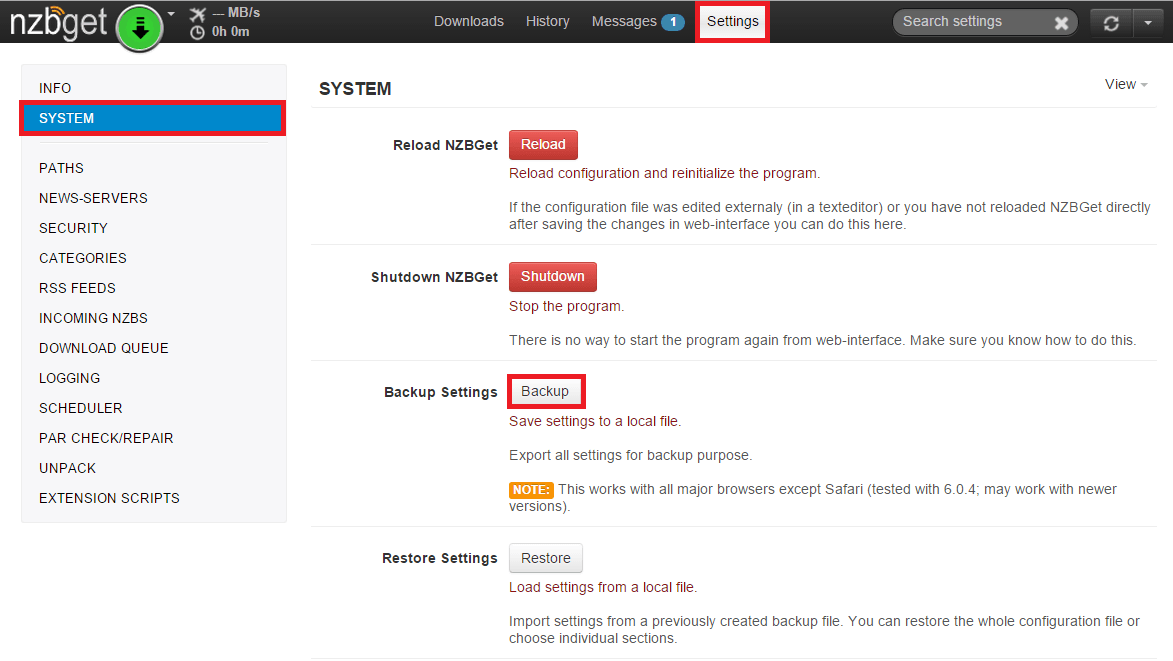
Go into your NZBGet WebUI, click Settings and then System and click the Backup button. You will get an sdx file on your local machine. In my upgrade test I didn't need this file but it is better to be safe, you can restore it using the Restore button. There can be issues with this if the paths are different so it is in no way guaranteed to work. One user has had problems with Sonarr working with NZBGet after importing settings through the WebUI, another user did not and experienced no issues so it cannot currently be recommended to restore using the WebUI.
Stop the NZBGet service, disable it and remove it, you will reinstall with an updated version.
sudo service nzbget stop
sudo service nzbget disable
sudo rm /etc/init.d/nzbget
Rename your NZBGet configuration file so it doesn't conflict, this is the location if you installed using Mike's repository
mv /home/pi/.nzbget /home/pi/nzbget14.bakRemove NZBGet
sudo apt-get remove nzbget -yIf you built from source you will have to delete the binary as well, you can find it like this
which nzbgetThen delete the location the above command spits out
rm /path/from/whichRemove the NZBGet entry in your crontab
crontab -eremove this line
@reboot nzbget -DSave and Exit
Now follow the guide, reinstalling unrar should not be necessary.
Install NZBGet Latest using Official Installer
Download the latest NZBGet installer linux, copy all 3 lines and paste them.
wget -O - http://nzbget.net/info/nzbget-version-linux.json | \
  sed -n "s/^.*stable-download.*: \"\(.*\)\".*/\1/p" | \
  wget --no-check-certificate -i - -O nzbget-latest-bin-linux.run
Run the NZBGet installer and install in the /usr/local/bin/nzbget folder
sudo sh nzbget-latest-bin-linux.run --destdir /opt/nzbgetRemove the NZBGet installer
rm nzbget-latest-bin-linux.runMake pi the owner of the NZBGet installation folder
sudo chown -R pi:pi /opt/nzbgetChange the NZBGet daemon to run as pi using this nifty sed command to automatically replace the DaemonUsername line
sed -i "/DaemonUsername=/c\DaemonUsername=pi" /opt/nzbget/nzbget.confIf you are upgrading, now restore your backup, if you are installing fresh skip down to Autostart NZBGet 15
Restoring NZBGet 14 Backup
Back up your new NZBGet 15 configuration
mv /opt/nzbget/nzbget.conf /opt/nzbget/nzbget.conf.bakCopy your old configuration
cp /home/pi/.nzbget14.bak /opt/nzbget/nzbget.confOpen your nzbget.conf and make the adjustments below, use Ctrl+W to search for them
nano /opt/nzbget.confChange ConfigTemplate to the correct location of the latest nzbget.conf
ConfigTemplate=/opt/nzbget/nzbget.conf.bakChange WebDir to the correct location
WebDir=/opt/nzbget/webuiCtrl+X, Y and Enter to Save
Now start NZBGet 15
/opt/nzbget/nzbget -DAutostart NZBGet on the Raspberry Pi
Create the nzbget init.d script, it may already exist if you are upgrading but double check it is the same as below
sudo nano /etc/init.d/nzbgetPaste the NZBGet init script
#!/bin/sh
### BEGIN INIT INFO
# Provides:          NZBGet
# Required-Start:    $local_fs $remote_fs $network
# Required-Stop:     $local_fs $remote_fs $network
# Default-Start:     2 3 4 5
# Default-Stop:      0 1 6
# Short-Description: NZBGet
# Description:       NZBGet for ebook management
### END INIT INFO


# Documentation available at
# http://refspecs.linuxfoundation.org/LSB_3.1.0/LSB-Core-generic/LSB-Core-generic/iniscrptfunc.html
# Debian provides some extra functions though
. /lib/lsb/init-functions

DAEMON_NAME="NZBGet"
DAEMON_USER=pi
DAEMON_PATH="nzbget"
DAEMON_OPTS="-D"
DAEMON_PWD="/opt/nzbget"
DAEMON_DESC=$(get_lsb_header_val $0 "Short-Description")
DAEMON_PID="/var/run/${DAEMON_NAME}.pid"
DAEMON_NICE=0
DAEMON_LOG='/var/log/nzbget'

[ -r "/etc/default/${DAEMON_NAME}" ] && . "/etc/default/${DAEMON_NAME}"

do_start() {
  local result

	pidofproc -p "${DAEMON_PID}" "${DAEMON_PATH}" > /dev/null
	if [ $? -eq 0 ]; then
		log_warning_msg "${DAEMON_NAME} is already started"
		result=0
	else
		log_daemon_msg "Starting ${DAEMON_DESC}" "${DAEMON_NAME}"
		touch "${DAEMON_LOG}"
		chown $DAEMON_USER "${DAEMON_LOG}"
		chmod u+rw "${DAEMON_LOG}"
		if [ -z "${DAEMON_USER}" ]; then
			start-stop-daemon --start --quiet --oknodo --background \
				--nicelevel $DAEMON_NICE \
				--chdir "${DAEMON_PWD}" \
				--pidfile "${DAEMON_PID}" --make-pidfile \
				--exec "${DAEMON_PATH}" -- $DAEMON_OPTS
			result=$?
		else
			start-stop-daemon --start --quiet --oknodo --background \
				--nicelevel $DAEMON_NICE \
				--chdir "${DAEMON_PWD}" \
				--pidfile "${DAEMON_PID}" --make-pidfile \
				--chuid "${DAEMON_USER}" \
				--exec "${DAEMON_PATH}" -- $DAEMON_OPTS
			result=$?
		fi
		log_end_msg $result
	fi
	return $result
}

do_stop() {
	local result

	pidofproc -p "${DAEMON_PID}" "${DAEMON_PATH}" > /dev/null
	if [ $? -ne 0 ]; then
		log_warning_msg "${DAEMON_NAME} is not started"
		result=0
	else
		log_daemon_msg "Stopping ${DAEMON_DESC}" "${DAEMON_NAME}"
		killproc -p "${DAEMON_PID}" "${DAEMON_PATH}"
		result=$?
		log_end_msg $result
		rm "${DAEMON_PID}"
	fi
	return $result
}

do_restart() {
	local result
	do_stop
	result=$?
	if [ $result = 0 ]; then
		do_start
		result=$?
	fi
	return $result
}

do_status() {
	local result
	status_of_proc -p "${DAEMON_PID}" "${DAEMON_PATH}" "${DAEMON_NAME}"
	result=$?
	return $result
}

do_usage() {
	echo $"Usage: $0 {start | stop | restart | status}"
	exit 1
}

case "$1" in
start)   do_start;   exit $? ;;
stop)    do_stop;    exit $? ;;
restart) do_restart; exit $? ;;
status)  do_status;  exit $? ;;
*)       do_usage;   exit  1 ;;
esac
Ctrl+X, Y and Enter to Save
Make it executable
sudo chmod +x /etc/init.d/nzbgetStart the NZBGet service with a later priority of 98 so we make sure the hard drive is mounted
sudo update-rc.d nzbget defaults 98You can now start NZBGet
sudo service nzbget startIf the NZBGet job fails to start on boot you can disable the init.d and add a cronjob instead
sudo update-rc.d nzbget disable
crontab -u pi -l | { cat; echo "@reboot /opt/nzbget/nzbget -D"; } | crontab -u pi -
If you plan to use SSL with NZBGet use the cipher RC4-MD5 for maximum speed
Now it's time to configure NZBGet and do some speed tweaks