 Reverse proxies are a safe, convenient way to remotely access your services from any computer or device. You can manage Sonarr (NzbDrone) while you're at your friend's house if s/he tells you about a cool show that you want to start seeing, you can add it right away. To get the maximum ease you should get a free dynamic DNS address by following my guide for Afraid DNS. This method will have fewer ports open on your router for added security while not having to remember 10 different port numbers for your services. You will need to have port 80 forwarded from your router to your media server. When you are done with this guide you will be able to access Sonarr through your custom domain you have set up http://htpcguides.crabdance.com/sonarr instead of htpcguides.crabdance.com:8989. We will be using the powerful, low memory footprint webserver nginx to get the job done.
Configure Sonarr Reverse Proxy nginx Windows
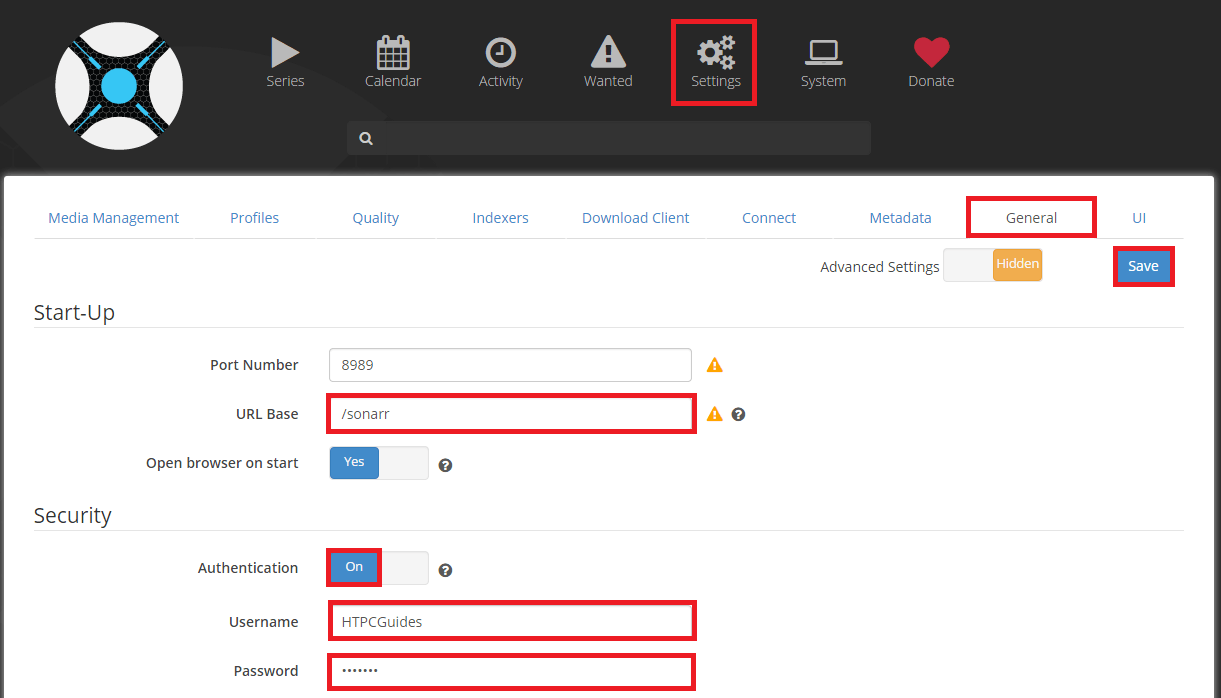
First enable the correct setting in Sonarr, open up the WebUI at http://ip.address:8989
Go to Settings, click General tab, scroll down to URL base and add /sonarr.
Set Authentication to Yes and give yourself a username and password too for extra security. Click Save.
Restarting Sonarr is a good idea
Install nginx by downloading their official stable zip file currently version 1.6.2
Open the zip and unpack it to c:\nginx-1.6.2 by dragging the folder to the C: drive
Open the configuration file in c:\nginx-1.6.2\conf\nginx.conf with Notepad or Notepad++
Find this section and change your server_name localhost to your dynamic dns address and your media server's local IP address
server {
        listen       80;
        server_name  localhost;

        #charset koi8-r;

        #access_log  logs/host.access.log  main;
Mine looks like this so I can access it locally and remotely. htpcguides.crabdance.com needs to be replaced with your own dynamic DNS address and 192.168.40.105 needs to be replaced with your home media server's local IP address.
server {
        listen       80;
        server_name  htpcguides.crabdance.com 192.168.40.105;

        #charset koi8-r;

        #access_log  logs/host.access.log  main;
Underneath the #access_log line, add these lines. 127.0.0.1 points to the loopback address on your media server
location /sonarr {
		proxy_pass http://127.0.0.1:8989;
		proxy_set_header Host $host;
		proxy_set_header X-Real-IP $remote_addr;
		proxy_set_header X-Forwarded-For $proxy_add_x_forwarded_for;
	}
The whole section will now look like this, if you already have set up one reverse proxy only add the blue text
server {
        listen       80;
        server_name  htpcguides.crabdance.com 192.168.40.105;

location /sonarr {
		proxy_pass http://127.0.0.1:8989;
		proxy_set_header Host $host;
		proxy_set_header X-Real-IP $remote_addr;
		proxy_set_header X-Forwarded-For $proxy_add_x_forwarded_for;
	}
Run a command prompt and enter these commands to start nginx, you can highlight each, right click and paste them in the command prompt window
c:
cd c:\nginx-1.6.2
start nginx
See if you can access Sonarr at your home media server's IP address http://ip.address/sonarr
Let's make nginx autostart on boot for your Windows media server
Create nginx.vbs in c:\nginx-1.6.2 and paste this code and save it.
Dim sh
Set sh = WScript.CreateObject("WScript.Shell")
sh.run "cmd /K CD C:\nginx-1.6.2\ & start nginx", 0
Create a shortcut of the nginx.vbs file and drag it to your Windows Startup folder
Reboot and it should all be working
If you ever edit your nginx.conf file you can reload the configuration with this command in the Windows command prompt
cd c:\nginx-1.6.2
nginx -s reload
Enjoy your reverse proxy server for Sonarr that you can access at http://dynamic.dns.address/sonarr or http://local.ip/sonarr.
Make sure you have set up port forwarding for port 80 on your router if you are using Dynamic DNS. You can then close the port forward for 8989 on your router.