![]() Enforce SSL for Secure nginx Reverse Proxy Linux using TLS to encrypt your password credentials. OpenSSL can be used to create your own web server certificates for use with nginx or Apache.
Enforce SSL for Secure nginx Reverse Proxy Linux using TLS to encrypt your password credentials. OpenSSL can be used to create your own web server certificates for use with nginx or Apache.
In this guide I show you how to create an SSL certificate using OpenSSL and configure your web server nginx to use the https protocol. I needed SSL certificates for use with reverse proxies for Sabnzbd, NZBGet, Sonarr, SickRage, CouchPotato and HTPC Manager for remote access using my free dynamic DNS address from Afraid.org (how to guide). This tutorial was tested on Debian and Ubuntu and should work on any debian-based systemd. CentOS users will want to make some SELinux exceptions for nginx.
Enforce SSL for Secure nginx Reverse Proxy Linux
This guide does not help you create SSL certficates from a Certified Authority so you will get warnings that the SSL certificate is not trusted – however, there is no reason not to trust a certificate that you have created yourself! If you do want an official certificate you can get one for free from StartSSL that you will have to renew each year.
OpenSSL on Linux
SSH in to your Linux box and install nginx and openssl. This works on Debian, Ubuntu, Raspbian and should work on any debian based system
sudo apt-get update
sudo apt-get install nginx openssl -y
Create the SSL Certificate with OpenSSL
A quick explanation about the best encryption. Other guides use des which is outdated and slow (Source). AES encryption has won awards for its strength, your home router is capable of AES encryption. There is a quick overview of AES encryption types. We will be using RSA which is also a respectable encryption method.
Create a directory to store the SSL certificates
sudo mkdir -p /etc/nginx/sslNow to create the actual SSL certificates, it will last 36500 days and have rsa 2048 bit encryption. The nodes switch means we don't have to enter the server key's password each time you connect to the nginx web server.
Create the OpenSSL certificate and key for nginx
sudo openssl req -x509 -nodes -days 36500 -newkey rsa:2048 -keyout /etc/nginx/ssl/nginx.key -out /etc/nginx/ssl/nginx.crtYou will be prompted for some information, you can leave them all blank if you like as it is only a self-signed certificate so none of the information is used for verification
You are about to be asked to enter information that will be incorporated
into your certificate request.
What you are about to enter is what is called a Distinguished Name or a DN.
There are quite a few fields but you can leave some blank
For some fields there will be a default value,
If you enter '.', the field will be left blank.
-----
Country Name (2 letter code) [AU]: DK
State or Province Name (full name) [Some-State]: Utopia
Locality Name (eg, city) []: Gotham
Organization Name (eg, company) [Internet Widgits Pty Ltd]: HTPC Guides
Organizational Unit Name (eg, section) []: Admin
Common Name (e.g. server FQDN or YOUR name) []: HTPCGuides.com
Email Address []: admin@htpcguides.com
Now you can actually configure nginx to use the SSL certificates and enforce it even for http connections on port 80.
Configure nginx to enforce SSL
Open the Linux nginx configuration file, adjust reverse if your file is different
sudo nano /etc/nginx/sites-available/reverseAdjust your http server block so that it automatically rewrites all http requests to https
Add the listen 443 ssl; and ssl_certificate lines, make sure your server_name is set
All of your locations for the services you reverse proxy to via nginx go in the SSL server block. I have left the Plex Media Server location as an example.
server {
        listen 80;
        server_name HTPCGuides.com 192.168.40.100 localhost;
        return 301 https://$server_name$request_uri;  # enforce https
}

server {
	server_name HTPCGuides.com 192.168.40.100 localhost;
	listen 443 ssl;
	ssl_certificate /etc/nginx/ssl/nginx.crt;
	ssl_certificate_key /etc/nginx/ssl/nginx.key;
	ssl_protocols TLSv1 TLSv1.1 TLSv1.2;
        ssl_prefer_server_ciphers on;
        ssl_ciphers "EECDH+AESGCM:EDH+AESGCM:AES256+EECDH:AES256+EDH";
        ssl_session_cache shared:SSL:10m;

	location /web {
	proxy_pass http://127.0.0.1:32400;
	proxy_set_header Host $host;
	proxy_set_header X-Real-IP $remote_addr;
	proxy_set_header X-Forwarded-For $proxy_add_x_forwarded_for;
	}
}
Hit Ctrl+X, Y and Enter to save the configuration
Test your nginx configuration to make sure there are no errors
sudo nginx -tThen restart nginx in Linux
sudo service nginx restartThat should do it, now you can access the nginx web server at https://ip.address and you should see your web site or the default nginx page.
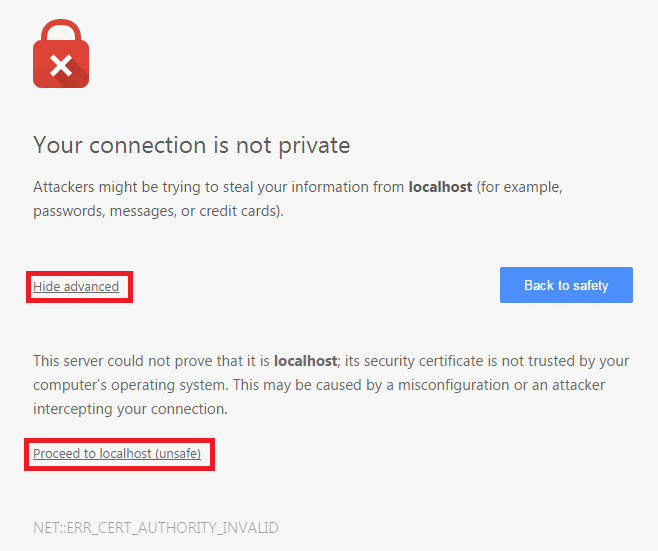
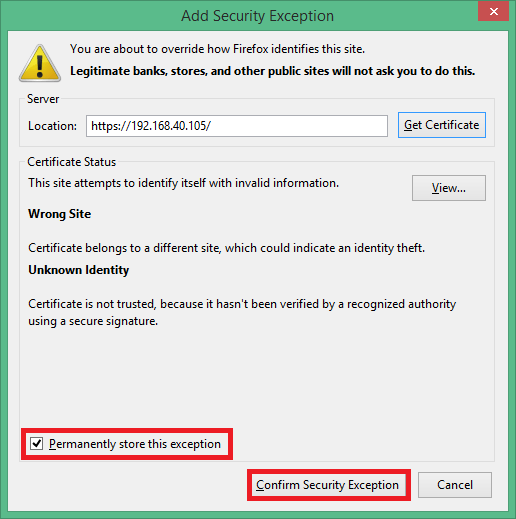
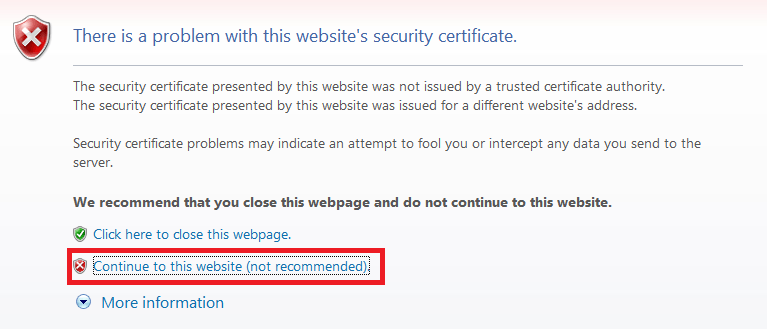
When you do open it you will see some warnings which you have to click past. The reason you get these warnings is because you created the certificate yourself and did not acquire it from a Certified Authority (CA). This is how to store the certificates you just created in your browser so the warning disappears for your personal site. If you ever get this warning when trying to visit a commercial website you should check your computer for viruses and malware.
In Chrome you need to click Show advanced and Proceed to ip.address (unsafe)
In Firefox click I understand the risks and Add Exception

Then check Permanently store the exception and click Confirm Security Exception
In Internet Explorer click Continue to this website
Now it's really done unless you are sharing this site with others in which case you can optimize https too if you are using it beyond personal usage.
Remember to open port 443 on your router!
A follow up post using Let's Encrypt with nginx for reverse proxies will be published in the future so you get CA certificates and no pesky security warnings.