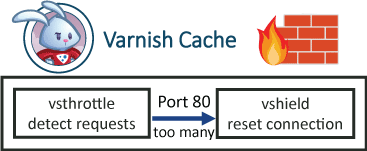
 Varnish a reverse proxy which gives you a real speed boost to WordPress. Running Varnish on this web server means I get a second load time, without Varnish the page load time would be 3+ seconds due to the slowness of PHP and all the WordPress plugins I use. Luckily, I host on a Digital Ocean VPS where you can install and configure Varnish very easily. I was recently DDoSed for the first time and wanted to use something besides Cloudflare for DDoS protection. Varnish 3 had many firewall vmods to deal with threats. In this tutorial I use the vsthrottle vmod and the Shield vmod. Throttle detects if there are too many requests per second and shield resets the connection if the request threshold has been reached. I will assume you already have Varnish 4 configured and working. This guide will work behind CloudFlare and with Varnish 4.0 and Varnish 4.1.
| VPS Provider | |||||
|---|---|---|---|---|---|
| Vultr | |||||
| Digital Ocean | |||||
| HostUS |
WordPress DDoS Attack Protection with Varnish 4 Firewall vmods
This is not a substitute for a full web application firewall but will do a good job of mitigating WordPress DDoS attacks. There is likely possible improvement to the vcl code so please share your thoughts in the comments. The vsthrottle vmod measures the requests per second and the shield vmod can reset the connection of the request threshold has been reached.
Install Varnish 4 vmod dependencies
You probably already have Varnish 4 installed in which case you just need to install these vmod buildling dependencies
sudo apt-get install libvarnishapi-dev dpkg-dev pkg-config build-essential -yInstall libvmod-shield
Installing libvmod-shield which resets the attacker's connection. If you are using Varnish 4.1 change 4.0 to 4.1
sudo apt-get install git autotools-dev automake libtool -y
cd ~
git clone -b 4.0 https://github.com/varnish/libvmod-shield
cd libvmod-shield
sh autogen.sh
./configure
sudo make
make install
Install vsthrottle
Install vsthrottle which detects how many requests per second the attacker is making. If you are using Varnish 4.1 change 4.0 to 4.1
cd ~
git clone -b 4.0 https://github.com/varnish/libvmod-vsthrottle
cd libvmod-vsthrottle
sh autogen.sh
./configure
sudo make
make install
Create the Varnish Rules
Open your Varnish vcl file
sudo nano /etc/varnish/default.vclAt the top you need these lines to use the Varnish vsthrottle and shield vmods, do it under the vcl 4.0; line
vcl 4.0;
import vsthrottle;
import shield;
In your sub vcl_recv section put the red lines at the bottom of your sub vcl_recv. It is using vsthrottle to detect the number of requests and if it exceeds 15 requests per 10 seconds the shield vmod is used to reset the connection. You can also change the error message Too Many Requests to whatever you want. Only the red section is necessary.
sub vcl_recv {

# Extracts first IP from header, works with and without CloudFlare
set req.http.X-Actual-IP = regsub(req.http.X-Forwarded-For, "[, ].*$", "");

	#Prevent hammering on wp-login page and users doing excessive searches (2 per second)

if(vsthrottle.is_denied(req.http.X-Actual-IP, 2, 1s) && (req.url ~ "xmlrpc|wp-login.php|\?s\=")) {
	return (synth(429, "Too Many Requests"));
	# Use shield vmod to reset connection
	shield.conn_reset();
	}

#Prevent users from making excessive POST requests that aren't for admin-ajax
if(vsthrottle.is_denied(req.http.X-Actual-IP, 15, 10s) && ((!req.url ~ "\/wp-admin\/|(xmlrpc|admin-ajax)\.php") && (req.method == "POST"))){
	return (synth(429, "Too Many Requests"));
	# Use shield vmod to reset connection
	shield.conn_reset();
	}
}
Test your Varnish vcl file works
varnishd -C -f /etc/varnish/default.vclIf there were no errors then reload Varnish 4 so it uses the new vcl file
sudo service varnish reloadTest Varnish 4 DDoS Protection
It is time to test the Varnish DDoS protection using Apache benchmark utility as a quick proof of concept
sudo apt-get install apache2-utils -yWe are going to test the web server first (apache or nginx on port 8080) by simulating 100 requests with 10 concurrent connections
ab -n 100 -c 10 localhost:8080/wp-login.phpOutput
Server Software:        Apache/2.4.10
Server Hostname:        localhost
Server Port:            8080

Document Path:          /
Document Length:        11104 bytes

Concurrency Level:      200
Time taken for tests:   3.907 seconds
Complete requests:      20000
Failed requests:        0
Total transferred:      227560000 bytes
HTML transferred:       222080000 bytes
Requests per second:    5118.76 [#/sec] (mean)
Now hit the Varnish DDoS protection with apache benchmark
ab -n 100 -c 10 localhost:80/wp-login.phpThe results will look something like this showing that shield is working
Benchmarking www.htpcguides.com (be patient)
apr_socket_recv: Connection reset by peer (104)
Or look something like this, notice there are now 85 failed requests because Varnish 4 has blocked them using the vmods
Server Software:        Varnish
Server Hostname:        localhost
Server Port:            80

Document Path:          /
Document Length:        156589 bytes

Concurrency Level:      10
Time taken for tests:   0.911 seconds
Complete requests:      100
Failed requests:        85
   (Connect: 0, Receive: 0, Length: 984, Exceptions: 0)
Non-2xx responses:      85
Total transferred:      8925166 bytes
HTML transferred:       8432056 bytes
Requests per second:    1097.38 [#/sec] (mean)
Time per request:       9.113 [ms] (mean)
Time per request:       0.911 [ms] (mean, across all concurrent requests)
Transfer rate:          9564.74 [Kbytes/sec] received
You can also test your Varnish DDoS Protection by opening your browser, open your Wordpress site's login page and hit refresh like crazy.
You will see this error after not too long sans the logo