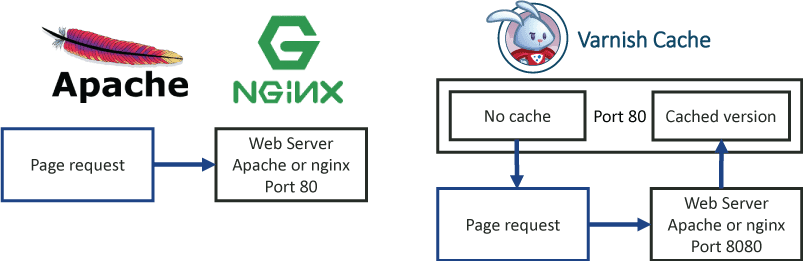
![]() Varnish is a refresh proxy that serves your WordPress lightning fast. Varnish will cache your WordPress site as compiled html pages so users avoid making PHP requests from the web server (Apache2 and nginx). It is very simple to set up WordPress Varnish cache on your VPS or dedicated server.
Varnish is a refresh proxy that serves your WordPress lightning fast. Varnish will cache your WordPress site as compiled html pages so users avoid making PHP requests from the web server (Apache2 and nginx). It is very simple to set up WordPress Varnish cache on your VPS or dedicated server.![]()
This guide is for Debian Wheezy but Jessie will work too as well as Ubuntu and Raspberry Pi, Banana Pi devices. The only limitation I have experienced so far using Varnish is using a custom login page with Apache 2. The custom login URL can likely be fixed but because I protect my login page with a free CloudFlare account it is not a current priority. I suggest disabling your custom login URL for now if you plan to test Varnish. Varnish 3 is older but the only packages available for 32-bit systems in the Debian Wheezy repository.
Varnish gives you the unbelievable load times that a vanilla Wordpress PHP backend has difficulty competing with a VPS like Digital Ocean ($5 a month). This site would take over 3 seconds to load because of the excessive amount of plugins I use (40+).
| VPS Provider | |||||
|---|---|---|---|---|---|
| Vultr | |||||
| Digital Ocean | |||||
| HostUS |
If you are on a 64-bit system, consider using the Varnish 4 guide instead, it supports the Varnish firewall too!

Configure WordPress Varnish 3 Cache with Apache or nginx
Varnish will listen on port 80 and you will change your web server to listen on port 8080
Configure Web Server to Use Varnish
Configure Apache for Varnish Cache
Open your Apache configuration file
sudo nano /etc/apache2/ports.confChange these lines so Apache listens on port 8080 instead
NameVirtualHost *:8080
Listen 8080
Ctrl+X, Y and Enter to save
Now adjust your Apache virtual host file for WordPress
sudo nano /etc/apache2/sites-available/wordpressChange this line to match so the virtual host listens on port 8080
<VirtualHost 127.0.0.1:8080>
Ctrl+X, Y and Enter to save Do not restart Apache yet
Configure nginx for Varnish Cache
Open your nginx virtual host file, it may not be called wordpress
sudo nano /etc/nginx/sites-available/wordpressIn your server block change the port from 80 to 8080
server {
        server_name www.htpcguides.com htpcguides.com;
        listen 8080;
Ctrl+X, Y and Enter to save
To get the Real IP of your WordPress user comments and emails from Varnish, use the Real IP feature of nginx
sudo nano /etc/nginx/conf.d/cloudflare.confPaste this to get the Real IP from CloudFlare and Varnish, we are using the X-Actual IP created earlier
#CloudFlare
set_real_ip_from   199.27.128.0/21;
set_real_ip_from   173.245.48.0/20;
set_real_ip_from   103.21.244.0/22;
set_real_ip_from   103.22.200.0/22;
set_real_ip_from   103.31.4.0/22;
set_real_ip_from   141.101.64.0/18;
set_real_ip_from   108.162.192.0/18;
set_real_ip_from   190.93.240.0/20;
set_real_ip_from   188.114.96.0/20;
set_real_ip_from   197.234.240.0/22;
set_real_ip_from   198.41.128.0/17;
set_real_ip_from   162.158.0.0/15;
set_real_ip_from   104.16.0.0/12;
set_real_ip_from   172.64.0.0/13;
set_real_ip_from   2400:cb00::/32;
set_real_ip_from   2606:4700::/32;
set_real_ip_from   2803:f800::/32;
set_real_ip_from   2405:b500::/32;
set_real_ip_from   2405:8100::/32;

#For use with Varnish
set_real_ip_from   127.0.0.1/32;
real_ip_header     X-Actual-IP;
Ctrl+X, Y and Enter to save the WordPress nginx real IP configuration
We will restart nginx or Apache later
Install Varnish 3 Cache
Add the Varnish repository, you may need to adjust wheezy to jessie if you have upgraded to jessie.
sudo apt-get install apt-transport-https -y
wget -O - https://repo.varnish-cache.org/GPG-key.txt | sudo apt-key add -
echo "deb https://repo.varnish-cache.org/debian/ wheezy varnish-3.0" >> /etc/apt/sources.list.d/varnish-cache.list
echo "deb-src https://repo.varnish-cache.org/debian/ wheezy varnish-3.0" >> /etc/apt/sources.list.d/varnish-cache.list
sudo apt-get update
sudo apt-get install varnish -y
Enable Varnish 3 Cache to listen on port 80 and start the daemon with the init.d startup script
If you are on Jessie you will need to update the Varnish systemd script outlined here, return to this page for the Varnish 3 vcl.
sudo nano /etc/default/varnishChange this line to enable the daemon
START=yesThen scroll down to Alternative 2 and change 6081 to 80 so Varnish will listen on port 80
DAEMON_OPTS="-a :80 \
             -T localhost:6082 \
             -f /etc/varnish/default.vcl \
             -S /etc/varnish/secret \
             -s malloc,256m"
Now back up the Varnish vcl file which contains all of the rules for treating requests and URLs
sudo mv /etc/varnish/default.vcl /etc/varnish/default.vcl.bakCreate the new Varnish vcl rules file
sudo nano /etc/varnish/default.vclThis Varnish 3 vcl was borrowed from here with adjustments to prevent caching RSS feeds and search results.
This WordPress Varnish vcl assumes your web server and Varnish are running on the same server.
Change Web.Server.IP to your web server's IP
This Varnish 3 using hash_always_miss vcl is designed for use with the Varnish smart refresh scripts.
/* SET THE HOST AND PORT OF WORDPRESS
 * *********************************************************/

backend default {
  .host = "127.0.0.1";
  .port = "8080";
}

# SET THE ALLOWED IP OF PURGE REQUESTS
# ##########################################################
acl purge {
  "localhost";
  "127.0.0.1";
  "Web.Server.IP";
}

#THE RECV FUNCTION
# ##########################################################
sub vcl_recv {

# set realIP by trimming CloudFlare IP which will be used for various checks
set req.http.X-Actual-IP = regsub(req.http.X-Forwarded-For, "[, ].*$", "");

# Enable smart refreshing
if (req.http.Cache-Control ~ "no-cache" && client.ip ~ purge) {
         set req.hash_always_miss = true;
    }

# Unset cloudflare cookies

 # Remove has_js and CloudFlare/Google Analytics __* cookies.
      set req.http.Cookie = regsuball(req.http.Cookie, "(^|;\s*)(_[_a-z]+|has_js)=[^;]*", "");
      # Remove a ";" prefix, if present.
     set req.http.Cookie = regsub(req.http.Cookie, "^;\s*", "");

  # For Testing: If you want to test with Varnish passing (not caching) uncomment
  # return( pass );

  # FORWARD THE IP OF THE REQUEST
  if (req.restarts == 0) {
    if (req.http.x-forwarded-for) {
      set req.http.X-Forwarded-For =
      req.http.X-Forwarded-For + ", " + client.ip;
    } else {
      set req.http.X-Forwarded-For = client.ip;
    }
  }

# DO NOT CACHE RSS FEED
 if (req.url ~ "/feed/") {
	return ( pass );
}

## Do not cache search results, comment these 3 lines if you do want to cache them

if (req.url ~ "/\?s\=") {
	return ( pass );
}

# CLEAN UP THE ENCODING HEADER.
  # SET TO GZIP, DEFLATE, OR REMOVE ENTIRELY.  WITH VARY ACCEPT-ENCODING
  # VARNISH WILL CREATE SEPARATE CACHES FOR EACH
  # DO NOT ACCEPT-ENCODING IMAGES, ZIPPED FILES, AUDIO, ETC.
  # ##########################################################
  if (req.http.Accept-Encoding) {
    if (req.url ~ "\.(jpg|png|gif|gz|tgz|bz2|tbz|mp3|ogg)$") {
      # No point in compressing these
      remove req.http.Accept-Encoding;
    } elsif (req.http.Accept-Encoding ~ "gzip") {
      set req.http.Accept-Encoding = "gzip";
    } elsif (req.http.Accept-Encoding ~ "deflate") {
      set req.http.Accept-Encoding = "deflate";
    } else {
      # unknown algorithm
      remove req.http.Accept-Encoding;
    }
  }

  # IF THIS IS A PURGE REQUEST, THEN CHECK THE IPS SET ABOVE
  # BLOCK IF NOT ONE OF THOSE IPS
  # ##########################################################
  if (req.request == "PURGE") {
    if ( !client.ip ~ purge ) {
      error 405 "Not allowed.";
    }
    return (lookup);
  }

  # PIPE ALL NON-STANDARD REQUESTS
  # ##########################################################
  if (req.request != "GET" &&
    req.request != "HEAD" &&
    req.request != "PUT" &&
    req.request != "POST" &&
    req.request != "TRACE" &&
    req.request != "OPTIONS" &&
    req.request != "DELETE") {
      return (pipe);
  }

  # ONLY CACHE GET AND HEAD REQUESTS
  # ##########################################################
  if (req.request != "GET" && req.request != "HEAD") {
    return (pass);
  }

  # OPTIONAL: DO NOT CACHE LOGGED IN USERS (THIS OCCURS IN FETCH TOO, EITHER
  # COMMENT OR UNCOMMENT BOTH
  # ##########################################################
  if ( req.http.cookie ~ "wordpress_logged_in|resetpass" ) {
    return( pass );
  }

#Fix CloudFlare Mixed Content Errors with Flexible SSL
  if (req.http.X-Forwarded.Proto) {
    return(lookup);
  }

  # IF THE REQUEST IS NOT FOR A PREVIEW, WP-ADMIN OR WP-LOGIN
  # THEN UNSET THE COOKIES
  # ##########################################################
  if (!(req.url ~ "wp-(login|admin)")
    && !(req.url ~ "&preview=true" )
  ){
    unset req.http.cookie;
  }

  # IF BASIC AUTH IS ON THEN DO NOT CACHE
  # ##########################################################
  if (req.http.Authorization || req.http.Cookie) {
    return (pass);
  }

  # IF YOU GET HERE THEN THIS REQUEST SHOULD BE CACHED
  # ##########################################################
  return (lookup);
  # This is for phpmyadmin
  if (req.http.Host == "pmadomain.com") {
     return (pass);
  }
}

sub vcl_hash {

if (req.http.X-Forwarded-Proto) {
    hash_data(req.http.X-Forwarded-Proto);
    }
}

# HIT FUNCTION
# ##########################################################
sub vcl_hit {
  # IF THIS IS A PURGE REQUEST THEN DO THE PURGE
  # ##########################################################
  if (req.request == "PURGE") {
    purge;
    error 200 "Purged.";
  }
  return (deliver);
}

# MISS FUNCTION
# ##########################################################
sub vcl_miss {
  if (req.request == "PURGE") {
    purge;
    error 200 "Purged.";
  }
  return (fetch);
}

# FETCH FUNCTION
# ##########################################################
sub vcl_fetch {
  # I SET THE VARY TO ACCEPT-ENCODING, THIS OVERRIDES W3TC
  # TENDANCY TO SET VARY USER-AGENT.  YOU MAY OR MAY NOT WANT
  # TO DO THIS
  # ##########################################################
  set beresp.http.Vary = "Accept-Encoding";

  # IF NOT WP-ADMIN THEN UNSET COOKIES AND SET THE AMOUNT OF
  # TIME THIS PAGE WILL STAY CACHED (TTL)
  # ##########################################################
  if (!(req.url ~ "wp-(login|admin)") && !req.http.cookie ~ "wordpress_logged_in|resetpass" ) {
    unset beresp.http.set-cookie;
    set beresp.ttl = 52w;
    set beresp.grace =1w;
  }

  if (beresp.ttl <= 0s ||
      beresp.http.Set-Cookie ||
      beresp.http.Vary == "*") {
      set beresp.ttl = 120 s;
      return (hit_for_pass);
 }

  return (deliver);
}

# DELIVER FUNCTION
# ##########################################################
sub vcl_deliver {
 # IF THIS PAGE IS ALREADY CACHED THEN RETURN A 'HIT' TEXT
 # IN THE HEADER (GREAT FOR DEBUGGING)
 # ##########################################################
 if (obj.hits > 0) {
 set resp.http.X-Cache = "HIT";
 # IF THIS IS A MISS RETURN THAT IN THE HEADER
 # ##########################################################
 } else {
 set resp.http.X-Cache = "MISS";
 }
}
Restart the Varnish init.d service, restart the nginx service before Varnish
sudo service nginx restart && sudo service varnish restartReload, enable and restart the Varnish systemd service, restart the Apache service before Varnish
sudo service apache2 restart && sudo service varnish restartLastly, to fix any compatibility issues with WordPress Varnish plugins add your hostname to your VPS hosts file
sudo nano /etc/hostsOptionally, add your host to the loopback address 127.0.0.1 and also for your VPS public IP.
Warning this could cause issues with postfix for sending email
127.0.0.1 localhost.localdomain localhost htpcguides.com www.htpcguides.comCtrl+X, Y and Enter to Save
If you use CloudFlare see this post and use ipcast so you can use WordPress plugins to purge Varnish cache.
There are many other cool things you can do with Varnish like mitigating DDoS attacks and a Web Application Firewall to prevent SQL injections and XSS attacks on WordPress sites (guide now complete).