 ConfigServer Firewall is a very popular and powerful firewall solution for your VPS, decdicated or home media server. CSF contains a plethora of options for securing your system.
All of the CSF options can be overwhelming so in this guide I walk you through how the ConfigServer Firewall is configured on my $5 Digital Ocean VPS and HostUS backup VPS ($15/year). I have configured a general firewall and failed login detecting and banning for SSH, SMTP, POP3, IMAP and FTP. I've also restricted the number of simultaneous users per service. This thorough CSF tutorial has been tested on Ubuntu and Debian systems but should work on Fedora, Red Hat, CentOS or other distros with minor adjustments.
| VPS Provider | |||||
|---|---|---|---|---|---|
| Vultr | |||||
| Digital Ocean | |||||
| HostUS |
Install and Configure CSF Firewall and Security
ConfigServer CSF Firewall is a very popular firewall and security measure for your web server, VPS or dedicated server. The amount of options can be overwhelming so hopefully this walkthrough tutorial helps you get a baseline configuration. This ConfigServer Firewall guide would not be possible without the help of tragidy on the forum.
Install Webmin
Webmin requires perl dependencies to function
sudo apt-get update
sudo apt-get install libauthen-pam-perl libio-pty-perl libnet-ssleay-perl libapt-pkg-perl apt-show-versions libwww-perl -y
Download Webmin, this will grab the latest version.
wget http://www.webmin.com/download/deb/webmin-current.debInstall Webmin on Debian or Ubuntu. It has a CSF module which makes it much easier to configure the firewall.
sudo dpkg -i webmin*You will see this message, hold off on logging in until after you've installed ConfigServer Firewall.
I use my IP address rather than domain name for logging in https://ip.address:10000
Webmin install complete. You can now login to https://htpcguides:10000/
 as root with your root password, or as any user who can use sudo
Install ConfigServer CSF Firewall
You should remove ufw or other iptable related firewalls (fail2ban is ok to leave installed).
sudo apt-get remove ufw -yDisable IPv6 if you aren't using it
sysctl net.ipv6.conf.all.disable_ipv6
sysctl net.ipv6.conf.default.disable_ipv6
sysctl net.ipv6.conf.lo.disable_ipv6
Download the latest version of CSF and install it
sudo apt-get install iptables unzip -y
wget https://download.configserver.com/csf.tgz
sudo tar -xvf csf.tgz -C /opt
cd /opt/csf
sudo bash /opt/csf/install.sh
Check your system can support all of the ConfigServer Firewall features
perl /etc/csf/csftest.plYou should see this output indicating all systems are go
Testing ip_tables/iptable_filter...OK
Testing ipt_LOG...OK
Testing ipt_multiport/xt_multiport...OK
Testing ipt_REJECT...OK
Testing ipt_state/xt_state...OK
Testing ipt_limit/xt_limit...OK
Testing ipt_recent...OK
Testing xt_connlimit...OK
Testing ipt_owner/xt_owner...OK
Testing iptable_nat/ipt_REDIRECT...OK
Testing iptable_nat/ipt_DNAT...OK

RESULT: csf should function on this server
Install ConfigServer Firewall Webmin Module
Log in to webmin, username is the root user or any member in the sudo group. If you jsut added a sudo user then restart the webmin service
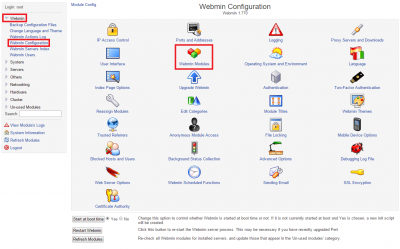
In left pane click Webmin -> Webmin Configuration and click Webmin Modules
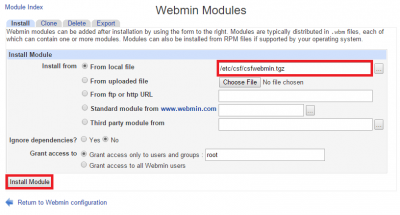
Under Install from local file paste /etc/csf/csfwebmin.tgz and click Install module
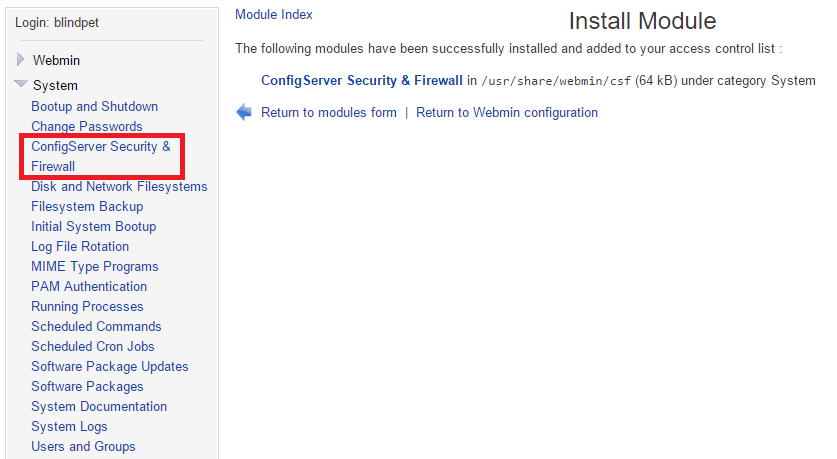
In the left pane click System and choose ConfigServer Security and Firewall
Go to WhatisMyIPAddress and copy either your IPv4 or IPv6 address.
Then do a quick allow for the IP address by pasting it in Allow IP address and click Quick Allow.
After allowing, click Return
It is more elegant to whitelist your dynamic DNS address like your free Afraid DNS since your home IP address probably changes from time to time.
Under lfd – Login Failure Daemon click the lfd – Dynamic DNS button.
Add your Dynamic DNS to the text page (mine is htpcguides.crabdance.com)
Click Change
Later you will add these entries under Global Lists/DYNDNS/Blocklists in Firewall Configuration
DYNDNS = 600
DYNDNS_IGNORE = 1
Configure ConfigServer Firewall
You should check for open ports that you use on your server by using netstat in the SSH terminal
netstat -plntYou will see output like this, note the ports and make sure you add the ports listening on local address 0.0.0.0 in the IPv4 port settings
Anything listening on 127.0.0.1 is not necessary to allow in the firewall.
Active Internet connections (servers and established)
Proto Recv-Q Send-Q Local Address           Foreign Address         State       PID/Program name
tcp        0      0 0.0.0.0:10000           0.0.0.0:*               LISTEN      1935/perl
tcp        0      0 0.0.0.0:80              0.0.0.0:*               LISTEN      22748/varnishd
tcp        0      0 0.0.0.0:8080            0.0.0.0:*               LISTEN      22040/nginx -g daem
tcp        0      0 0.0.0.0:22              0.0.0.0:*               LISTEN      7099/sshd
tcp        0      0 0.0.0.0:8090            0.0.0.0:*               LISTEN      22040/nginx -g daem
tcp        0      0 127.0.0.1:6082          0.0.0.0:*               LISTEN      22748/varnishd
tcp        0      0 127.0.0.1:6379          0.0.0.0:*               LISTEN      10006/redis-server
tcp6       0      0 :::80                   :::*                    LISTEN      22748/varnishd
tcp6       0      0 :::22                   :::*                    LISTEN      7099/sshd
Initial Settings
To get started with securing your VPS or dedicated server with ConfigServer Firewall, go to the csf – ConfigServer Firewall section in the Webmin Module
Click Firewall Configuration to set all of these options
The firewall is only enabled when TESTING is set to 0, it is safe to do so since you whitelisted your IP address above using WhatIsMyIPAddress and/or Dynamic DNS
RESTRICT_SYSLOG = 0Under Initial Settings make these changes
RESTRICT_SYSLOG = 3Under IPv4 Port Settings
Choose TCP ports, the defaults will handle most systems but do include any additional ports from the netstat output. Remember to add port 10000 for Webmin and a custom SSH port (I've used 69) which you will configure later.
TCP_IN 20,21,22,25,53,80,110,143,443,465,587,993,995,69,8080,10000
TCP_OUT 20,21,22,25,53,80,110,113,443,587,993,995
Make UDP blank, generally you do not need UDP for anything on a web server unless it is streaming video or music.
UDP_IN
UDP_OUT
Under IPv6 Port Settings make them match the IPv4 Port settings
TCP_IN 20,21,22,25,53,80,110,143,443,465,587,993,995,69,8080,10000
TCP_OUT 20,21,22,25,53,80,110,113,443,587,993,995
Same for UDP
UDP_IN
UDP_OUT
Under General Settings
Necessary to log failed attempts, makes sure syslog service is running
SYSLOG_CHECK = 3600SMTP Settings
Under SMTP Settings you need to know if you allow external users from remote IPs to send emails, if you only send emails using your local user set these options to block all other users except root and mailman. If you want to allow other non-local users leave SMTP_BLOCK=0 like if you are using Google's servers as an SMTP relay to send your emails.
SMTP_BLOCK = 1
SMTP_ALLOWLOCAL = 1
To allow extra SMTP users set them in SMTP_ALLOWUSER and GROUP
SMTP_ALLOWUSER = webmaster,postmaster
SMTP_ALLOWGROUP = mail
Reporting Settings
Under Reporting Settings leave the LF_ALERT_TO and LF_ALERT_FROM if you have postfix configured to autoforward to you regular email address.
Do set X_ARF to get detailed reports of intrusion alerts.
X_ARF = 1Global Lists/DYNDNS/Blocklists
Under Global Lists/DYNDNS/Blocklists you can set custom IP lists to ignore including dynamic DNS addresses. If you set your dynamic DNS address to be ignored set these options to check the IP of the dynamic DNS address every 10 minutes and ignore the IP in the firewall rules.
DYDNS = 600
DYNDNS_IGNORE = 1
Under Country Codes Lists and Settings you can set custom countries to block. If you want to block Russia and China these country codes can be added to CC_DENY.
CC_DENY = RU,CNLogin Failure Blocking and Alerts
Under Login Failure Blocking and Alerts you can block users attempting to brute force your services like SSH, FTP, SMTP and others. The PERM setting set to 1 makes the ban permanent.
For the Login Failure daemon to permanently block failed IPs set LF_TRIGGER_PERM to 1 so it blocks that IP for all login failures which you enable in the LF_ settings that follow.
LF_TRIGGER_PERM = 1If you are concerned about locking yourself or other friendly users out then set the LF TRIGGER to a value like 60 so that the IP is unlocked after 1 minute
LF_TRIGGER_PERM = 60Set this option to only block users on the port they are attacking. This prevents innocent users whose machines are compromised from getting access to your services.
LF_SELECT = 1The rest of the options are set to block the users on the specific port after a number of failed connections. You can decrease the limit for SSH from 5 to 3 like this
LF_SSHD = 3Same goes for FTP and SMTP
LF_FTPD = 3
LF_SMTPAUTH = 3
Block Webmin failed attempts
LF_WEBMIN = 3You can also block users requesting 404 or 403 pages from Apache – beware this can cause false positives from bots you want to crawl your site.
LF_APACHE_404 = 200
LF_APACHE_403 = 200
Under Distributed Attacks you can prevent botnets from making multiple failed attempts from different IP addresses, here the minimum amount of unique IP addresses allowed to login with the same credentials is 2
LF_DISTATTACK = 1
LF_DISTATTACK_UNIQ = 2
You should do the same with FTP, be careful with the unique IP setting if multiple users share the same account – here it is set to 3 IPs to share the same account. Make them permanent too.
LF_DISFTP = 1
LF_DISTFTP_UNIQ = 3
LF_DISTFTP_PERM = 1
Repeate the same for SMTP, again if multiple users share the same account take care with the UNIQ setting – again 3 IPs share this account.
LF_DISTSMTP = 1
LF_DISTSMTP_UNIQ = 3
LF_DISTSMTP_PERM = 1
Process Tracking
Under Process Tracking you can check rogue processes. It is usually easier to disable it by setting PT_LIMIT to disable process tracking as the amount of emails can be quite annoying. However, if you do want to use it then leave PT_LIMIT's default value and add processes to ignore as shown for /opt/csf/pignore.
PT_LIMIT = 0To disable any SSH attacks disconnect users who leave sessions open
PT_SSHDHUNG = 1Note: from this point onwards no configuration is done in Webmin and is done in your SSH session.
Alternatively you can add the services to exclude from process tracking in /opt/csf/csf.pignore to stop the excessive and annoying Process Tracking Emails, this is done in SSH
nano /opt/csf/pignoreAdd the services you wish to ignore there
exe:/usr/bin/dbus-daemon
exe:/usr/sbin/mysqld
exe:/usr/bin/nginx
exe:/usr/lib/postfix/smtp
exe:/usr/lib/dovecot/auth
Additional ConfigServer Firewall Setup
Use CSF Blocklists from dshield and spamhaus
sudo nano /etc/csf/csf.blocklistsUncomment these lines by removing the hashtag # symbol, Spamhaus and Dshield block lists in CSF should not result in any false positives.
DSHIELD|86400|0|http://www.dshield.org/block.txt
SPAMDROP|86400|0|http://www.spamhaus.org/drop/drop.lasso
Restart CSF
csf -rAllowing the CloudFlare IPs should not be necessary! I use Flexible and strict SSL with CloudFlare and have not needed to do this but they do recommend it. If for some reason you need to allow the CloudFlare IPs on CSF go back in Webmin and click Firewall Allow IPs and paste this list and click Change
You can also consider adding this list to /etc/csf/csf.ignore
199.27.128.0/21;
199.27.128.0/21
173.245.48.0/20
103.21.244.0/22
103.22.200.0/22
103.31.4.0/22
141.101.64.0/18
108.162.192.0/18
190.93.240.0/20
188.114.96.0/20
197.234.240.0/22
198.41.128.0/17
162.158.0.0/15
104.16.0.0/12
172.64.0.0/13
If you set the CloudFlare allow IPs, click Return
Secure SSH for CSF
Open the SSH configuration
sudo nano /etc/ssh/sshd_configChange the port and add UseDNS no so log files for SSH failed logins show the IP and not the domain name.
You must remember to add the port you choose here in TCP_IN for IPv4
# What ports, IPs and protocols we listen for
Port 69
UseDNS no
Restart SSH daemon
sudo service ssh restartSecure MySQL
There is security risk
sudo nano /etc/mysql/my.cnfUnder [mysqld] add this
[mysqld]
#
# * Basic Settings
#
local-infile    = 0
user            = mysql
Restart MySQL
sudo service mysql restartMonitor Critical System Files for Changes
ConfigServer lfd lets you monitor critical system files for changes by checking md5 sums periodically and will alert you of changes. This provides a basic Intrustion Detection System alternative to Snort, Tripwire and others.
Add the files you want to monitor here
sudo nano /etc/csf/csf.dirwatchI have used root authorized keys and some other important files which would indicate a security breach.
CSF lfd ignores files owned by root by default but if you specify them here they will be monitored by ldf
/root/.ssh/authorized_keys
/etc/ssh/sshd_config
/etc/shadow
In the ConfigServer Webmin module find this setting under Directory Watching & Integrity and set it to 600 (every 10 minutes)
LF_DIRWATCH_FILE=600Restart the CSF service in Webmin or SSH
lfd will check files ever 10 minutes for changes and send you an email alert
Time:   Sat Dec  5 23:20:13 2015 +0000
File:   /root/.ssh/authorized_keys has changed

Output:

-rw------- 1 root root 404 2015-12-05 23:19:32.727340313 +0000 /root/.ssh/authorized_keys
These CSF settings should keep you pretty safe from attacks and intrusions, my VPS is actually using less resources since activating this ConfigServer Firewall configuration