![]() Monitoring Linux systems securely is important for home media server management. Use Monit to monitor your media server services and send email alerts if things have gone wrong. I personally use secure Monit on my web servers and media servers with https so nobody can sniff my password. Monit has a very powerful configuration syntax that allows a flexible way to monitor the health of all of your usenet, torrent or media server services.
Monitoring Linux systems securely is important for home media server management. Use Monit to monitor your media server services and send email alerts if things have gone wrong. I personally use secure Monit on my web servers and media servers with https so nobody can sniff my password. Monit has a very powerful configuration syntax that allows a flexible way to monitor the health of all of your usenet, torrent or media server services.![]()
I have already shown how to monitor Plex Media Server and restart it automatically if the Plex process has stopped in this guide. This monit tutorial shows you how to install monit securely on Ubuntu and Debian systems. I also show you how to use your gmail account to send monit alerts from your home media server. This is a monit installation using https and your own self-signed certificate.
Updated January 26, 2016 fixed mail settings and sudo omissions
Install Secure Monit to Monitor Home Media Server
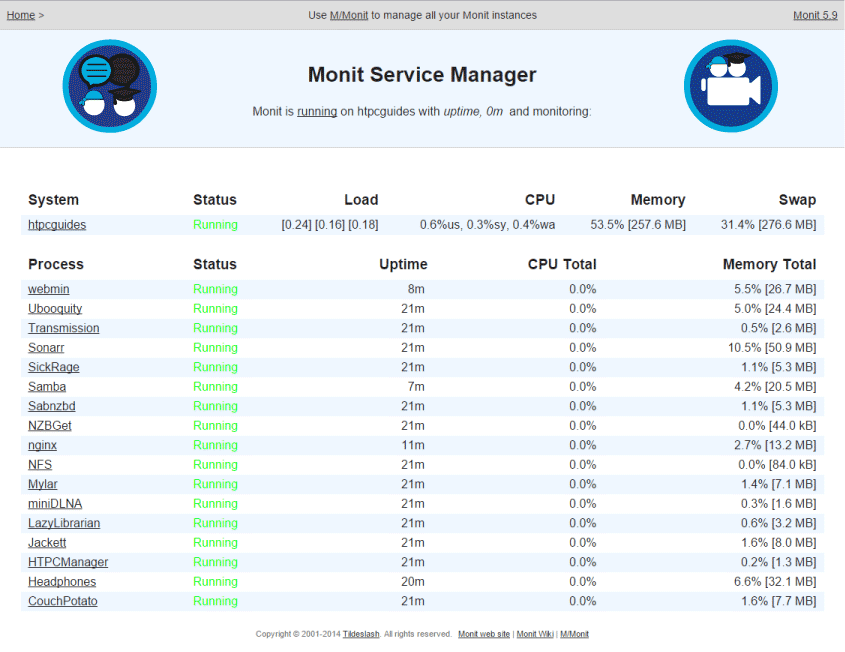
Here is what the Monit configurations essentially do for each service
- Monitors the existence of the pid file, if it is no longer present the program is restarted
- Tests if port or unix socket is open on the loopback address
- Tests if a URL is accessible and returns specific content
I have already prepared a thorough guide for most media server programs posted here.
Secure Monit with SSL Certificate
We need an SSL certificate for Monit in order to look at the Monit web interface securely.
Install OpenSSL
sudo apt-get install openssl -yCreate certs folder
sudo mkdir -p /var/certsGenerate a key, you can enter the information it prompts for if you want but it is not necessary, you can just leave it blank.
If you want to increase the validation period increase 365 to something like 36500 (100 years).
sudo openssl req -new -x509 -days 365 -nodes -out /var/certs/monit.pem -keyout /var/certs/monit.pemModify the permissions to prevent this error
monit: The SSL server PEM file '/var/certs/monit.pem' must have permissions no more than -rwx------ (0700); right now permissions are -rw-r--r-- (0644).
/etc/monit/monitrc:124: Error: SSL server PEM file permissions check failed 'allow'
This command changes the permissions of the monit ssl certificate
sudo chmod 0700 /var/certs/monit.pemInstall Monit from Repository
Easy as always straight from the repository
sudo apt-get install monit -yBackup the old Monit configuration
sudo mv /etc/monit/monitrc /etc/monit/monitrc.bak
Open the Monit configuration
sudo nano /etc/monit/monitrcPaste the block below while making appropriate changes
This Monit configuration assumes you are using a gmail account for sending and receiving notifications
You will need to uncomment the lines under Mail settings by deleting the # to activate them
Set the username “htpc” and password “guides” to your gmail credentials
Set alert to the email address you wish to receive the monit emails on, when using Google set it to allow insecure apps (other solutions here). This is disabled by default so remove the # to enable it.
The http settings are for setting the port and address for Monit to listen on
If you do use free Dynamic DNS then comment out the allow 0.0.0.0 line by preceding with # and uncomment (remove #) for the allow htpcguides.crabdance.com line. This will effectively whitelist only your home IP to access Monit.
You should change the allow htpc:guides to the username and password you want to use to access Monit.
If you don't use Dynamic DNS then comment that line out with a # symbol.
  set daemon 60 #check services every 60 seconds
  set logfile /var/log/monit.log
  set idfile /var/lib/monit/id
  set statefile /var/lib/monit/state

#Event queue
  set eventqueue
      basedir /var/lib/monit/events # set the base directory where events will be stored
      slots 100                     # optionally limit the queue size

#Mail settings
# set mail-format {
#     from: monit@$HOST
#  subject: monit alert --  $EVENT $SERVICE
#  message: $EVENT Service $SERVICE
#                Date:        $DATE
#                Action:      $ACTION
#                Host:        $HOST
#                Description: $DESCRIPTION
#
#           Your faithful employee,
#           Monit }
#  set mailserver smtp.gmail.com port 587
#     username "htpc" password "guides"
#  using TLSV1 with timeout 30 seconds
#  set alert htpcguides@gmail.com #email address which will receive monit alerts

#http settings
 set httpd port 2812 address 0.0.0.0  # allow port 2812 connections on all network adapters
    ssl enable
    pemfile  /var/certs/monit.pem
    allow 0.0.0.0/0.0.0.0 # allow all IPs, can use local subnet too
#    allow htpcguides.crabdance.com        # allow dynamicdns address to connect
    allow htpc:"guides"      # require user htpc with password guides

#allow modular structure
    include /etc/monit/conf.d/*
Ctrl+X, Y and Enter to save
Modify permissions of the new monit configuration to avoid this error
The control file '/etc/monit/monitrc' must have permissions no more than -rwx------ (0700); right now permissions are -rw-r--r-- (0644).Fix the permissions
sudo chmod 0700 /etc/monit/monitrcTest monit syntax is correct for the configuration file
sudo monit -tYou should see the OK below, if you don't it's ok, it probably means you are on Debian Jessie or Ubuntu 15.x and later
Control file syntax OKThen restart Monit
sudo service monit restartNow open a browser and go to your local ip with https not http: https://ip.address:2812 and enter your log in credentials (in the example htpc with password guides) to make sure the base install of Monit is working.
New Monit guides will be posted for monitoring different services.
For those of you using reverse proxies, it is easy to add Monit to nginx or Apache.