ownCloud is a popular cloud storage solution for your home server. It is the closest dropbox-like experience I am aware of that has clients for Windows, Mac, Linux, Android and iOS. I have chosen to use ownCloud as a backup for dropbox so my ownCloud folder and Dropbox folder are one and the same. ownCloud runs much faster on the Rasbperry Pi 2 compared to the B+ and earlier models so it is far more usable now though it is still limited in speed by the slow fast ethernet port and USB hard drives.
If you back up large amounts of data and like speed then consider using a Banana or Orange Pi which both have SATA ports and boost your speeds 4x over (see benchmarks). Do make sure you regularly back up your ownCloud hard drive using rsync or some other method to protect your data. This guide was tested on the Raspberry Pi 2 but will work on the Banana Pi as well as ODROID, Orange Pi, Cubieboard and other Lemaker models.
Updated May 2, 2016 to resolve memcached issues
| Pi Unit | ||||||||
|---|---|---|---|---|---|---|---|---|
| Raspberry Pi 3 | Quad Core |
|||||||
| Raspberry Pi 2 | Quad Core |
|||||||
| Raspberry Pi | Single Core |
|||||||
| Banana Pi | Dual Core |
|||||||
| Banana Pi Pro | Dual Core |
Install ownCloud Raspberry Pi
ownCloud requires a database engine for which I use MySQL. It also needs PHP and a web server (I use the lightweight yet powerful nginx) in order to work so all these components will be installed if you follow this guide. If you want remote access to ownCloud through a friendly URL see the nag free dynamic DNS guide.
Update: After completing this guide enable memcached with php5-fpm
Install MySQL
Update your repositories
sudo apt-get updateInstall MySQL
sudo apt-get install mysql-server -ySet MySQL root password
Now create the MySQL database for ownCloud and grant permissions to the ownCloud user you create.
Enter the MySQL command line as the root user
mysql -u root -pAdjust the database name, username and password as necessary. I color coded them to make it easier.
CREATE DATABASE owncloud;
CREATE USER htpcguides@localhost IDENTIFIED BY 'password';
GRANT ALL PRIVILEGES ON owncloud.* TO htpcguides@localhost;
FLUSH PRIVILEGES;
exit
Install PHP-FPM
Install all the PHP goodies
sudo apt-get install php5-fpm php5-mysql openssl ssl-cert php5-cli php5-common php5-cgi php-pear php-apc curl libapr1 libtool php5-curl libcurl4-openssl-dev php-xml-parser php5-dev php5-gd libmemcached* memcached php5-memcached -y
Open the php-fpm configuration file to fix ownCloud environment path variables
sudo nano /etc/php5/fpm/pool.d/www.confUncomment these lines by deleting the semicolon ;
env[HOSTNAME] = $HOSTNAME
env[PATH] = /usr/local/bin:/usr/bin:/bin
env[TMP] = /tmp
env[TMPDIR] = /tmp
env[TEMP] = /tmp
Ctrl+X, Y and Enter to Save
Download ownCloud Software
Create the web folder for owncloud, grab the latest owncloud release and unpack it.
There may be a newer version of ownCloud to replace in the wget and tar lines, check here if you want the latest and greatest
mkdir -p /var/www/owncloud
cd /var/www/
wget https://download.owncloud.org/community/owncloud-8.0.4.tar.bz2
tar -xvf owncloud-8.0.4.tar.bz2
sudo chown -R www-data:www-data /var/www
Install nginx
Install nginx and php5-fpm
sudo apt-get install php5-fpm nginx -yGenerate ssl certificate, create the SSL folder first
sudo mkdir -p /etc/nginx/sslGenerate the SSL certificate for owncloud
sudo openssl req -x509 -nodes -days 36500 -newkey rsa:2048 -keyout /etc/nginx/ssl/owncloud.key -out /etc/nginx/ssl/owncloud.crtFor Country Name, State, Locality Name, Organization etc you can leave them blank.
For Common Name you must use your dynamic DNS address, e.g. htpcguides.crabdance.com
Now create the nginx virtualhost for owncloud
sudo nano /etc/nginx/sites-available/owncloudPaste the working nginx ownCloud configuration (the virtual host)
Adjust your server_name to your dynamic DNS address and the local IP address of your ownCloud server
server {
  listen 80;
  server_name htpcguides.crabdance.com 192.168.40.135;
  return 301 https://$server_name$request_uri;  # enforce https
}

server {
  listen 443 ssl;
  server_name htpcguides.crabdance.com 192.168.40.135;
  access_log /var/log/nginx/sitename.access.log;
  error_log /var/log/nginx/sitename.error.log;

  ssl_certificate /etc/nginx/ssl/owncloud.crt;
  ssl_certificate_key /etc/nginx/ssl/owncloud.key;

  # Path to the root of your installation
  root /var/www;
  client_max_body_size 10G; # set max upload size
  fastcgi_buffers 64 4K;

# Some rewrite rules, more to come later
  rewrite ^/owncloud/caldav((/|$).*)$ /owncloud/remote.php/caldav$1 last;
  rewrite ^/owncloud/carddav((/|$).*)$ /owncloud/remote.php/carddav$1 last;
  rewrite ^/owncloud/webdav((/|$).*)$ /owncloud/remote.php/webdav$1 last;

  # Protecting sensitive files from the evil outside world
  location ~ ^/owncloud/(data|config|\.ht|db_structure.xml|README) {
           deny all;
  }
  # Configure the root location with proper rewrite rules
  location /owncloud/ {
           rewrite ^/owncloud/.well-known/host-meta /public.php?service=host-meta last;
           rewrite ^/owncloud/.well-known/host-meta.json /public.php?service=host-meta-json last;
           rewrite ^/owncloud/.well-known/carddav /remote.php/carddav/ redirect;
           rewrite ^/owncloud/.well-known/caldav /remote.php/caldav/ redirect;
           rewrite ^/owncloud/apps/calendar/caldav.php /remote.php/caldav/ last;
           rewrite ^/owncloud/apps/contacts/carddav.php /remote.php/carddav/ last;
           rewrite ^/owncloud/apps/([^/]*)/(.*\.(css|php))$ /index.php?app=$1&getfile=$2 last;
           rewrite ^(/owncloud/core/doc[^\/]+/)$ $1/index.html;
           try_files $uri $uri/ index.php;
 }
location ~ \.php(?:$|/) {
  fastcgi_split_path_info ^(.+\.php)(/.+)$;
  include fastcgi_params;
  fastcgi_param SCRIPT_FILENAME $document_root$fastcgi_script_name;
  fastcgi_param PATH_INFO $fastcgi_path_info;
  fastcgi_param HTTPS on;
  fastcgi_pass unix:/var/run/php5-fpm.sock;
 }

# Optional: set long EXPIRES header on static assets
location ~* \.(?:jpg|jpeg|gif|bmp|ico|png|css|js|swf)$ {
expires 30d;
# Optional: Don't log access to assets
access_log off;
 }
}
Enable the owncloud site and disable the default nginx site
sudo ln -s /etc/nginx/sites-available/owncloud /etc/nginx/sites-enabled/owncloud
sudo unlink /etc/nginx/sites-enabled/default
Finishing Up
If you plan to use the Web interface and upload large files, you need to make some modifications or you will get owncloud Failed to write data errors
Edit php.ini to change max upload size and make sure you charset is UTF-8 (which it should be by default)
I have assumed a 10GB limit (10G) and a 60 hour session which should cover even the most extreme upload scenarios. Using the owncloud clients is the better option.
sudo nano /etc/php5/fpm/php.inichange default_charset to UTF-8 uncomment by removing the ;
You should also adjust your maximum upload size to match what the nginx configuration says.
default_charset = "UTF-8"
upload_max_filesize = 10G
post_max_size = 10G
upload_tmp_dir = /mnt/usbstorage/owncloud/tmp
max_input_time = 360000
#The maximum time in seconds a script is allowed to parse input data.
max_execution_time = 360000
memory_limit = 512M
Ctrl+X, Y and Enter to Save the changes
Restart nginx and php5-fpm
sudo service nginx restart
sudo service php5-fpm restart
If you already have your hard drive mounted properly then you can add the www-data user to the pi group to prevent permission issues. nginx runs as the www-data user so ownCloud runs under this user.
sudo usermod -a -G pi www-dataNow make your ownCloud directory adjust your path as necessary to your mounted hard drive folder
sudo mkdir -p /mnt/usbstorage/owncloud
sudo chown -R www-data /mnt/usbstorage/owncloud
Make a temporary storage folder for uploads also on the USB and change the owner to www-data
sudo mkdir -p /mnt/usbstorage/owncloud/tmp
sudo chown -R www-data /mnt/usbstorage/owncloud/tmp
Browse to either your local IP https://ip.address/owncloud or your remote address https://dynamicdns.com/owncloud
Note that you may have to enable NAT loopback in your router or the equivalent setting for your dynamic DNS address to work inside your home network. You will also get a warning about the SSL certificate because you generated it yourself rather than used a Certified Authority, you can safely ignore this warning.
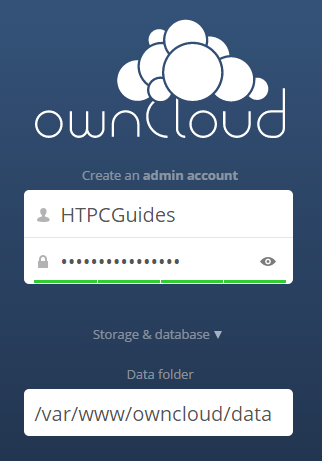
Once you get to the ownCloud web interface choose an administrative account name and password.
Choose your ownCloud data folder which we created earlier here /mnt/usbstorage/owncloud
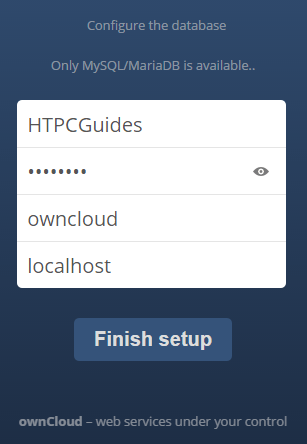
Enter the SQL database details you created earlier, your username and password come first and then the database name. You do not need to change localhost.
Click Finish Setup
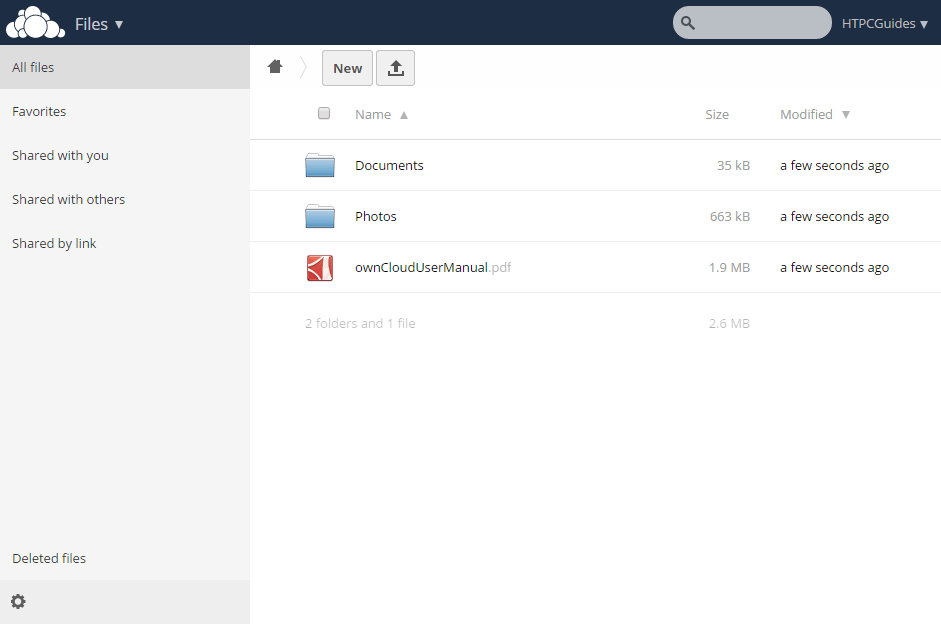
Then you will see the main ownCloud web interface and you can get started
If you are using dynamic dns you may have to add the trusted certificate
sudo nano /var/www/owncloud/config/config.phpFind this section and add your dynamic dns address and local IP
'trusted_domains' =>
array (
    0 => '192.168.40.135',
    1 => 'htpcguides.crabdance.com',
While in the config.php file add these lines at the bottom to enable memcached
'memcache.local' => '\OC\Memcache\Memcached',
'memcache.distributed' => '\OC\Memcache\Memcached',
'memcached_servers' =>
array (
    0 =>
array (
    0 => '127.0.0.1',
    1 => 11211,
    ),
    ),
Ctrl+X, Y and Enter to save the ownCloud config.php
Alter permissions for your mounted folders if you encounter any problems, 750 gives write, read and execute access to the www-data user and read and write access to the www-data group.
sudo chown -R www-data:www-data /mnt/usbstorage/owncloud
sudo chown -R www-data:www-data /mnt/usbstorage/owncloud/cloud
sudo chmod -R 750 /mnt/usbstorage/owncloud
Now ownCloud is installed on your Raspberry Pi 🙂